
To assemble your mechanical keyboard kit with stabilizers, start by confirming all parts and prepping your tools. Clean and lubricate stabilizer wires, stems, and housings to reduce noise and wobble. Install stabilizers securely, ensuring proper orientation with wires towards larger PCB holes. Test your PCB and switches using VIA or VIAL for connectivity. Add foam for sound dampening, then carefully attach keycaps. Finally, check for smooth, silent keypresses and tweak as needed—there’s a lot more to mastering a flawless build.
Gather All Tools and Keyboard Parts

Before you begin assembling your mechanical keyboard kit, make sure you’ve gathered every part and tool you’ll need. Have your PCB, plate, stabilizers, switches, keycaps, and case ready and confirmed.
Ensure all your keyboard parts and tools are prepared before starting assembly to streamline the build process.
Double-check that your stabilizers are compatible with your PCB and plate type, whether screw-in, clip-in, or mounted. Don’t forget essential tools: a screwdriver, tweezers, switch opener, and soldering equipment if your build requires it.
Importantly, grab stabilizer lubricant along with a lube syringe and brush—these help reduce noise and improve key feel during stabilizer installation. Preparing all these in advance saves time and frustration.
Finally, consider downloading software like VIA or VIAL to test PCB and switch connectivity before you fully assemble your keyboard kit.
Test Your PCB for Switch Contact Connectivity
With all your tools and parts ready, you can now check your PCB’s switch contacts to make sure they register correctly. Whether you’re using a printed circuit board or a hot-swap PCB, testing guarantees every key position functions before assembly.
Connect your PCB to your computer and open a testing app like VIA or VIAL. Use tweezers to gently tap each switch contact pad and watch for lights confirming proper registration.
Keep these tips in mind:
- Verify all switch contacts respond accurately in the testing software
- Check for bent pins or faulty contacts that could cause issues
- Repeat tests after adjustments to guarantee consistent performance
- Confirm full connectivity to avoid troubleshooting post-assembly problems
This step saves time and prevents frustrating errors down the road.
Understand Stabilizer Types and Choose Yours

You’ll need to choose between screw-in and clip-in stabilizers, each with different mounting styles.
Screw-in stabilizers attach directly to the PCB for maximum stability, while clip-in versions snap into place on the plate for quicker installation. Picking the right type affects your keyboard’s feel and noise, so consider your build goals carefully.
Stabilizer Mounting Styles
How do you choose the right stabilizer mounting style for your mechanical keyboard? Stabilizers come primarily in two mounting styles: PCB-mounted and plate-mounted. Each affects your keyboard’s profile, feel, and noise level.
- PCB-mounted stabilizers offer a slimmer profile and better stability.
- Plate-mounted stabilizers are easier to install but can be noisier.
- Screw-in PCB-mounted stabilizers provide superior durability and less wobble.
- Plate-mounted stabilizers are cheaper but prone to clip breakage and less noise reduction.
When installing, make certain the stabilizer wire faces the large PCB holes for proper function. Your choice depends on your build preferences, budget, and desired typing experience.
Understanding these stabilizers and mounting styles helps you craft a keyboard that feels just right for you.
Screw-In vs Clip-In
Although both screw-in and clip-in stabilizers serve the same purpose of reducing key wobble, they differ considerably in installation, stability, and durability.
Screw-in stabilizers mount securely with screws directly into the PCB, providing maximum stability and durability. They almost eliminate key wobble and rattling but require a more complex, time-consuming installation.
In contrast, clip-in stabilizers snap onto the PCB, making installation quick and easy. They’re perfect if you want convenience or are new to keyboard assembly. However, clip-in stabilizers are less stable and can pop out during use.
Ultimately, choosing between screw-in stabilizers and clip-in depends on your skill level, budget, and whether you prioritize long-term stability or straightforward installation.
Prepare Stabilizers: Clean and Lube for Smooth Operation
Before lubing your stabilizers, make sure to clean them thoroughly to remove any manufacturing residue that can cause noise or resistance.
Choose a high-quality lubricant that works well with plastic, and apply it carefully with a brush or syringe for smooth, rattle-free keys.
Proper cleaning and precise lubing techniques are key to achieving a stable, silent typing experience.
Stabilizer Cleaning Techniques
To get your stabilizers operating smoothly, start by soaking their components in warm soapy water and gently scrubbing away any leftover manufacturing residue or dust.
Once clean, dry the parts thoroughly before disassembling the stabilizers into wire, housing, and stem. This thorough cleaning guarantees that when lubing, the lubricant adheres evenly to all contact surfaces, minimizing friction and rattle.
Keep these tips in mind:
- Use a soft brush to remove stubborn debris without damaging parts.
- Confirm every component is completely dry before lubing.
- Disassemble stabilizers carefully for better lubricant coverage.
- Focus on areas where metal contacts plastic for peak smoothness.
Proper cleaning is essential before lubing your stabilizers for the best mechanical keyboard experience.
Lubricant Types Selection
When choosing lubricant for your stabilizers, picking the right type can make a huge difference in their smoothness and noise levels. You want a thin, high-quality dielectric grease or a specialized keyboard stabilizer lubricant. Avoid thick greases or heavy oils, as they cause sluggish movement and attract dust. Apply lube sparingly to wires and plastic contact points to prevent overlubing. Before lubing, clean your stabilizer parts well with isopropyl alcohol or warm soapy water for better lubricant adherence.
| Lubricant Type | Effect on Stabilizer |
|---|---|
| Dielectric Grease | Smooth, quiet, long-lasting |
| Specialized Keyboard Lube | Designed for plastic and metal parts |
| Heavy Oils/Thick Greases | Causes sluggishness, dust attraction |
Choose wisely for peak stabilizer performance.
Application Methods Overview
Choosing the right lubricant sets the stage for a smooth and quiet stabilizer operation. Before lubing, thoroughly clean stabilizers to remove residue that could hinder performance.
Apply lubricant carefully using a fine brush or syringe to critical points: stems, wires, and housings. This reduces friction, eliminates rattling, and guarantees better stability.
Prepare and lube your stabilizers separately to simplify assembly and guarantee each key travels smoothly.
Keep these tips in mind:
- Use recommended thicker greases or blends made for stabilizers
- Lubricate clips and posts where stabilizer wires connect
- Apply lube sparingly to avoid attracting dust or gunk
- Align the wire precisely to maximize smooth keypress feel
Following these steps maximizes quietness and longevity in your mechanical keyboard build.
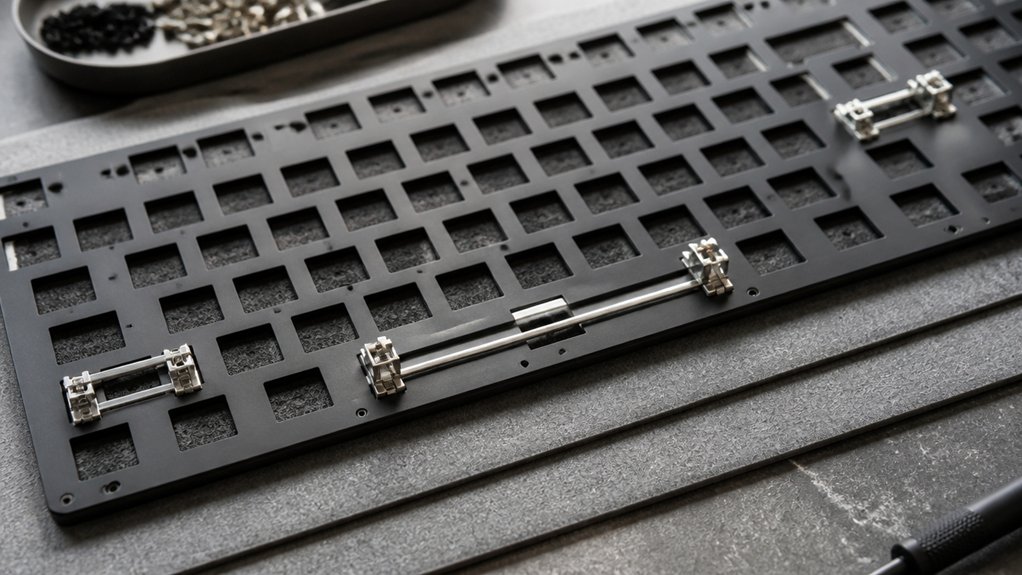
Install Stabilizers Correctly on PCB or Plate
Although installing stabilizers may seem straightforward, orienting the wire toward the larger PCB holes is essential for proper fit and function.
Before you install stabilizers, thoroughly lubricate the stems and wires to reduce rattle and guarantee smooth keypresses.
If you’re using screw-in stabilizers, add washers and tighten screws just enough to secure them without causing damage.
Make sure each stabilizer clips or screws firmly in place to avoid wobble or popping during use.
After installing stabilizers, immediately perform testing on the stabilized keys to confirm they produce a consistent feel with no rattling.
Proper installation and testing at this stage will save time and improve your keyboard’s overall typing experience.
Install Keyboard Plate and Add Foam or Dampening
Start by securely placing the keyboard plate onto the PCB to align all the switch slots correctly.
Adding foam or dampening material between the plate and PCB can greatly improve sound and reduce vibrations. Just make sure the foam doesn’t block any switch pins or stabilizers for a perfect fit.
Plate Installation Steps
When installing the keyboard plate, carefully align it with the PCB so the switch cutouts and mounting holes match perfectly before securing it in place. This step guarantees your switches, including the larger enter key, fit correctly and function smoothly within the keyboard case.
If you’re using plate-mounted stabilizers, insert them into the plate first to make installation easier.
Remember to add foam or other dampening materials between the plate and PCB to manage sound and feel.
Here are key plate installation steps:
- Verify the plate fits flush against the PCB.
- Add Poron foam for muted sound or Poly-Fil for livelier acoustics.
- Align switch cutouts precisely for seamless switch seating.
- Confirm stabilizers are correctly positioned before locking the plate in place.
This will set a solid foundation for the next assembly stages.
Adding Foam Benefits
Once you’ve aligned and secured the keyboard plate, adding foam between the plate and PCB can greatly improve your keyboard’s sound and feel. Foam placement reduces hollow, echoing sounds and enhances your typing experience by absorbing vibrations. You’ll typically add foam before inserting switches to avoid interference with key travel. Popular materials like Poron or EVA balance sound dampening with a natural typing feel. You can adjust or layer the foam to fine-tune dampening to your preference. Just make certain careful alignment to prevent obstructing switch pins or stabilizer wires during assembly.
| Foam Material | Dampening Level | Typing Feel |
|---|---|---|
| Poron | High | Soft |
| EVA | Medium | Balanced |
| None | None | Hollow/Echoey |
Carefully Insert Switches, Support Hot-Swap Pins
Although it might seem straightforward, you need to carefully support the switch pins with tweezers or your fingers as you insert each switch into the hot-swap PCB to prevent bending or damage.
Proper alignment of switch pins with the PCB holes is essential before pressing down gently. Avoid using too much force, as it can damage the hot-swap socket, which protects the board from permanent soldering iron work.
To guarantee everything’s working:
- Insert switches slowly and evenly for a secure fit.
- Test each key using a keyboard testing app like VIA.
- If a pin bends, carefully straighten it before reinserting.
- Avoid soldering iron use in hot-swap sockets unless necessary.
This method preserves the PCB and keeps your keyboard assembly smooth and reliable.
Solder Switches or Confirm Hot-Swap Connections

How do you guarantee your keyboard switches are reliably connected before final assembly?
First, if you’re working with a solder-type PCB, confirm the plate is firmly mounted and stabilizers are properly installed and lubricated to avoid rework. Then, solder switches carefully, checking that each switch sits flush and securely to prevent wobble.
Ensure the plate is secure and stabilizers lubricated before soldering switches flush to prevent wobble.
For hot-swap PCBs, carefully insert switches while supporting the socket to avoid bent pins or damage.
After soldering switches or confirming hot-swap connections, test every switch with software like VIA or VIAL to verify electrical contact and functionality. If any keys fail to register, inspect for missed solder joints or bent pins, resolder as needed, or straighten pins before reinserting. This step guarantees your keyboard performs perfectly in the final build.
Assemble Case Components: Gaskets, Foam, and Boards
After confirming every switch functions correctly, you can start assembling the case components. Begin by placing the gaskets carefully with tweezers into their slots, ensuring perfect alignment for a better typing feel and sound.
Next, insert foam layers—plate foam or Poron foam—between the PCB and case to reduce hollowness and dampen sound resonance. Attach daughter boards and any additional PCB components, making sure all cables are secure and strain-free.
Finally, screw the top and bottom parts of the case together without overtightening to maintain gasket compression and prevent warping.
- Place gaskets precisely for ideal acoustics
- Insert foam to reduce noise and enhance stability
- Secure daughter boards, check cable alignment
- Assemble case parts carefully, avoiding overtightening
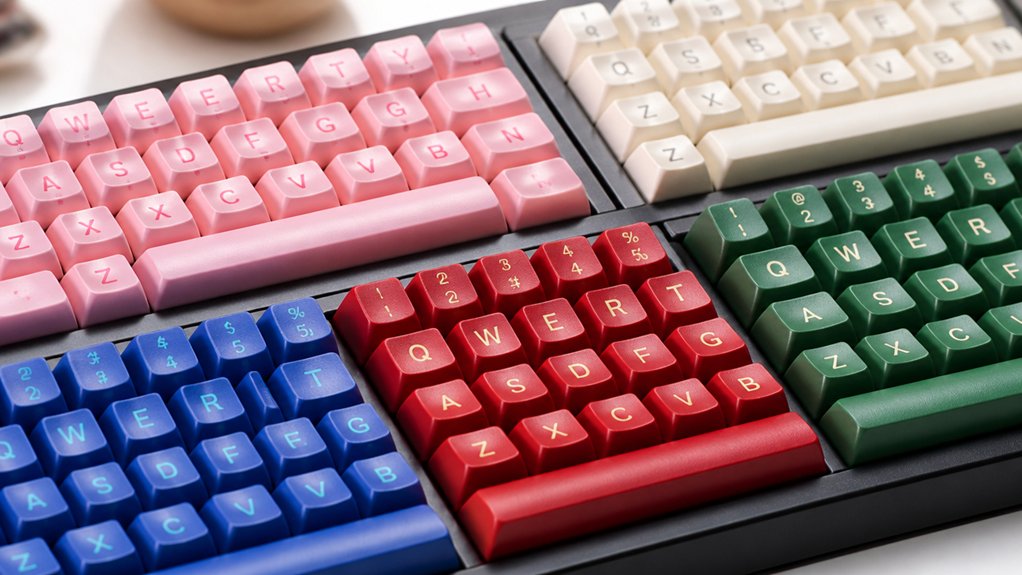
Attach Keycaps and Ensure Stabilizer Fit

When attaching keycaps, start by confirming that the stabilizer sizes match the larger keys like the spacebar, enter, and shift. Double-check that the stabilizers correspond to keycap sizes such as 2u, 2.25u, or 6.25u to avoid fit issues.
Carefully align keycap stems with both stabilizer and switch stems to prevent wobble or a loose connection. Make sure stabilizer wires sit correctly under the keycaps to avoid uneven resistance or an uneven key feel.
This alignment guarantees smoother, more consistent keypresses for your larger keys. Properly fitting keycaps on stabilized switches helps eliminate rattling and wobbliness. Paying attention here guarantees your keyboard feels solid and responsive without uneven or unstable keys interfering with your typing experience.
Test Your Keyboard: Check Keys and Stabilizer Rattle
Although you’ve installed your keycaps and stabilizers carefully, you’ll want to thoroughly test each key to guarantee everything functions correctly and quietly. Proper testing guarantees all keys register inputs without issues and stabilizer rattle is eliminated.
Thoroughly testing each key ensures perfect functionality and eliminates any annoying stabilizer noise.
Here’s how to check effectively:
- Use tweezers to tap each switch contact pad while running VIA or VIAL software to confirm key registration.
- Press each stabilized key, verifying smooth travel and listening closely for rattling noises.
- Confirm stabilizers are securely clipped or screwed in without any looseness or wobble.
- Check for loose keycap stems causing residual rattling and consider minor adjustments like adding thin plastic shims.
Adjust Stabilizers and Apply Sound Mods
Since stabilizers play a crucial role in reducing key wobble and noise, you’ll want to carefully align their wires and stems before applying lubricant. Use a thin layer of lube on the wires and contact points to minimize rattle and improve smoothness. After installing, test each key for stabilizers sound and consider adding thin plastic pieces if you notice any gaps. To further control sound, you can add sound mods like foam or Poly-Fil under the PCB. Applying masking tape on the PCB’s bottom can subtly increase the keyboard’s sound volume while keeping it reversible.
| Adjustment Step | Purpose |
|---|---|
| Align wires & stems | Prevent wobble and noise |
| Apply lubricant | Reduce rattle, smooth keys |
| Use masking tape | Enhance sound volume gently |
Troubleshoot Common Issues and Final Tips
After adjusting stabilizers and applying sound mods, you’ll want to confirm every key works properly. Make sure to test each switch using the VIA or VIAL app, which will help you identify any missed solder joints or bent pins.
Confirm each key functions correctly by testing switches with VIA or VIAL to catch solder or pin issues.
If something’s off, resolder faulty connections and straighten pins with tweezers before reinserting switches.
For rattling stabilizers, strongly recommend checking lubrication, wire alignment, and filling gaps with thin plastic to eliminate stem movement. Also, double-check stabilizer orientation—wires should point toward larger PCB holes. Avoid overtightening screws, especially with screw-in stabilizers, to prevent damage.
Finally, join mechanical keyboard Discord groups for community support—it’s a rewarding build experience.
- Test every key with VIA or VIAL
- Resolder and straighten pins as needed
- Lubricate and align stabilizers carefully
- Confirm correct stabilizer orientation
Frequently Asked Questions
What Brands Offer the Best Mechanical Keyboard Kits for Beginners?
You’ll find Drop, Keychron, and Glorious offer the best mechanical keyboard kits for beginners. They include clear instructions and quality components, making it easier for you to build and customize your first keyboard confidently.
How Do Different Switch Types Affect Typing Sound and Feel?
Different switch types change your typing sound and feel—linear switches feel smooth and quiet, tactile switches give you a bump and moderate noise, and clicky switches provide loud clicks and strong feedback, so pick what matches your typing style.
Can I Customize Keycap Profiles for Ergonomic Typing?
Yes, you can customize keycap profiles to suit your ergonomic typing preferences. Mixing sculpted and uniform profiles lets you find comfort and improve typing posture, reducing strain during long sessions by tailoring key shape and height to your needs.
What Software Can I Use for Programming Custom Keyboard Layouts?
You can use software like QMK Firmware, VIA, or Karabiner-Elements to program custom keyboard layouts. These tools let you remap keys and create macros easily, giving you full control over your keyboard’s functions and layers.
How Do RGB Lighting Options Impact Keyboard Battery Life?
RGB lighting options can greatly drain your keyboard’s battery, especially with bright or complex effects. Using simpler colors or turning off the lights when not needed helps extend battery life for longer typing sessions.
In Summary
Now that you’ve assembled your mechanical keyboard kit with stabilizers, take a moment to test every key and listen for any rattling. Don’t hesitate to adjust or re-lube stabilizers to perfect your typing feel and sound. Remember, patience and attention to detail make all the difference. With your keyboard fully tested and customized, you’re ready to enjoy a smooth, satisfying typing experience every time you sit down to work or game.

Leave a Reply