

To get premium custom keycap fit and repair tips, start by inspecting your keycaps and switch stems for cracks, chips, or debris. Use proper tools like wired pullers and clean components regularly to prevent looseness. Applying PTFE tape or O-rings enhances stability and reduces wobble without extra effort. For long-term fixes, replace damaged parts and consider upgraded keycaps. Keep components clean and properly fitted—future adjustments will be much easier if you follow these strategies.
Why Do Keycaps Become Loose on Mechanical Keyboards?

Have you ever wondered why your keycaps keep becoming loose on your mechanical keyboard? The main reason is worn or damaged keycap stems, often caused by frequent use or repeated removal.
When you take off your keycaps, improper tools or excessive force can accelerate wear, making them less secure. Dust, debris, and grime can also get trapped between the keycap stem and the switch stem, leading to unstable fittings.
If the keycap stems crack, chip, or become misaligned, they won’t fit snugly anymore. Additionally, damage or contamination on the switch stems can cause looseness, especially after swapping keycaps.
Over time, these factors weaken the connection, making your keycaps feel wobbly or unstable. Proper removal tools, such as keycap pullers, can help prevent unnecessary damage and maintain a secure fit.
How to Spot Damage and Wear on Keycap and Switch Stems
Check your keycap and switch stems for visible cracks, chips, or worn edges that can cause loose fitting. Look for discoloration, shiny wear, or deformation on the stems, which signals frequent use damage. Also, examine switch stems for bends, dirt, or debris that might interfere with a secure connection. To ensure longevity, consider inspecting the compatibility essentials of switches and keycaps to prevent wearing out prematurely.
Visible Cracks and Chips
Visible cracks and chips on keycap stems often indicate repeated stress or impact, especially on frequently used keys. These damages can lead to wobbling or poor fit, affecting typing experience. To spot them, examine the keycap and switch stems under bright light, looking for hairline fractures or missing plastic fragments that weaken the structure. Also, check switch stems for bends, dents, or debris buildup, which can prevent a secure fit. Look for uneven edges or thickness where the stem connects to the keycap, signaling wear. Damage signs include:
| Damage Type | Indicators |
|---|---|
| Cracks | Hairline fractures, chips |
| Chips | Missing plastic fragments |
| Bends/Dents | Deformed switch stems |
Identifying these issues helps prevent further damage or a loose fit. Considering the quality of the material quality and durability, replacing worn or damaged components early can prolong your keyboard’s lifespan and maintain optimal performance.
Wear Patterns and Discoloration
Over time, wear patterns and discoloration on keycap and switch stems can reveal the extent of usage and potential issues. Using a keycap puller, you can carefully inspect these areas for cracks, chips, or deformation on the stems—especially on frequently pressed keys like spacebar, enter, and shift. A thick-walled PBT material provides enhanced durability and resistance to deformation, helping maintain the integrity of your keyset over time. Discoloration, such as shiny surfaces or faded legends, indicates plastic wear from repeated finger contact. Look for dirt buildup, bent switch stems, or worn edges that might cause loose keycap fittings or unstable keypresses. Distinguishing between keycap and switch damage is essential for proper repair. Early detection of wear patterns and discoloration guides you to replace keycaps before more serious issues arise, maintaining both typing accuracy and hardware longevity.
How to Troubleshoot Loose Keycaps Effectively
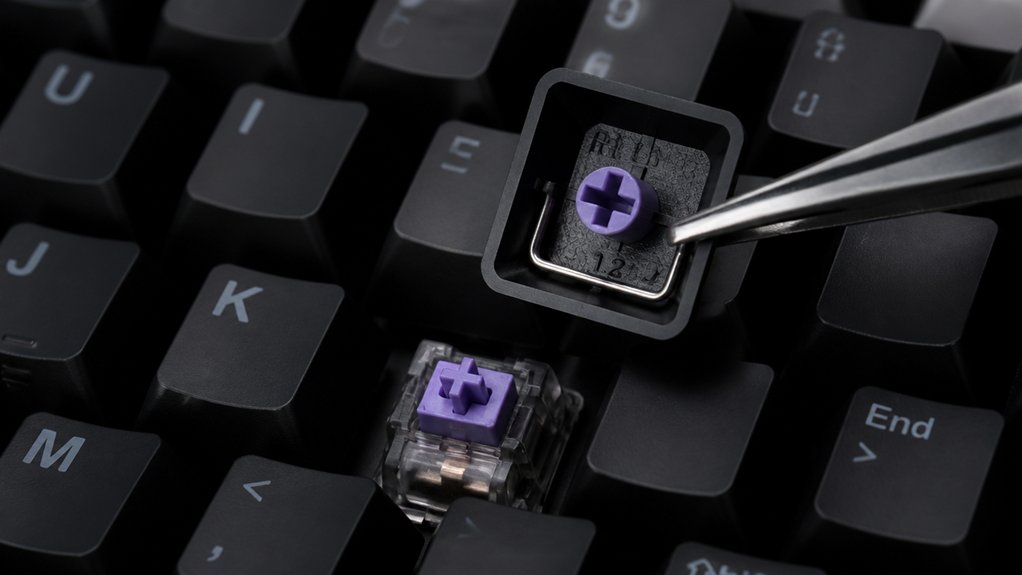
Start by checking if the keycap wobbles when pressed; if it does, confirm whether the looseness moves with the keycap or stays with the switch. Swap the keycap with another from the same row to see if the wobble follows the keycap or remains in the switch. This quick test helps you identify whether the issue lies with the keycap stem or the switch itself. Using a quality keycap puller ensures safe removal without damaging the cap or switch components.
Identifying Keycap Wobble
Ever wonder why some keys wobble more than others? The key might be loose, but pinpointing the cause is key. Start by swapping a suspect keycap with another from the same row. If the wobble moves with the keycap, the issue likely stems from the keycap’s stem—look for cracks, chips, or wear, especially on frequently used keys. If the wobble stays after swapping, the problem might be with the switch stem itself. Check for bent, dirty, or debris-filled switch stems that could prevent a tight fit. Cleaning and inspecting both parts helps determine the cause. Using high-quality materials like PBT or polycarbonate can also reduce the likelihood of wobble over time. If wobble persists, consider replacing the keycap or switch, or use fit-enhancing materials like PTFE tape or O-rings to improve stability.
Testing Switch Stability
When troubleshooting loose keycaps, testing switch stability helps identify whether the issue originates from the keycap or the switch itself.
Start by swapping the loose keycap with another from the same row. If the looseness follows the keycap, the problem likely lies with the keycap stem—look for visible cracks, chips, or wear, especially on heavily used keys.
If looseness remains after swapping, inspect the switch stem for dirt, debris, or damage that prevents a snug fit. Clean the switch stem with compressed air or a soft brush to improve stability.
Persistent looseness on the switch stem indicates the switch may be faulty. This process isolates the cause, helping you decide whether to replace the keycap or the switch for a secure, stable fit.
Additionally, material durability like stainless steel or high-quality plastics can impact switch stability over time.
What Tools Do You Need to Remove and Fix Loose Keycaps?
Removing and fixing loose keycaps requires the right tools to do the job safely and effectively. First, a good keycap puller is essential. A wired metal keycap puller (~$5) is recommended because it prevents stem damage and offers strain-free removal, unlike plastic ring pullers that can scratch the keycap.
For hot-swappable keyboards, a combination keycap and switch puller helps remove both keycaps and stabilizer bars efficiently, avoiding excessive force. Next, use compressed air or a soft brush to clear dust and debris from switch stems before refitting.
Finally, precision tweezers or bent paper clips can assist with delicate alignment adjustments if needed. Having these tools guarantees a smooth, damage-free removal and fix process for loose or wobbly keycaps.
How to Use PTFE Tape and O-Rings to Improve Keycap Fit
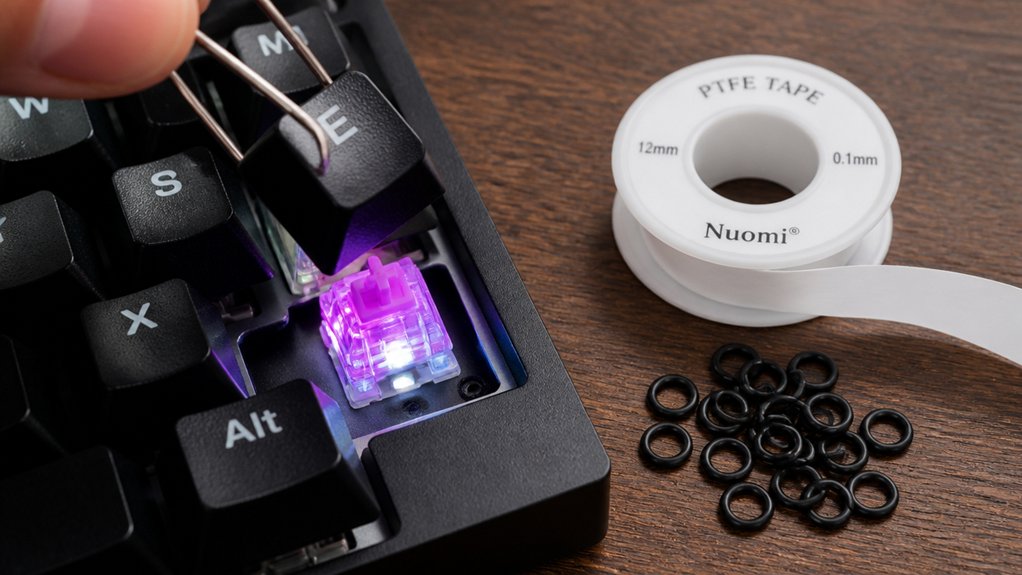
To improve keycap fit, you can use PTFE tape or O-rings, but knowing how to apply them correctly makes a big difference. Wrapping PTFE tape tightly around the stem helps tighten loose fits without changing key height, while selecting the right O-ring size reduces wobble without affecting key registration. Proper application guarantees your adjustments are reversible and effective, giving you a more stable and comfortable typing experience. Additionally, understanding the material compatibility of O-rings ensures you choose the right type for durability and optimal fit.
Applying PTFE Tape Effectively
Applying PTFE tape effectively starts with wrapping a thin, even layer around the keycap stem, ensuring it snugly fits without obstructing the switch mechanism.
When working with a keycap set, you want the tape to reduce wobble without impairing key registration. Here’s how:
- Carefully remove the keycaps, then wrap a minimal amount of PTFE tape around each stem—avoid thick layers to prevent installation issues.
- Make sure the tape is even and free of folds or bunching, which helps maintain consistent pressure and long-term durability.
- Pair the tape with rubber O-rings near the base of the stem for extra fit stability, reducing noise and wobble further.
Using excess tape can hinder removal or cause binding, so apply it sparingly for best results. Additionally, choosing appropriate lubricants can further enhance keycap fit and feel.
Choosing Right O-Ring Size
Wondering how to choose the right O-ring size for your keycaps? You want O-rings no thicker than 3mm to avoid interference with key registration and guarantee proper switch actuation. Thin O-rings near the base of the keycap stem help tighten the fit and dampen noise without blocking switch engagement. Wrap small layers of PTFE tape around the stem to improve fit subtly without damaging plastic. Using the appropriate alloy composition in your soldering process ensures reliable, durable joints when repairing keyboard PCBs. Here’s a quick guide:
| O-Ring Thickness | Purpose |
|---|---|
| No thicker than 3mm | Prevents interference, maintains actuation |
| Thicker O-rings | Might block switch engagement, cause wobble |
| PTFE Tape | Use |
| Thin layers | Creates snug fit, reduces wobble |
Temporary Fixes for Loose Keycaps: Adhesive Dots and Cling Wrap
Are you in a pinch with a loose keycap and need a quick fix? If your keyboard keycaps have been removed, don’t worry—there are simple, temporary solutions. Here’s what you can do:
In a bind with a loose keycap? Try adhesive dots, cling wrap, or double-sided tape for a quick, temporary fix.
- Apply adhesive dots or double-sided tape to the underside of the loose keycap stem to improve fit and reduce wobble. Make sure surfaces are clean and dry for effective adhesion.
- Carefully layer cling wrap around the keycap stem, creating a thin shim that keeps the key snug without damaging components.
- Always check key registration after applying these fixes, as too much thickness from adhesive or cling wrap can interfere with key actuation or cause sticking.
These fixes are best for quick, non-invasive repairs, not long-term solutions.
Long-Term Solutions to Keep Your Keycaps Tight and Stable
For a long-lasting, secure fit for your keycaps, consider using quality methods like wrapping switch stems with clear or PTFE tape. This simple upgrade helps mechanical keys with stabilizers stay stable and reduces wobble without damaging components.
Additionally, upgrading to high-quality, durable keycaps made from PBT or doubleshot plastics guarantees better long-term fit and resistance to wear compared to cheaper ABS options.
Using thin rubber O-rings (no thicker than 3mm) on keycap stems can provide stable seating and dampen noise—though be mindful that some switches like Kailh Box may be less compatible.
Regularly lubricating switch stems with a keyboard-safe lubricant will also reduce friction, allowing your keycaps to fit more securely and operate smoothly over time, especially on keys with stabilizers.
Maintenance Tips: Cleaning and Caring for Your Keycaps and Switches
Regular cleaning is essential to keep your keyboard functioning smoothly and prevent dust or debris from causing keycap looseness or switch issues.
To maintain peak performance, follow these tips:
- Use a proper wired keycap puller for removing keycaps, applying steady vertical force to avoid damaging stems or switches.
- Clean switch stems gently with compressed air or a microfiber cloth to remove dirt and manufacturing residue that can affect fit and performance.
- Keep your keyboard protected from dust when not in use by covering it and regularly cleaning keycaps with a microfiber cloth. After cleaning, make certain keycaps are properly aligned and seated with gentle pressing to prevent wear and maintain a snug fit.
Consistent care prolongs your keyboard’s lifespan and keeps it looking new.
When and How to Replace Worn or Damaged Keycaps or Switch Parts
Knowing when to replace worn or damaged keycaps or switch parts is vital for maintaining your keyboard’s performance and appearance. You should replace worn-out keycaps if the stems are cracked, chipped, warped, or if the fit feels loose despite cleaning and adjustments. For switch parts, replace them if the switch stem is bent, damaged, or dirty, impairing keycap stability. To diagnose stem faults, swap the keycap; if looseness moves with the keycap, replace it. If it stays with the switch, replace the switch part. Use the following guide:
| Condition | Action | Notes |
|---|---|---|
| Cracked or warped stems | Replace the keycap | Hold the keycap firmly during swap |
| Faded or discolored legends | Replace the keycap | Maintains visual clarity |
| Loose fit despite cleaning | Replace the keycap | Guarantees secure hold |
| Bent or damaged switch stems | Replace the switch part | Improves stability |
| Dirty switch components | Replace switch components | Enhances functionality |
Expert Tips for Custom Keycap Fitment and Enhancing Performance
Achieving a perfect fit for custom keycaps often requires attention to detail and the right techniques. To make sure your keys perform well, start by using a proper keycap puller to prevent damage, especially on hot-swappable keyboards.
Next, inspect the small plastic stems on both the keycap and switch for debris or wear. Using thin PTFE tape or rubber O-rings (under 3mm) can improve fit and reduce wobble without affecting key registration.
- Always handle keycaps carefully during removal and installation.
- Soak your custom keycaps in warm water to expand the small plastic, ensuring a tighter fit.
- Regularly clean stems with compressed air or soft brushes to maintain peak performance.
Frequently Asked Questions
Who Makes the Highest Quality Keycaps?
You’ll find the highest quality keycaps from manufacturers like GMK and EnjoyPBT, known for their durability and precision molding. Artisans like Dwarf Factory also craft unique, handcrafted caps that blend aesthetics with perfect fit and high craftsmanship.
Is Moa or Cherry Better?
You’ll find Cherry keycaps better for compatibility, easy repair, and broad community support, making them ideal for most users. Moa keycaps offer a unique aesthetic and vintage feel, appealing if you prioritize distinctive design over ease of maintenance.
Is ABS or PBT Better?
You’ll find PBT better because it’s more durable, resists wear and shine longer, and offers a textured feel for comfortable typing. ABS is cheaper and brighter but wears faster and develops a glossy surface over time.
Is OEM or Cherry Better?
You’ll find Cherry profile keycaps better for ergonomics and comfort, ideal for typing, whereas OEM keycaps are more versatile, easier to replace, and preferred by gamers for their taller height and larger surface area, enhancing visibility.
In Summary
Keeping your keycaps secure and well-maintained is essential for a smooth typing experience. By recognizing signs of wear, using the right tools, and applying simple fixes like PTFE tape and O-rings, you can extend your keyboard’s lifespan and improve performance. Regular cleaning and timely replacements will prevent issues from worsening. Follow these expert tips, stay attentive to your keyboard’s needs, and enjoy consistent, comfortable typing for years to come.


