Pick a switch whose actuation force matches your hand strength—light (40‑50 g) for weaker fingers, medium (55‑65 g) for average, heavy (70 g +) for strong hands. Light switches cut fatigue and boost gaming speed, while heavier ones give tactile feedback for accurate typing. Linear, tactile, and clicky styles differ in bump feel and bottom‑out resistance, so test them on a hot‑swappable board. Adjust travel distance and add O‑rings if you need softer bottom‑outs. Your layout and keycap profile also shift perceived stiffness. Keep these factors in mind and you’ll discover the perfect balance for comfort and performance.
Identify the Switch Stiffness Force Range for Your Hand Strength

Ever wondered how to match a keyboard’s actuation force to your own hand strength? You’ll find the right switch stiffness by comparing its actuation force to your hand strength and typing style.
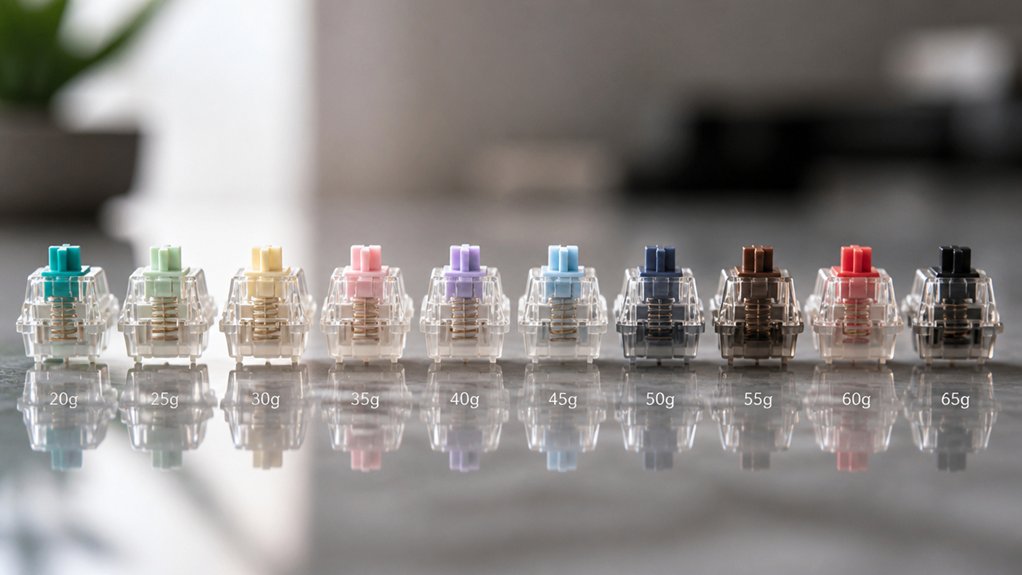
Light switches, around 40–50 g, let you fire a key press with minimal effort, perfect for weaker fingers or a light touch. Medium stiffness, roughly 55–65 g, offers a balanced feel that suits average hand strength and most typing or gaming habits. Heavy switches, 70 g and above, give firmer feedback and curb accidental presses, ideal for strong fingers or a heavy typing style.
Match Stiffness to Your Hand‑Strength Level
First, gauge your grip strength to know whether you need a light or heavy actuation force.
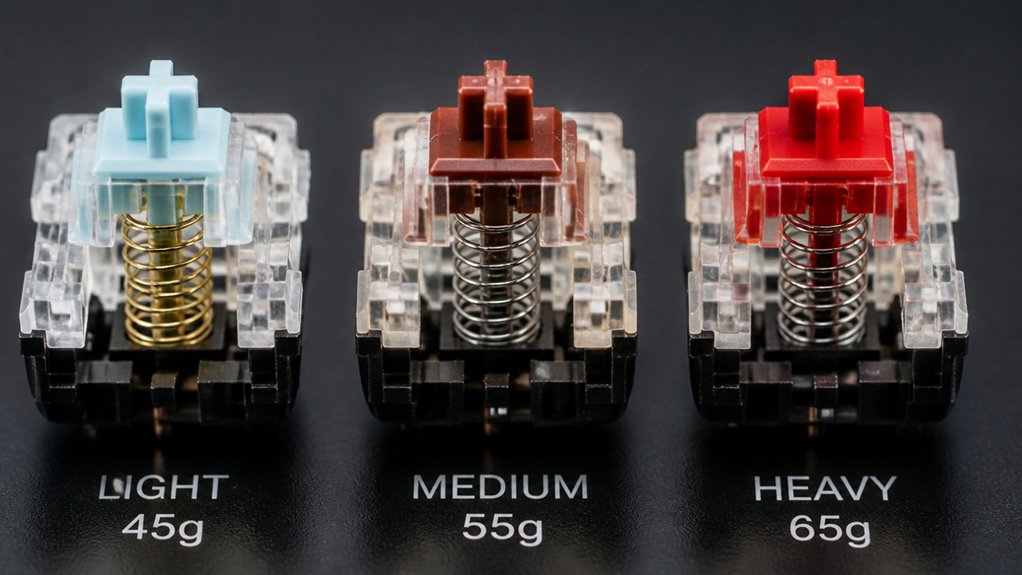
Then, try out a few switches—45g, 55g, 60g—to feel which one feels comfortable and responsive.
Finally, fine‑tune your choice by swapping springs or keycaps until the stiffness matches your hand‑strength level.
Assess Your Grip Strength
Are you sure your hand strength matches the spring weight of your switches? Evaluating your grip is the first step to pairing the right switch stiffness with your finger strength. Grab a simple grip‑tester or a stress ball, squeeze for three seconds, and note the resistance you feel. Compare that feeling to the actuation force range of mechanical keyboard switches: lighter springs (≈45‑50 g) suit weaker hands, while heavier springs (≥60 g) fit stronger fingers.
Matching spring weight to your grip promotes ergonomic typing and reduces fatigue.
- Use a hand‑grip dynamometer to record peak force.
- Identify your comfortable actuation range (light vs. heavy).
- Test sample switches with a tester or trial board.
- Choose the spring weight that feels natural and minimizes strain.
Test Different Actuation Forces
If you want to pinpoint the perfect actuation force, start by testing switches with incremental spring weights—45 g, 55 g, and 65 g—on a hot‑swappable board or a switch tester. Feel each key press, note how the spring force resists your fingers, and compare the resulting typing comfort.
Light switches (around 45 g) suit weaker hand strength, reducing fatigue during long sessions, while heavier 60 g‑plus switches give tactile resistance that improves key press precision for strong‑handed typists or gamers.
Use a systematic approach: test switches, record the effort required, and gauge how the stiffness feels across different typing styles. Matching switch stiffness to your hand strength guarantees consistent performance and minimizes strain.
Adjust Switches Accordingly
When you match a switch’s actuation force to your hand strength, you’ll notice immediate comfort and control: lighter switches (≈40–45 cN) suit weaker fingers or fast‑typing styles, while heavier ones (55–78 cN) give strong hands the resistance they need to avoid accidental presses and enjoy richer tactile feedback.
- Identify your typing profile – light typists benefit from low actuation force and short travel distance, heavy typists need higher force and longer activation point.
- Choose switch stiffness – pick a switch whose actuation force aligns with your hand strength to keep key presses consistent.
- Adjust travel distance – shorter travel speeds up light typists, while a longer travel gives heavy typists better control.
- Add dampening if needed – O‑rings or heavier bottom‑out force reduce fatigue for heavy typists, preserving tactile feedback.
How Actuation Force Influences Speed and Fatigue
You’ll notice that lighter actuation forces let you type faster because each keystroke needs less effort and responds quicker.
When you lower the force, your fingers stay comfortable longer, reducing fatigue during extended sessions.
Striking a balance—choosing a moderate force—gives you speed without sacrificing comfort.
Actuation Force and Typing Speed
Because lighter switches—typically 40–45 cN—require less finger strength, you can register keypresses more quickly, which boosts typing speed and reduces early fatigue.
On a mechanical keyboard, the actuation force you choose directly shapes how fast you type and how soon finger fatigue sets in. Lower actuation lets you snap through key presses with minimal effort, while higher actuation forces add resistance that can slow each key press but guard against accidental hits.
Medium actuation offers a compromise, delivering steady speed without excessive strain.
Key takeaways
- Lower actuation → higher typing speed, less finger fatigue.
- Medium actuation force → balanced speed and comfort.
- Higher actuation force → slower key press, more control.
- Match force to your hand strength for peak performance.
Fatigue Reduction Through Lower Force
Although lighter switches—typically 40‑45 g (≈39‑44 cN)—require far less finger pressure, they let you fire keystrokes with minimal effort, which directly cuts fatigue during long typing or gaming sessions. When you use a mechanical keyboard with lower actuation force, each press a key feels almost weightless, so your hand muscles stay relaxed even during prolonged typing.
Light switches such as Kailh Speed Silver or Cherry MX Red let you glide across rows without bottoming out, which translates into measurable fatigue reduction. You’ll notice that actuation forces under 45 g let you maintain speed without sacrificing accuracy, while higher forces above 60 g quickly wear you out. Pair the light switches with good posture and regular breaks, and you’ll keep your fingers fresh for hours of typing.
Balancing Speed With Comfort
When you pick a switch whose actuation force sits around 45‑55 g, you get a sweet spot where rapid key presses stay comfortable for long sessions. That range gives enough resistance to prevent accidental bottom‑out while keeping the key press light enough for high typing speed and low finger fatigue.
It works well for gaming keyboards and everyday work because the tactile feedback remains crisp without demanding excess force.
- Choose tactile switches for clear feedback and moderate resistance.
- Aim for 45‑55 g actuation force to balance speed and comfort.
- Use O‑rings or similar accessories to cushion bottom‑out.
- Test key press feel in real‑world typing or gaming scenarios.
Linear vs. Tactile vs. Clicky: Stiffness Comparison
Ever wonder how the feel different keys when you press them? You’ll notice linear switches glide with consistent stiffness, needing an actuation force of 40‑60 g and no bumps or clicks. Tactile switches add a tactile bump that spikes stiffness near the actuation point, usually 45‑55 g, giving feedback without an audible click. Clicky switches combine that bump with a distinct audible click, pushing the actuation force to about 50‑60 g for both tactile and sound cues. Heavier options like Cherry MX Black (≈60 g linear) or Green (≈80 g clicky) raise overall stiffness, suiting users who want firmer keypresses.
| Switch type | Actuation force | Stiffness feel |
|---|---|---|
| Linear | 40‑60 g | Smooth, constant |
| Tactile | 45‑55 g | Bump‑enhanced |
| Clicky | 50‑60 g | Bump + audible click |
| Heavy (e.g., MX Black/Green) | 60‑80 g | Firm, resistant |
How Bottom‑Out Resistance Affects Stiffness Feel for Gaming and Typing
You’ll notice that the bottom‑out force directly shapes the perceived stiffness, while the travel distance tweaks how that resistance feels during a keystroke.
For gaming, you usually want a lighter bottom‑out so you can fire off rapid presses without tiring, whereas typists often favor a firmer feel to avoid accidental hits. Balancing these two aspects lets you fine‑tune a keyboard that feels comfortable for both fast actions and precise typing.
Bottom‑Out Force Impact
If you focus on the bottom‑out force, you’ll notice it’s the key factor that shapes a switch’s stiffness feel. Heavier bottom‑out force means a larger force required to press, giving a firmer mechanical switch that resists accidental key press during intense gaming.
Lighter force reduces finger fatigue during long periods of typing but may diminish tactile feedback. Choose the level that matches your usage to avoid strain and maintain comfort.
- 75 g+ – strong resistance, good for fast gaming, higher fatigue risk.
- 60 g – balanced feel, moderate cushioning, versatile.
- 45‑50 g – soft bottom‑out, low strain, less feedback.
- Custom‑weight switches – fine‑tune force and tactile response for personal preference.
Travel Distance Interaction
The bottom‑out force you just examined directly shapes how travel distance feels in practice. When you press a key past the actuation point, the remaining force you push determines the stiffness you sense.
Longer travel distances with progressive spring weights increase cushioning, so the final phase feels smoother and boosts typing comfort. Heavy springs (≥75 cN) raise bottom‑out resistance, making the last millimeter feel stiff and preventing accidental key presses during vigorous sessions.
Conversely, short‑travel switches with lighter force, like Kailh Speed Silver, let you reset quickly, but the reduced bottom‑out resistance can feel less solid. Adding O‑rings or foam dampeners softens that final impact, tailoring the mechanical keyboard’s feel to your preferred balance of speed and comfort.
Gaming vs. Typing Balance
When you game, a light bottom‑out resistance—often around 40–45 g—lets you fire off keystrokes with minimal fatigue, while typists usually prefer a heavier spring (≥55 g) that gives a solid tactile stop, preventing accidental full‑presses and reducing strain during long sessions.
The key is balancing switch stiffness so both gamers and typists feel comfortable. Light spring weight and low actuation force on linear switches give rapid response, while tactile switches add feedback that helps typists control each press.
O‑rings or foam can soften perceived bottom‑out resistance, letting a heavier switch feel gentler.
- Choose spring weight that matches your primary use.
- Opt for linear switches for gaming speed.
- Pick tactile switches for typing accuracy.
- Add dampeners to tune bottom‑out resistance.
How to Objectively Measure Switch Stiffness With a Force‑Gauge

Because consistency matters, start by securing the force gauge so its probe aligns perfectly perpendicular to the key’s travel axis, then press the stem straight down until you feel the actuation click, noting the peak force in grams‑force or centiNewtons.
Record the actuation force for the chosen switch type—linear, tactile, or clicky—then continue pressing to the bottom‑out point and capture that force as well.
Repeat the measurement three times, averaging the results to smooth out spring variance.
Compare the values across switches on your mechanical keyboard; a higher actuation force indicates greater switch stiffness, while a larger gap between actuation and bottom‑out forces suggests a softer spring.
Use these objective numbers to rank stiffness levels reliably.
How Travel Distance and Bump Shape Influence Perceived Stiffness
Ever wondered why a longer travel distance makes a switch feel stiffer? You’ll notice that the farther the key moves before reaching the actuation point, the more spring force you must sustain, which raises perceived switch stiffness.
The tactile bump’s shape also reshapes the force profile: sharper, higher bumps create a sudden resistance spike, while gentle bumps feel smoother. Progressive springs add another layer, steepening force near bottom‑out and making the tail end feel tighter.
- Longer travel → higher sustained spring force.
- Sharp tactile bump → higher perceived stiffness.
- Progressive spring → stiffer feel toward bottom‑out.
- Linear switches → smoother, less stiff due to constant force.
How Keyboard Layout and Keycap Profile Change Stiffness Perception

If you swap a flat, uniform keycap for a sculpted OEM or Cherry profile, the altered finger angle changes the way force is applied, making the switch feel either stiffer or smoother.
A keyboard layout that spreads keys farther apart, like a full‑size board, often pushes stabilizer placement farther from the stem, so larger keycaps on spacebars or Enter keys feel stiffer because the longer lever arm amplifies resistance.
Sculpted keycap profiles, especially taller ones, shift your fingertip upward, increasing the moment arm and making each press feel more solid. Keycap material matters too; PBT feels harder than ABS, subtly boosting stiffness perception.
Together, layout, profile, size, and material shape how you experience each key’s resistance.
Align Switch Stiffness With Ergonomic Needs and RSI Prevention
Choosing a switch with a moderate actuation force—roughly 45–55 g—keeps finger fatigue low and is a solid strategy for preventing RSI such as carpal or cubital tunnel syndrome.
You’ll notice smoother mechanical typing when the switch’s stiffness matches your hand size and strength, reducing the strain that leads to repetitive strain injuries.
Pair a balanced actuation force with linear travel and cushioning springs to soften impact, and remember to take regular breaks and stretch. This ergonomic pairing lets you type longer without pain.
- Opt for 45–55 g for most users.
- Choose lighter switches (<45 g) if you have arthritis or weaker fingers.
- Use heavier switches (60 g+) only if you have large hands and can tolerate extra resistance.
- Combine the right switch with frequent micro‑breaks and hand‑stretching routines.
Build a Simple Stiffness Matrix to Pick Your Ideal Switch

After matching your actuation force to ergonomic needs, the next step is to visualize those choices in a simple stiffness matrix.
Plot actuation force on the horizontal axis and bottom‑out force on the vertical axis, then shade cells for light (<45 g), medium (45‑60 g), and heavy (>60 g) spring force zones. Mark linear switches in the low‑bump region, tactile switches where the bump raises perceived stiffness, and clicky switches where both bump and audible click shift the cell upward.
Compare each cell to your typing style—gaming may favor lighter, smoother linear keys, while long‑form typing might need tactile or clicky resistance to reduce finger fatigue. This matrix lets you instantly spot the switch that balances stiffness, actuation, and bottom‑out for comfort.
Frequently Asked Questions
What Is the Smoothest Keyboard Switch?
You’ll find the smoothest switch in Novelkeys Cream, thanks to its buttery plastic blend and unique stem. Gateron linear reds also feel incredibly smooth, especially when lubed, offering light 45‑55g actuation.
Is 84 Keys 75%?
Yes, 84 keys typically constitute a 75% keyboard. You’ll get a compact layout that retains function keys, navigation cluster, and arrows, offering most full‑size functionality while saving desk space.
Do Pro Gamers Use Linear or Tactile?
You’ll find most pros favor linear switches for their smooth, low‑force actuation, but many also choose tactile ones like MX Browns when they want a subtle bump without sacrificing speed.
Which Is Better, Red, Blue or Brown Switches?
You’ll find reds best for fast, quiet gaming, blues for tactile, clicky typing, and browns a versatile middle ground; pick the one that matches your noise tolerance and feedback preference.
In Summary
Now you’ve mapped your hand strength, actuation force, travel, and layout to the right switch type, you can pick a keyboard that feels effortless and stays comfortable. Whether you need linear smoothness, tactile feedback, or a clicky pop, the right stiffness will boost speed, cut fatigue, and protect your wrists. Use the simple matrix to test a few switches, and you’ll land on the perfect match for gaming or typing.

Leave a Reply