

To install screw-in stabilizers, start by gathering and organizing all your parts, checking for completeness, and applying a thin layer of Krytox lubricant to the stems and wire ends. Next, insert the stabilizer into the PCB, making sure it’s secure and properly aligned, then tighten the screws snugly without over-tightening. Finally, test the stabilizer’s movement, lubricate if needed, and troubleshoot any rattling or wobbling. For detailed tips on each step, keep exploring the process further.
Getting Your Stabilizer Parts Ready for Installation
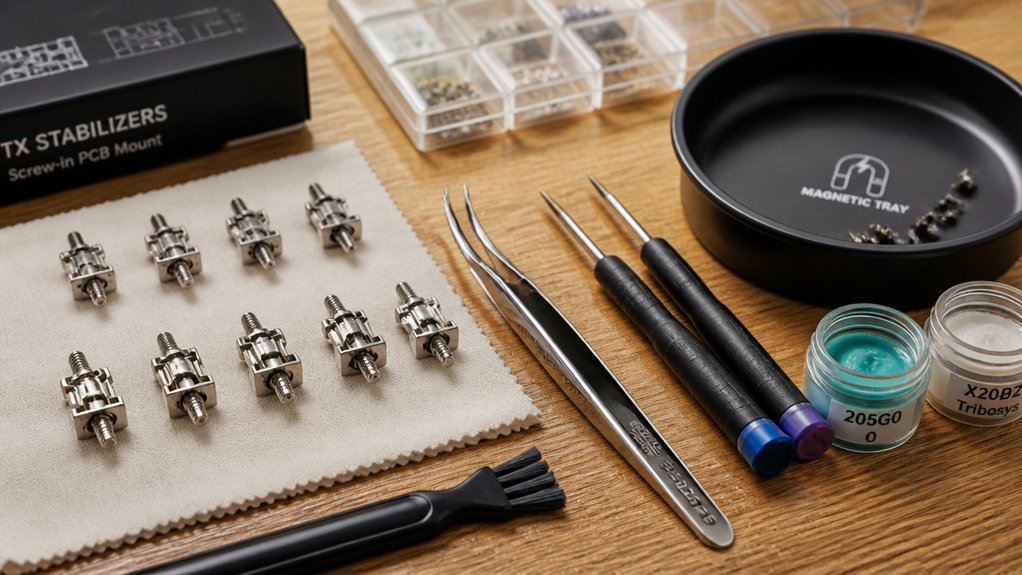
Before you begin installing your screw-in stabilizers, gather all necessary parts—housings, stems with wire holes outward, connecting wire, screws, and washers—and double-check each component for completeness. Organization is key; use sorting dishes or containers to separate screws, washers, stems, and wires for easy access.
Prepare your tools, like a small Phillips screwdriver, curved tweezers, and a keycap puller, to assist with precise assembly. Apply a thin layer of Krytox 205G0 Lubricant to the sides of the stabilizer stems and wire ends beforehand to guarantee smoother, quieter operation.
Inspect and straighten the stabilizer wire by rolling it on a flat surface to eliminate bends, preventing rattling and uneven keypresses later during the installation process.
Installing Screw-In Stabilizers Into Your PCB
To install your screw-in stabilizers into the PCB, start by aligning the stabilizer housing so that the stem’s two-hole side faces outward, matching the designated screw holes. Place a washer between the stabilizer housing and the PCB to prevent screw damage during insertion.
Insert the connecting wire into the stabilizer stem’s holes until it clicks securely, confirming proper assembly. Once assembled, carefully insert the stabilizer into the PCB, ensuring it’s fully seated and stabilized by the washer and housing.
Secure the stabilizer by inserting screws through the housing and washers, tightening snugly but without over-tightening to avoid stripping threads. After installation, gently wiggle the stabilizer to confirm it’s secured and properly seated on the PCB.
Testing, Lubricating, and Troubleshooting Stabilizers for Smooth Performance

Testing, lubricating, and troubleshooting your stabilizers guarantees they perform smoothly once installed.
Start by testing the stabilizer once assembled on your keyboard; press the keys to check for smooth, synchronized movement without wobbling or rattling.
Before applying lubricant, straighten the stabilizer wire by rolling it on a flat surface to remove bends that could cause noise.
Use Krytox 205G0 lubricant with a small brush on the inside of the stabilizer housings, sides of the stem, and wire ends, and use dielectric grease on the wire ends to prevent pinging and rattling.
If the stabilizers feel mushy or noisy, recheck the lubrication amount and make certain housings are properly seated, and screw-in stabilizer screws are snug without overtightening.
Troubleshoot rattling by pressing clip-in stabilizers firmly or tightening screw-in screws for secure seating.
Additionally, verifying the material quality of your stabilizers can help ensure long-term durability and consistent performance.
Frequently Asked Questions
How Do You Install Screw in Stabilizers?
You insert the stabilizer stem into the housing, snap the wire into place, fit the stabilizer into PCB holes with washers, tighten screws carefully, and lubricate with Krytox. Test for stability and smooth movement after installation.
Does It Matter Which Way You Install a Steering Stabilizer?
Yes, it matters which way you install a steering stabilizer. You need to face the two-hole side outward to guarantee proper wire alignment and smooth operation, preventing wobble, rattling, and ensuring safe, effective stabilization during driving.
How to Install New Stabilizers?
To install new stabilizers, start by inserting the stem with the two-hole side outward, snap in the wire, fit the housing with washers into PCB holes, tighten screws snugly, and apply lubricant for smooth, quiet operation.
How to Assemble Durock Stabilizers?
You insert the stabilizer stem with the two-hole side outward, lubricate it and the wire ends, snap the wire into the stems, then attach the assembly to your PCB with screws, tightening gently for a secure fit.



