

To install silent stabilizers, start by cleaning all parts thoroughly and lubricating the housings, stems, and wires with Krytox 205g0 and dielectric grease for quieter sound. For PCB-mounted stabilizers, align the clips or screw in securely, making sure the stabilizer wires are straight and properly seated. For clip-in types, press firmly until they click into place. Take your time to test stability and noise, and if you keep going, you’ll learn how to optimize your stabilizer setup for the quietest, smoothest keystrokes.
How to Choose Stabilizers for Your Mechanical Keyboard

Wondering how to pick the right stabilizers for your mechanical keyboard? Start by considering screw-in stabilizers for a more secure, rattle-free fit, perfect for silent builds.
Choose screw-in stabilizers for a secure, quiet, and rattle-free typing experience.
If you prefer easier installation, clip-in stabilizers are a good choice, but they may need extra dampening and precise seating to reduce noise.
Check your keyboard’s PCB mount style—most boards like Neo80 accept both stabilizer types using the same hole footprint.
Look for stabilizers with sound-dampening features, such as soft material inserts or plastic leaf springs, to keep typing quiet.
Also, choose stabilizers that are pre-lubricated or easy to mod with Krytox 205g0 and dielectric grease on their wires.
Make certain the stabilizer size set matches your keyboard’s key layout for consistent feel and noise reduction, ensuring compatibility with various layouts and sizes.
Preparing Your Stabilizers: Cleaning and Lubrication Tips
Before installing your stabilizers, it’s important to thoroughly clean all components. Start by cleaning the stabilizer housings, stems, and wires to remove manufacturing residues or dust that can cause noise or friction. Use a soft brush or cloth to guarantee they’re spotless.
Next, apply a thin, even layer of Krytox 205g0 lubricant inside the housing and on the stem walls to reduce plastic-on-plastic scratchiness. Lightly coat the stabilizer wire ends with dielectric grease, such as Loctite dielectric grease, to minimize rattling and pinging sounds. Be careful not to over-lubricate, especially inside the wire channel, as it can lead to a mushy feel and dust buildup.
For added durability and a quieter typing experience, consider the material quality of your stabilizers, which impacts their lifespan and noise reduction capabilities. After assembly, allow a break-in period for the lubricant to settle evenly, guaranteeing smoother performance.
Installing PCB-Mounted Stabilizers: Step-by-Step Guide

To install your PCB-mounted stabilizers effectively, start by aligning the stabilizer housing’s feet or legs with the holes on the PCB. For clip-in types, press the stabilizer firmly until you hear a click, ensuring it’s seated properly and doesn’t wobble. For screw-in stabilizers, insert screws through washers into the PCB, tightening them snugly but avoiding over-tightening, which can strip threads or deform the housing. Before full assembly, pre-lubricate the stabilizer stems and interior of the stabilizer housing with Krytox 205g0 to promote smooth movement. Lightly apply dielectric grease on the wire ends to minimize pinging noise. Additionally, considering the materials used in stabilizer components can help reduce wire wobble and noise over time. After installation, insert each stabilizer wire into the stem holes, making sure the bend orientation matches and the wires click securely into place.
Installing Clip-In Stabilizers: How to Get a Tight, Secure Fit
To guarantee your clip-in stabilizers fit tightly, start by properly aligning the stabilizer pins with the PCB holes and pressing firmly until you hear a click. If the fit feels loose, use quality shims or pads, especially on thinner PCBs, to improve stability. Test the seating by gently wiggling the stabilizer housing, and reseat or make minor adjustments if necessary to achieve a secure, wobble-free connection. Ensuring compatible mounting style and high-quality materials will also help maintain a snug fit over time.
Properly Align Stabilizer Pins
Guaranteeing your stabilizer pins are properly aligned with the PCB mounting holes is essential for a secure and stable fit.
When installing clip-in stabs, carefully position the stabilizer housing so the stabilizer pins line up precisely with the PCB mounting holes before pressing in. Misaligned pins can cause incomplete seating and long-term wobble, affecting sound and feel.
Press firmly and evenly on both sides of the stabilizer housing until you hear a distinct click, indicating the stabilizer legs have snapped into place. For thinner PCBs, consider using high-quality stabilizer shims to improve stability and prevent the clip-in stabilizers from popping out under tight keycaps.
Once installed, gently wiggle the stabilizer to confirm it’s securely seated without excess movement or play. Proper stabilizer alignment ensures optimal sound and feel for your mechanical keyboard.
Use Correct Shims or Pads
Using the right shims or pads is key to achieving a tight, secure fit for your clip-in stabilizer. Choose high-quality stabilizer shims designed for your PCB thickness—typically 1.0mm to 1.2mm—to prevent the stabilizer anchors from popping out or feeling loose. Properly align the stabilizer prongs with the PCB holes on the left and right ends, then press firmly until you hear a secure “click,” ensuring a stable fit. If your PCB is thinner or moves easily, add thin medical tape or custom-cut dampening pads to the stabilizer legs for extra friction and stability. Always avoid over-tightening, which can damage the PCB holes or weaken the clip retention. Test for wobble by gently wiggling the stabilizer before installing the keycap. Additionally, selecting stabilizers made with durable materials and proper wire finish can significantly enhance sound damping and stability material quality, ensuring a more refined typing experience.
Ensure Firm-Press Fit
Achieving a firm, secure fit for your clip-in stabilizer requires careful attention during installation. First, align the stabilizer prongs precisely with the PCB holes, pressing firmly until you hear a click that indicates full seating. To prevent wobbling, apply even pressure across the stabilizer housing, guaranteeing the prongs fully anchor into the PCB. Use stabilizer shims if your PCB is thinner (1.0mm–1.2mm) to enhance retention, especially with PBT keycaps. After installation, gently wiggle the stabilizer to check for movement—if it shifts or pops out, reseat or add shims. Avoid fingertips on clip-in stabilizers; instead, use a keycap puller for secure handling. Proper material quality and mounting style greatly influence the stability and longevity of your stabilizers.
Adjusting Stabilizer Tension and Preload for Quieter Performance
Adjusting the stabilizer tension and preload is essential for quiet performance, as improper settings can lead to rattling or squeaking.
Start by preload stabilizer springs slightly—tighten screws just enough to remove housing wiggle but avoid over-tightening, which increases friction and noise.
Before installation, confirm stabilizer wires are perfectly straight and balanced on a flat surface to prevent rattling and create smooth keystrokes.
Apply a thin layer of thicker grease, like Krytox 205g0, on plastic housings and stem walls to soften plastic-on-plastic contact.
Use dielectric grease or Nyogel on the wire ends entering the stems to dampen pinging sounds.
Be cautious with dampened stabilizers; avoid adding extra pads or tape, as they can alter preload and responsiveness.
Additionally, consider using material compatibility lubricants such as silicone or synthetic greases to ensure consistent performance across varying conditions.
Troubleshooting Rattles and Noise in Your Stabilizers

When your stabilizers rattle or make noise, start by checking if the wires wobble or sit unevenly, since straightening and fully clipping them can reduce many issues.
Next, make sure you’ve applied the right amount of lubricant—too little can cause friction, but too much might lead to mushy keys—and verify your installation is correct.
Finally, confirm that stabilizer housings are flush with the PCB and mounted securely without over-tightening to prevent unwanted movement. Using vibration-dampening features in your stabilizers can also help minimize noise and rattling during use.
Identifying Wobbling Wires
Have you noticed rattling sounds or a loose feel when pressing keys on your keyboard? This often indicates wobbling stabilizer wires.
To identify the issue, remove the keycap and carefully check the stabilizer wire. If the wire and the stem don’t sit flush or move unexpectedly, you may have wobbling stabilizer wires.
Place the stabilizer wire on a flat surface and gently roll it; this helps spot bent wires or kinks that cause instability. If the wire is bent or damaged, straighten it with a small screwdriver or tweezers.
Make sure the wire is fully seated in the stabilizer housing grooves to prevent gaps. Proper placement reduces rattles and stabilizes the key feel.
Using high-quality tool materials like stainless steel or durable plastics can help prevent the stabilizer components from bending or wearing out prematurely. Proper maintenance and checking for these issues early can help extend your keyboard’s lifespan.
Applying Proper Lubrication
Applying proper lubrication is essential for reducing rattles and noise in your stabilizers, but it’s equally important to do it correctly. Use a thin layer of lubricant, like Krytox 205g0, on stabilizer housing walls and stem sides with a fine brush. This reduces plastic-on-plastic friction, leading to smoother key travel and a better keyboard feels.
On stabilizer wire ends and bends, apply a tiny amount of dielectric grease, such as Loctite or XHT BDZ, to minimize pinging sounds without causing stickiness. Be cautious not to over-lubricate, as excess grease can make the keys mushy and attract dirt.
Before applying, straighten and properly seat the stabilizer wire to prevent rattles. Allow a few days for the grease to settle and fully improve noise reduction.
Ensuring Correct Installation
Guaranteeing your stabilizers are properly installed can greatly reduce rattles and noise. Make sure the housing and stems of your keyboard stabilizers are fully seated and aligned—parallel and perpendicular to the PCB—to prevent wobble. For screw-in mounted stabs, avoid over-tightening, which can strip PCB threads or warp housings, causing rattles. Use stabilizer shims on thin PCBs (1.0mm–1.2mm) to secure screw-in stabilizers tightly and minimize movement-induced noise. Check wire straightness by rolling it on a flat surface; replace bent wires if needed. Apply a lubricificant like Krytox 205g0 lightly to plastic parts and dielectric grease to wire ends, without extending past bends, to stop wire-on-plastic pinging. Proper installation guarantees quiet, smooth key operation.
| Step | Tip |
|---|---|
| 1 | Fully seat stabilizer housing and stems |
| 2 | Use shims for thin PCBs |
| 3 | Be cautious with screw tightness |
| 4 | Check wire straightness |
| 5 | Lubricate with appropriate lubrificant |
How to Lubricate Stabilizers for Silent Typing

To effectively reduce noise and improve the smoothness of your stabilizers, start by lubricating the relevant parts carefully.
Use a thin layer of Krytox 205g0 lubricant on plastic housing walls and stabilizer stem sides to minimize plastic meets metal friction and plastic-on-plastic noise. An excellent lubricant can make stabilizers feel smoother.
Apply a thin layer of Krytox 205g0 to reduce noise and enhance stabilizer smoothness.
Follow these steps:
- Fully assemble stabilizers on the keyboard PCB before applying any extra lubricant inside the wire slot for fine-tuning.
- Apply a light layer of thicker dielectric grease, like Loctite or XHT BDZ, on stabilizer wire ends without extending past the bends to cut down on pinging and rattling.
- Clip-in stabilizer legs prior to lubrication for better stability.
- Avoid over-lubricating to prevent mushy keys and dust attraction; let the lubricant settle over several days.
Aligning and Positioning Stabilizer Wires for Optimal Sound
Start by making sure your stabilizer wires are straight and free of bends or twists, as these can cause rattling and uneven sound.
Position the wires so they clip securely into the housing grooves with both ends flush, preventing movement that could introduce noise.
Use a bit of dielectric grease on the wire ends to guarantee smooth motion and reduce unwanted sounds during keypresses.
Ensuring Proper Wire Alignment
Before inserting the stabilizer wire, it’s crucial to straighten it by gently rolling it on a flat surface. This helps detect any bends and guarantees even contact, reducing wobble in your keys.
To properly align the stabilizer wire, follow these steps:
- Face the two-hole side of the stabilizer wire outward, so it clicks securely into the housing.
- Position the wire so it fits snugly into the wire slots on the stem, avoiding excessive looseness or tightness.
- Fully seat the wire so it’s flush with the bottom of the housing grooves, preventing wobble.
- Test the keycap press afterward, checking that the stabilizer remains stable and centered, re-adjusting if needed.
Correct wire alignment guarantees a smooth, quiet keypress and an even, satisfying sound in your mechanical keyboard.
Correcting Wire Bends and Twists
Once you’ve correctly seated the stabilizer wire, it’s important to check for bends and twists that could affect sound and stability. To do this, straighten stabilizer wires by rolling them gently on a flat surface, which helps detect unintended bends. Confirm proper wire alignment by carefully positioning the wire so it sits evenly in the housing wire slots. Avoid twisting the wire, as this can cause rattling and uneven key feel. Maintaining proper wire alignment minimizes noise and wobble. Double-check that the wire runs parallel and perpendicular to the PCB surface, and that the stabilizer housing feels stable. Here’s a quick guide:
| Step | Action | Purpose |
|---|---|---|
| 1 | Roll on flat surface | Straighten stabilizer wires |
| 2 | Position carefully | Ensure proper wire alignment |
| 3 | Check for twists | Prevent rattling |
| 4 | Verify stability | Avoid wobble |
Using Lubricant for Smoothness
To achieve the smoothest key presses and minimize noise, applying lubricant correctly is essential. Proper lubrication reduces friction between the stabilizer parts, leading to a quieter, more consistent sound.
Here’s how to optimize your stabilizers’ positioning:
- Lightly coat the plastic housing walls and stem sides with Krytox 205g0 lubricant for smooth keypresses without mushiness.
- Apply dielectric grease or Nyogel to the stabilizer wire ends, especially past bends, to prevent pinging and rattling sounds.
- Roll stabilizer wires on a flat surface to straighten any bends, ensuring even sound and reduced wobble.
- Inside the wire channel, add a small amount of lubricant once assembled, and align the wire flush with the housing slots to avoid unwanted metal-plastic contact.
Testing Your Stabilizers: Ensuring Smooth, Rattle-Free Keys
How can you be sure your stabilizers are properly installed and functioning smoothly? Start by testing each stabilizer for rattles or wobbling. Gently wiggle the stabilized key; if it moves excessively or makes noise, it mightn’t be seated correctly or needs adjustment.
Press and release each stabilizer wire repeatedly to detect any scratchy sounds or rattles. If you hear noise, reapply lubricant or adjust the wire position. Before installation, perform a flat surface roll test on each stabilizer wire to confirm they’re straight, preventing uneven key movement.
Also, make certain stabilizer housings are aligned parallel and perpendicular to the PCB—misalignment can lead to rattles. After testing, type normally over several days to allow lubricants to settle and stabilize the key feel.
Maintaining and Replacing Stabilizers to Keep Your Keyboard Quiet
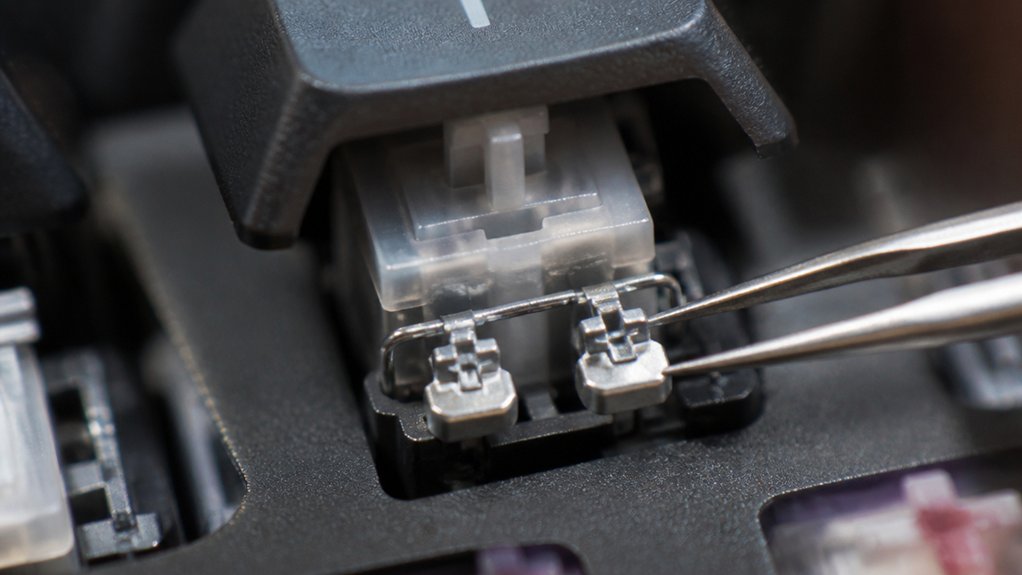
Maintaining your stabilizers is essential for keeping your keyboard quiet and performing smoothly over time. Regularly check the stabilizer wire seating and housing alignment to prevent rattling and noise.
Here are key steps to keep your stabilizers in top shape:
- Replace worn or bent stabilizer wires immediately, as damage can’t always be fixed by straightening.
- Reapply lubricant, like Krytox 205g0, on plastic housings, stems, and dielectric grease on wire ends every few months.
- Opt for screw-in stabilizers, such as Durock stabilizers, for better stability and reduced rattling, especially on larger keys.
- Avoid over-lubrication or thick greases, which can cause mushiness and attract dust, counteracting noise reduction.
Proper maintenance guarantees quiet, smooth key presses for the long haul.
Frequently Asked Questions
Can I Install Silent Stabilizers on Any Mechanical Keyboard?
You can install silent stabilizers on most mechanical keyboards, but compatibility depends on your keyboard’s size and switch type. Check your keyboard’s specifications, key spacing, and stabilizer mounting style before purchasing, to guarantee easy installation and peak noise reduction.
How Do I Know if My Stabilizers Are Compatible With My PCB?
You check if your stabilizers are compatible with your PCB by verifying their size, usually whether they’re 2U or larger, and confirm their mounting style matches your PCB’s layout. Consult your keyboard’s specifications for exact compatibility.
What’s the Best Type of Grease for Lubricating Stabilizers?
The best grease for lubricating stabilizers is a plastic-safe, thin, and smooth lubricant like Krytox GPL 105 or dielectric grease. You apply a small amount to reduce squeaking, enhance smoothness, and guarantee quiet, peak stabilizer performance.
Do I Need Special Tools for Installing Stabilizers?
No, you don’t need special tools to install stabilizers. Regular tweezers, a small screwdriver, and maybe a keycap puller will do. These help position and secure the stabilizers properly for smooth, silent operation.
How Can I Reduce Stabilizer Noise After Installation?
You can reduce stabilizer noise by lubricating them thoroughly, especially the and clips, with high-quality switch lubricant. Additionally, applying dielectric grease can further minimize rattle and sound, leading to a quieter, smoother typing experience.



