

To clip and lube stabilizers effectively, use sharp tools like flush cutters carefully, clipping only the longer legs at a slight angle to reduce noise without weakening them. Apply lubricant evenly to stems, housing, and wire ends for smooth keypresses, avoiding over-lubing that causes mushiness. Confirm wires are properly seated and aligned, and consider pad modding to reduce wobble and noise. Proper reinstallation and troubleshooting will further improve performance—keep exploring for detailed tips to perfect your modding skills.
How to Safely Clip Stabilizer Legs Without Damage

Before you start clipping your stabilizer legs, it’s important to handle them carefully to avoid damage. Use flush cutters to trim only the longer legs of your clip-in stabilizers, keeping the plastic housing intact. Aim for a flat, even cut close to the base to prevent bottom-out interference and ticking noise.
Handle stabilizers carefully and clip only the longer legs near the base for a smooth, noise-free typing experience.
Hold the stabilizer firmly and clip slowly to avoid cracking or snapping the plastic housing. Only clip the extended legs, leaving the shorter legs untouched to guarantee proper mounting stability.
Perform the clipping before applying any lubrication, as this helps prevent damage to lubed surfaces and gives you better control. Properly cutting the stabilizer legs minimizes rattling and assures a smoother typing experience.
Additionally, consider verifying the mount type compatibility, such as PCB mount or screw-in, to ensure your stabilizers are suited for your keyboard’s build for optimal performance. Patience and precision are key to safe, effective clipping.
Why Clipping Stabilizer Feet Improves Sound and Feel
Clipping the extended legs of your stabilizers greatly enhances both the sound and feel of your keyboard. When you clip stabilizer feet, you reduce contact with the PCB, preventing bottom-out noise and ticking sounds caused by stabilizer legs hitting the board. This creates a smoother, more consistent sound during keystrokes. Additionally, clipping stabilizer feet minimizes wobbling, resulting in better stabilizer movement and a more solid, satisfying feel. Properly clipped stabilizers sit flush, improving key travel uniformity and ensuring even acoustics. Here’s how it impacts your experience:
| Effect | Benefit |
|---|---|
| Reduced noise | Quieter keyboard sounds |
| Improved feel | More stable and satisfying keystrokes |
| Consistent acoustics | Even, balanced sound profile during typing |
Clipping stabilizer feet also helps maintain the material integrity of your stabilizers by reducing unnecessary wear caused by wobbling and impacts over time.
Tools and Tips for Clipping Stabilizer Legs Easily

Using the right tools, like flush cutters or sharp nail clippers, makes clipping stabilizer legs easier and more precise. Remember to hold the stabilizer securely to prevent slipping and to clip only just enough to avoid damaging the part. Always prioritize safety and perform clipping before lubrication for best results. Incorporating stabilizer modding tools ensures a smoother process and reduces the risk of errors during modification.
Choosing the Right Clipper
Choosing the right clipper is essential for achieving clean, precise cuts on your stabilizer legs without damaging the plastic or surrounding components. You’ll want to use flush cutters or sharp nail clippers with a flat cutting surface to guarantee smooth, accurate trimming.
A small to medium size clipper, like #0 or #00, offers better control when trimming close to the base. Make sure the blades are sharp and rust-free to prevent jagged edges that could interfere with the stabilizer’s fit or cause damage.
Cutting at a slight angle helps create a flatter surface, reducing noise and interference with the PCB. Hold the stabilizer firmly with tweezers or fingers during clipping to prevent slipping and accidental damage, securing a clean, professional finish.
Using tools made from durable materials such as high-grade stainless steel can also help ensure the longevity of your clipper and consistent results.
Clipping Technique Tips
To make clipping stabilizer legs easier and more accurate, selecting the right tools and applying proper techniques are key. Using flush cutters guarantees a clean, precise trim of the stabilizer’s extended legs, which helps prevent PCB interference and ticking noise.
When clipping, hold the stabilizer firmly with tweezers or a stable grip to avoid slips or damage, especially when clipping in stabilizers. Aim to remove just enough leg length to prevent bottom-out interference, without weakening the stabilizer’s structure.
It’s best to perform clipping before lubrication—this keeps your workspace clean and helps achieve smooth edges where lube will go.
For added safety and control, some users opt to protect surrounding components with masking tape to prevent accidental damage during clipping.
Before final assembly, test the clip-in stabilizers on the board to confirm reduced noise and smoothness, assuring peak performance.
Safety and Precautions
Ensuring safety while clipping stabilizer legs is essential to both your personal safety and the integrity of your keyboard. Always keep the keyboard unplugged before starting to prevent risk of electric shock or damage.
Use flush cutters with a sharp, flat edge to cleanly trim the stabilizer legs close to their base, avoiding damage to surrounding plastic. Clip slowly and carefully, aiming for a flat bottom surface to prevent uneven PCB contact and ticking noise.
Wear eye protection, as small plastic pieces can fly off unexpectedly. Handle trimmed stabilizer parts with tweezers or a fine brush to avoid losing small debris that may cause issues later. Additionally, using professional tools designed specifically for keyboard modding can help achieve more precise and safe results.
Following these precautions helps you work safely and preserves your keyboard’s functionality.
Applying Lubricant to Stabilizer Housing and Stems for Smoothness

To achieve smooth stabilizer movement, you need to apply lubricant carefully and evenly. Use a fine brush or lube pen to target all sides of the stems and inside the housings. Proper coverage minimizes friction, reduces scratchiness, and helps produce that satisfying deep “thock” sound. Ensuring the lubricant reaches all contact points within the stabilizer assembly is crucial for optimal performance.
Proper Lube Application Technique
Applying lubricant correctly is essential for achieving smooth, stable keystrokes. To do this effectively, focus on precise application to the stabilizer stems and housings.
Use a small, fine paintbrush or lube pen to apply a thin, even layer of Krytox™ 205g0 to all sides of the stabilizer stems. Pay particular attention to areas where the wire contacts to reduce scratchiness and noise.
Lightly coat the inside walls of the stabilizer housings to guarantee smooth stem movement and avoid plastic-on-plastic friction. Be cautious not to over-lube, as excess can cause mushy keypresses.
Remember these key points:
- Apply lubricant evenly to contact points
- Focus on inside surfaces of housings
- Quickly assemble to prevent excess transfer
Ensuring Even Lubrication Coverage
Achieving smooth and consistent keystrokes depends on applying lubricant evenly to all relevant surfaces.
Start by applying a thin, fully seated layer of Krytox™ 205g0 to the stabilizer stems, especially inside the groove where the stabilizer wires contact. This guarantees smooth movement and reduces scratchiness.
Next, coat the inside walls of the stabilizer housings with a uniform, light film of lubricant to minimize friction and extend component lifespan. Use a small brush or lube pen for precise coverage, avoiding excess that can cause mushy keys or inconsistent sound.
Additionally, generously lubricate the stabilizer wire ends and contact points with Krytox™ XHT-BDZ in an “L” shape.
After lubrication, immediately assemble the stems into the housings, and verify even coverage by visual or tactile inspection. Proper stabilizer maintenance helps ensure optimal performance and longer-lasting components.
How to Lubricate Stabilizers Evenly for Consistent Performance
Guaranteeing even lubrication is key to making your stabilizers perform smoothly and sound consistent. Start by applying a thin, even layer of Krytox™ 205g0 to all sides of the stabilizer stems, focusing on the inside of the housing where the stabilizer wire rests.
Use a fine lube brush to reach all contact areas, preventing uneven movement or noise. Lightly coat the inside of the housing to reduce friction without causing mushy keys.
Pay special attention to the stabilizer wire ends and clip-in points, generously applying Krytox™ XHT-BDZ for quieter operation.
- Use a lube brush or fine applicator for precision
- Focus on inside of the housing to guarantee smooth movement
- Apply a thin layer to avoid excess buildup or sticky keys
Test Your Stabilizers Before Full Reassembly
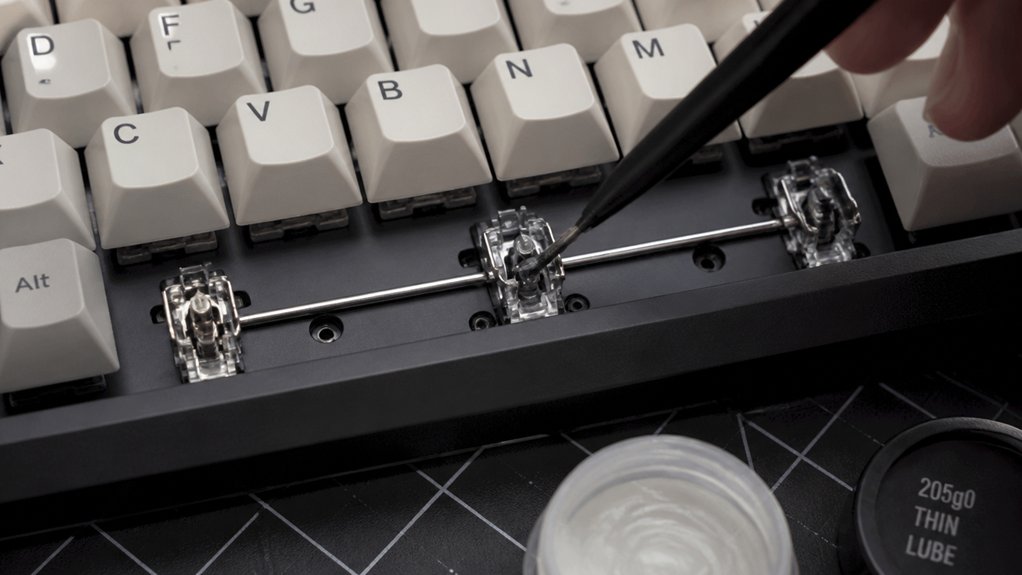
Before fully reassembling your keyboard, test each stabilized key by pressing it from side to side to check for rattling or ticking sounds. Make sure the keypress feels smooth and registers correctly using testing software or tools. Confirm that the stabilizers are fully clipped in, housings are flush, and the spacebar sits evenly without wobbling. Additionally, inspecting the material quality of your stabilizers can help identify potential issues before final assembly.
Check Stabilizer Movement
Have you tested your stabilizers yet? Before final reassembly, it’s essential to check the movement of your stabilized key. You want to make certain the contact points on the stabilizer branch smoothly without any wire hitting or rattling, which could cause noise or uneven keypresses.
To do this, press the stabilized key side to side and observe its motion.
Consider these key points:
- Confirm the stabilizer wires are fully clipped in and locked in place
- Watch for wobble or resistance during keypress
- Listen for ticking or rattling sounds indicating loose contact points
- Ensuring wire rigidity can significantly influence the deep sound profile of your stabilizer setup
This check guarantees the stabilizer functions properly, with consistent key travel and no sticky feel, leading to a more satisfying and stable typing experience.
Listen for Noises
After confirming that your stabilizers move smoothly and are properly clipped, it’s time to listen for any noises that might indicate issues. Listen for noises like rattling or ticking, which suggest the stabilizers aren’t seated correctly or lack sufficient lubrication. Use headphones or do this in a quiet environment to better distinguish subtle sounds.
As you press each key side to side, pay attention to how the keyboard feels—any scratchiness or uneven travel indicates uneven lubrication or improper clipping. Make sure dielectric grease was applied to both wires and housings, as dry contacts often cause noises.
If sounds persist, double-check that stabilizer wires are fully clipped in. Running this test before reassembly helps catch problems early, saving you time and effort later.
Verify Keypress Smoothness
To guarantee your stabilizers are functioning smoothly, start by installing them temporarily on the PCB and testing their keypresses before fully reassembling the keyboard. This step helps you spot issues like rattling, ticking, or scratchiness that may affect the keys feel.
- Press stabilized keys evenly from side to side and center to detect any uneven resistance.
- Listen for a deeper “thock” sound, indicating proper lubrication and quieter operation.
- Check key travel for smoothness without mushiness, which suggests good stabilizer alignment and lubrication.
Using key tester software or typing tests can confirm consistent activation before you proceed with full reassembly. Verifying keypress smoothness at this stage guarantees your keyboard’s stability and prevents the need for rework later.
Common Mistakes When Clipping and Lubricating Stabilizers (and How to Avoid Them)
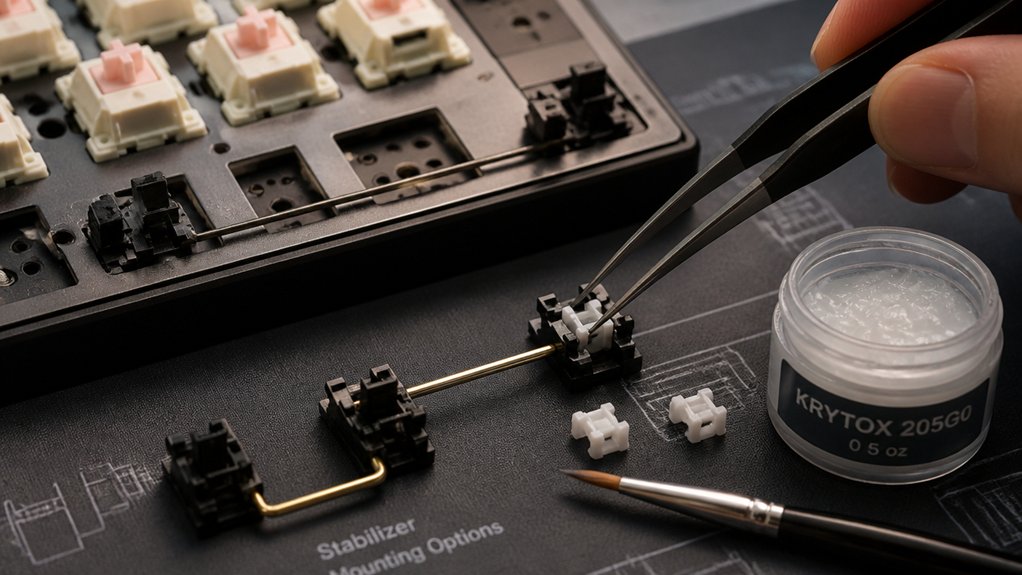
Clipping and lubricating stabilizers might seem straightforward, but common mistakes can easily compromise their performance and sound.
As a keyboard enthusiast, you’ll want to avoid over-lubing, which can cause mushy or sluggish keypresses.
When clipping your clip-in stabilizers, make sure to trim the two longer legs close to the base with flush cutters to prevent bottom-out interference and ticking noise.
Applying an even, thin layer of Krytox™ 205g0 on all sides of the stems and inside housings helps guarantee consistent sound and prevents scratchiness.
Don’t forget to lubricate stabilizer wires with Krytox™ XHT-BDZ—especially where the wire contacts the stem in an “L” shape—to reduce rattle and ticking.
Take your time handling small parts and applying lube carefully to avoid messy, uneven coverage.
Using Pad Modding to Reduce Noise and Wobble
Using pad modding is an effective way to reduce noise and wobble in your stabilizers, enhancing overall typing quality. By placing stabilizer pads beneath the stabilizer feet with larger hole openings facing forward, you create a cushioned interface that dampens rattling and harsh sounds.
Pad modding reduces stabilizer wobble and noise, improving typing feel with cushioned damping and enhanced stability.
This simple step not only minimizes wobble but also complements clipping and lubing efforts. When installing, make sure the pads are properly oriented and pressed firmly against the stabilizer housing before securing to the keyboard case. Adding these pads helps stabilize the stabilizer, especially if your keyboard case provides a looser fit.
- Improves sound dampening with stabilizer pads
- Reduces wobble by filling gaps in the keyboard case
- Compatible with both screw-in and clip-in stabilizers
Step-by-Step Reinstall and Reassemble Your Stabilizers
Once you’ve addressed noise and wobble with padding, it’s time to carefully reinstall and reassemble your stabilizers.
Carefully remove the stabilizer wire, ensuring it’s clipped securely into the bottom hole of the stem for proper function. Insert the stabilizer stem into the housing with the larger opening facing the front of the keyboard to avoid wire interference.
To reinstall, align the stabilizer with the PCB cutouts and either snap or screw them in firmly, using the right tools. For screw-in stabilizers, tighten the screws carefully without overtightening—this maintains proper pressure and prevents housing damage.
After reinstallation, assemble switches and keycaps to test the keys, ensuring smooth travel and that there’s no rattling or ticking noise.
Troubleshoot Sticky or Rattly Stabilizers After Clipping and Lubing
If your stabilizers feel sticky or rattly after clipping and lubing, it’s usually due to uneven lubrication or misaligned parts. Over-lubrication can cause sluggish keypresses, so clean excess lube thoroughly.
Rattling often results from missed lubrication on stabilizer wire ends—reapply Krytox™ XHT-BDZ generously in an “L” shape to improve smoothness. Make sure that clipped stabilizer legs have smooth, flat bottoms, preventing interference and ticking noises from bottoming out on the PCB.
Verify that stabilizer wires are fully seated and properly aligned to avoid contact noise and uneven key travel. Test each key by pressing side to side after reassembly to identify any that need additional lube or wire straightening.
Frequently Asked Questions
Can Clipping Stabilizers Affect Keyboard Structural Integrity?
Clipping stabilizers can slightly weaken their structure if done improperly, but generally, it doesn’t harm your keyboard’s overall integrity. Just be careful during clipping and lube them thoroughly to guarantee smooth, stable keys without risking damage.
How Do I Choose the Right Lubricant for Stabilizers?
You should choose a lubricant that’s thin, non-gumming, and compatible with plastic. Look for silicone or krytox-based options, as they guarantee smooth movement, reduce noise, and won’t damage your stabilizers over time.
Is It Necessary to Remove Stabilizers Before Lubing?
It’s not strictly necessary to remove stabilizers before lubing, but doing so allows for a more thorough application, guarantees even coverage, and prevents excess lubricant from spreading onto other keyboard parts, ultimately providing smoother and quieter keystrokes.
How Often Should Stabilizers Be Re-Lubricated?
You should re-lubricate your stabilizers every six to twelve months, depending on usage and noise levels. Regular maintenance keeps them smooth and quiet, preventing stiffness or squeaking, and ensuring your typing remains comfortable and consistent over time.
Will Clipping Stabilizer Legs Impact Keycap Fit?
Clipping stabilizer legs might slightly affect keycap fit if you’re overly aggressive, but generally, it improves stability and reduces rattle. Just be gentle, and you’ll maintain a proper fit while enhancing your keyboard’s feel.



