

To improve your handwired keyboard stabilizer mods, start by understanding the different stabilizer types and their effects on sound and feel. Gather essential tools like screwdrivers, pliers, cutters, and lubricants. Disassemble carefully, remove stabilizers, and trim the feet to reduce rattle. Apply smooth, even lubrication for quieter action, and consider the Band-Aid mod to limit wobble and noise. Troubleshoot common issues, double-check your work, and you’ll get better stability—more tips await if you continue exploring.
Understand Stabilizer Types and How They Affect Sound and Feel
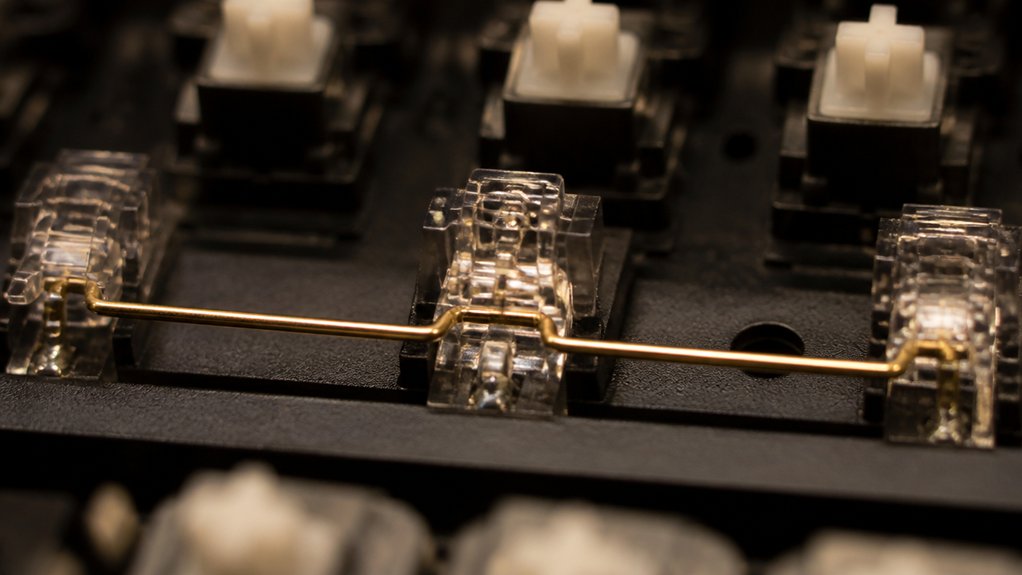
Understanding the different stabilizer types is key to customizing your keyboard’s feel and sound. Stabilizers work with keys, preventing wobble and uneven pressure. Plate-mounted stabilizers clip into the metal plate, making installation easier but often producing more noise and wobble. PCB-mounted stabilizers fit into dedicated PCB cutouts, offering better stability and quieter operation—these are popular for custom builds. Screw-in stabilizers, a subtype of PCB-mounted stabilizers, are secured with screws or nuts, greatly reducing wobble and rattling while improving sound and feel. Stabilizer wire, used inside the housings, influences smoothness and noise. Additionally, material quality and design features play a significant role in noise reduction and durability. Some stabilizers, like Cherry-style, transfer pressure evenly but can be loud or scratchy without mods. Choosing the right stabilizer type affects both sound and typing experience for your custom keyboard.
Gather Essential Tools and Materials for Stabilizer Mods
To modify your stabilizers effectively, you’ll need a few essential tools like Phillips screwdrivers, keycap pullers, and switch pullers for hot-swap setups. Precise application of lubricants such as Krytox 205g0 and dielectric grease requires fine paintbrushes, while cutting tools like flush cutters help trim stabilizer stems safely. Don’t forget tweezers, scissors, and adhesive materials for padding and adjustments to guarantee smooth, quiet stabilizer performance. Additionally, inspecting material quality, such as nylon housings and stainless steel wires, ensures durability and optimal sound dampening during modding.
Necessary Screwdrivers and Pliers
Having the right tools is essential when modding stabilizers on your handwired keyboard. A Phillips screwdriver (#0 or #00) is crucial for removing keyboard shells and securing PCB-mounted or screw-in stabilizers.
Needle-nose pliers or tweezers help in wire balancing, gripping small parts, and carefully placing band-aid fabric pads inside stabilizer stems. Small angle flush cutters or sharp nail clippers are perfect for trimming stabilizer stem feet without damaging the plastic. These tools allow precise cuts and adjustments, ensuring stable and smooth stabilizer operation.
Using clip-in stabilizers also simplifies removal and installation, requiring minimal tool effort. Completing these tasks efficiently depends on having these essential screwdrivers and pliers in your toolkit, making your stabilizer modding process smoother, safer, and more precise. Additionally, employing material durability and construction techniques can help preserve your stabilizers and prevent damage during modding.
Lubricants and Applicators
Gathering the right lubricants and applicators is essential for achieving smooth, noise-free stabilizers during your keyboard modding process. Use Krytox 205g0 grease on plastic-to-plastic parts, applying it carefully with a fine paintbrush (size 0–2) to guarantee neat coverage. For stabilizer wires, apply Permatex or Loctite dielectric grease to reduce rattling and protect metal-plastic contact points, but avoid excess that can cause sluggish keys. Ensuring compatibility with various materials, such as plastics and metals, is crucial to prevent damage and maintain performance Material Compatibility. Essential tools include tweezers for handling small components and a fine paintbrush for precise application. It’s best to lubricate before reassembly, targeting friction points on the housing, stems, and wire contact areas. Keep the application minimal to prevent stickiness, and focus on coating all relevant parts for peak stabilization.
Cutting and Padding Tools
Using the right cutting and padding tools can make stabilizer mods more precise and manageable. A small angle cutter allows you to trim the stabilizer stem feet carefully, minimizing plastic debris and preventing damage to the stabilizer housing.
Scissors with sharp, fine blades are essential for trimming bandage strips to fit perfectly between stabilizer mounting holes, ensuring a snug fit without excess material. For padding, fabric-backed adhesive bandages or thin cloth tape with rounded ends work best for the Band-Aid mod, providing cushioning beneath stabilizers.
Needle-nose pliers wrapped with tape help hold stabilizer wires securely during adjustments without scratching the metal. Finally, a fine paintbrush should be used to apply lubricants like Krytox 205g0 and dielectric grease precisely, especially around the stabilizer stem and housing corners. Understanding wire wobble and noise can help you choose the right components and techniques for quieter, more stable stabilizers.
Disassemble and Prepare Your Handwired Keyboard for Modding
Before you start, unplug your keyboard and remove all power sources to stay safe.
Use a keycap puller to carefully remove the larger keycaps, keeping track of their positions, then unscrew the case with a Phillips screwdriver and set aside all screws and small parts.
Gently detach the PCB and plate, taking care not to damage any wiring, and carefully remove the stabilizers, ensuring they’re organized for easy reassembly.
Verifying stabilizer compatibility ensures that the modding process proceeds smoothly and reduces the risk of fitting issues during reinstallation.
Remove Keycaps Carefully
Careful removal of keycaps is essential to avoid damaging delicate stabilizer wires and stems, especially on clip-in stabilizers. Use a proper keycap puller to gently remove large stabilizer keys first, noting and organizing their positions for easy reinstallation.
Before starting, fully unplug your keyboard and remove any batteries or power sources for safety. Work on a clean, flat surface to keep keycaps and stabilizer parts separate and protected from loss or damage.
Avoid applying excessive force; gently wiggle the keycaps free to prevent the wire hitting other components or causing stress on fragile stabilizer wires. Document or photograph the layout and stabilizer placements to guarantee accurate reassembly after you complete your modding.
Additionally, understanding the compatibility considerations can help prevent issues during reassembly and ensure your stabilizers function smoothly after the mod. Taking these precautions helps preserve the stabilizers and maintains your keyboard’s functionality.
Unscrew and Detach Components
Start by unplugging your keyboard and removing any connected USB cables or batteries to guarantee safety.
Use a Phillips screwdriver (#0 or #00) to carefully unscrew the bottom shell without stripping the screws. Keep track of all screws and small pieces separately to prevent losing essential components.
Once the case is open, gently remove the stabilizers by carefully detaching them from the plate and PCB—this involves removing the stabilizer stems and unscrewing their mounting points if applicable. Removing the stabilizers carefully guarantees they’re ready for lubrication, clipping, or other modifications later.
Handle all parts gently to avoid damage. Organizing these components now makes reassembly easier and assures you won’t accidentally forget any pieces during reassembly. Proper component organization and handling are crucial to preserving the integrity of your keyboard during modding.
Organize and Identify Parts
Organizing and identifying parts is an essential step when preparing your handwired keyboard for modding. Start by carefully removing all large keycaps, noting each key’s position for easy reassembly.
Use tools like a Phillips screwdriver, keycap puller, and switch puller to open the case and access stabilizers. When disassembling stabilizers, first remove the metal wire gently through twisting and unclipping.
Next, detach the stabilizer housings and stabilizer feet, keeping parts organized by key. Label each component—wires, stems, housings, and mounting plates—to prevent confusion during lubrication, clipping, and reinstallation.
Inspect stabilizer wires for balance, and check PCB or plate mounting points for debris or damage. Properly organized parts make the modding process more efficient and guarantee stabilizers are easy to install later. Being aware of stabilizer compatibility and how different designs fit your keyboard is crucial for smooth modding.
Safely Clip Stabilizer Feet to Reduce Rattle
Clipping the outward-facing stabilizer feet can greatly reduce rattling and improve keypress smoothness, but it’s important to do so safely. Use a small angle cutter to carefully clip the two protruding stabilizer feet on the stem base, leaving the other two intact for stability.
Material Compatibility is crucial when performing this mod to ensure the plastic doesn’t crack or weaken prematurely. Clip slowly and precisely to avoid plastic shards flying, as small sharp objects can become airborne.
Doing this stabilizer mod reduces the stabilizer stem’s interference with the housing, considerably decreasing rattling and making key presses smoother. After clipping, make sure you fully reinsert the stem into the housing before reinstalling the wire; this guarantees proper rotation and function.
This simple yet effective mod is best performed on Cherry-style stabilizers before lubrication for maximum noise reduction and better feel.
Lubricate Stabilizers for Smoother, Quieter Action

Lubricating stabilizers after clipping helps guarantee they move smoothly and quietly when you press keys. Applying Krytox 205g0 on stabilizer housings and stems reduces plastic-on-plastic friction, making the keyboard feel more refined. Use Permatex dielectric grease sparingly on stabilizer wires at contact points to prevent rattling and metallic noise. Also, lubricate inside the housing’s bottom hole and wire bend areas to minimize wire movement and noise. Use a small paintbrush for precise application, avoiding excess that can cause a sticky or mushy sensation. Proper lubrication guarantees your stabilizers operate quietly and stably, enhancing the overall keyboard feel.
| Stabilizer Part | Lubricant Type | Purpose |
|---|---|---|
| Housing | Krytox 205g0 | Smoother movement |
| Stem | Krytox 205g0 | Reduced friction |
| Wire | Permatex grease | Less rattle, metallic noise |
| Bottom hole | Krytox 205g0 | Minimize wire movement |
| Bend areas | Krytox 205g0 | Quieter, stable action |
Use the Band-Aid Mod to Limit Noise and Wobble
The Band-Aid Mod is an effective way to reduce noise and wobble in your stabilizers by providing a soft cushion between the stabilizer housing and the PCB.
You start by cutting a fabric-backed adhesive strip to match the distance between the stabilizer mounting holes on the PCB. Place the strip inside the stabilizer housing, ensuring it lines up correctly for a snug fit. This cushion absorbs impacts from the housing, limiting wobble and decreasing noise during key presses.
Avoid applying lubricant directly onto the fabric strip, as it can cause mushy key action, though some grease migrating onto the strip isn’t problematic. The Band-Aid Mod enhances stabilizer stability without interfering with movement, especially effective with screw-in or clip-in stabilizers, but less certain with plate-mounted options.
Troubleshoot Common Stabilizer Problems and Final Tests

When stabilizers don’t perform as they should, pinpointing the problem starts with simple tests. Remove the wire and perform a tap test on a flat glass surface to listen for bouncing or noise. If rattling persists, check if the end of the wire is bent or unbalanced. Use the table below to identify issues and solutions:
| Problem | Cause | Solution |
|---|---|---|
| Rattling or noise | Unbalanced wire, excessive lubricant | Straighten wire, apply much lubricant at contact points |
| Sticky keypresses | Over-lubrication | Clean excess lubricant, reapply thinner layer |
| Mushy bottom-out feel | Improperly seated wires, padding | Re-seat wires, adjust padding |
| Inconsistent activation | Loose housing, end of wire, connection | Tighten housing, check wire connection |
| Final key test | Rattling, sluggish keys | Confirm proper seating, reassemble, test with key tester software |
Frequently Asked Questions
How Do I Identify Worn or Damaged Stabilizers Before Modding?
You can identify worn or damaged stabilizers by inspecting them for loose parts, excessive wobbling, or missing clips. Test their smoothness and listen for rattling sounds when pressing keys, ensuring they function properly before modding.
What Are Common Mistakes to Avoid When Adjusting Wire Bends?
When adjusting wire bends, avoid forcing them too much, which can cause breakage or misalignment. Make subtle bends and test frequently, ensuring the stabilizers move smoothly without catching or feeling stiff. Patience prevents potential damage.
Can I Mix Different Stabilizer Types on the Same Keyboard?
Yes, you can mix different stabilizer types on the same keyboard. Just make sure they fit properly and work harmoniously, testing each one to avoid sound or feel inconsistencies that might affect your typing experience.
How Often Should I Re-Lubricate Stabilizers After Modding?
You should re-lubricate your stabilizers every 6 to 12 months, depending on usage and environment. Regular maintenance keeps them smooth and quiet, so monitor their performance and re-apply lube when you notice increased noise or stiffness.
What Signs Indicate My Stabilizers Need Further Tuning or Replacement?
You’ll notice rattling, wobbly movement, or inconsistent keypresses, signaling your stabilizers need further tuning or replacement. If lubing doesn’t fix noise or instability, consider adjusting or swapping them for smoother, more stable keystrokes.



