

Cherry-style stabilizers are PCB-mounted, offering better stability, less wobble, and quieter operation compared to plate-mounted stabilizers, which clip into the plate and are easier to install without soldering. Plate mounts are more prone to wobbling and noise but are popular for quick swaps and easy maintenance. Your choice depends on whether you prioritize stability and noise reduction or convenience—exploring each type further reveals the best fit for your keyboard setup.
Understanding the Differences Between Stabilizer Types
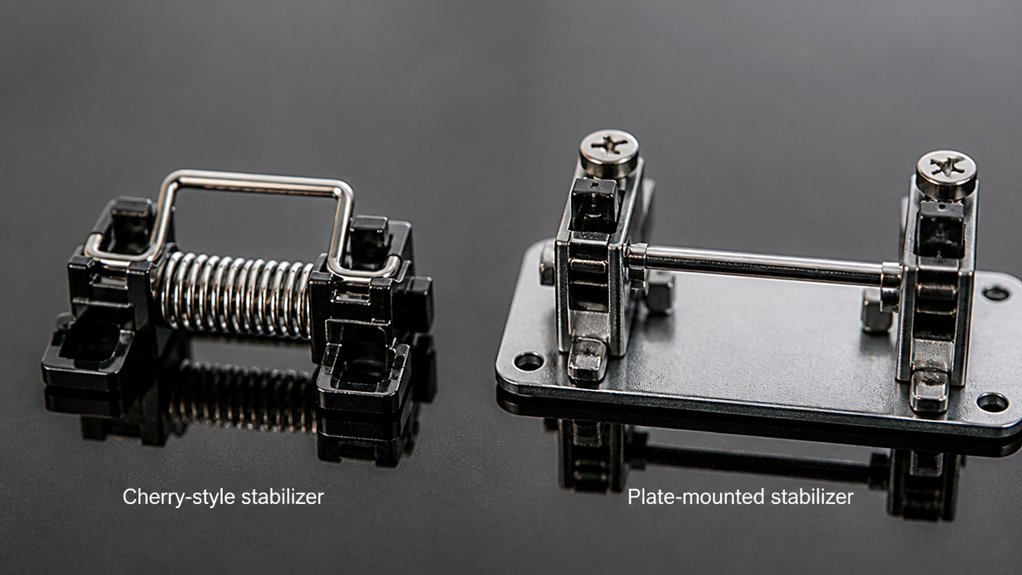
Understanding the differences between stabilizer types is essential when choosing or customizing your mechanical keyboard. Stabilizers, especially Cherry-style ones, come in two main types: plate mount and PCB mount.
Plate-mounted stabilizers clip directly into cutouts on the keyboard’s metal or plastic plate, making them easy to remove and maintain without soldering. They’re common in mass-produced or older keyboards.
In contrast, PCB-mounted stabilizers attach directly to the printed circuit board using clips, screws, or snaps, providing a firmer fit that reduces wobbling. This makes them popular in custom builds for smoother, quieter typing.
Your choice between the two affects not only installation and maintenance but also influences the overall typing feel, noise level, and stability of your keyboard. Stabilizer materials can also impact noise reduction and durability, further influencing your decision.
How Do Plate-Mount Stabilizers Attach?
Plate-mount stabilizers attach by pressing their housings into cutouts on the keyboard’s plate, securing them directly in place. The housings have a split design with bent legs that clip onto the plate to reduce wobble and keep everything flush. A pre-clipped V3 stems design facilitates easier installation and minimizes the need for additional lubrication. Because installation is tool-free, swapping stabilizers is simple, but you’ll need to verify compatibility with your plate’s cutouts.
Mounting Method Mechanism
Plate-mount stabilizers attach by pressing their split housing directly into the designated cutouts in the keyboard’s mounting plate. This method secures the stabilizer without screws or PCB holes.
When installing, you need to guarantee proper alignment to avoid wobbling, rattling, or noise during typing.
Additionally, the material quality of the stabilizer housing and wires significantly impacts durability and noise reduction.
Key points include:
- The stabilizer housing’s bottom fits behind the plate, while the top rests above it.
- The stabilizer wire clips into the housing and stems securely.
- Properly fitted mounting plate guarantees the stabilizer stays in place during use.
- Removal or replacement is simple—just unclip the stabilizer from the plate without tools.
This mounting method offers a firm, yet accessible, way to secure plate-mounted stabilizers effectively.
Plate Compatibility Requirements
To securely attach stabilizers, the key factor is guaranteeing the keyboard plate has precisely cut holes that match the stabilizer housings’ dimensions and shape. Plate-mount stabilizers depend on these cutouts being accurate, as they press-fit directly into the keyboard plate.
Proper plate compatibility means the holes are properly aligned and sized to prevent wobbling or looseness, which guarantees stability during typing. The stabilizer housing has a split design, with the top resting above the plate surface and the bottom below.
It’s also important to clip bent bottom legs of the stabilizer stems so they lie flat against the PCB beneath the plate. Correct plate material and cutout precision work together to reduce noise and keep the stabilizer wire stabilized during key presses. Ensuring high-quality plate material also plays a crucial role in minimizing vibration and noise during use.
Common Installation Challenges
Attaching stabilizers to a keyboard plate involves carefully pressing their split housings into precisely cut slots, but this process can present several challenges.
One common issue is key wobble caused by the stabilizer housings not fitting snugly, which can lead to rattling noises. Another problem is housings popping out if switch stems or keycaps are mishandled, especially since these stabilize only through clip-mounted stems. Additionally, improper sizing of plate cutouts can make it difficult to snap in stabilizer housings firmly. You may also encounter looseness or excessive tightness that affects stability.
To prevent these issues, make sure that the plate cutouts are smooth and precisely sized, and clip bent legs on the stabilizer stems flat against the PCB for better stability. Proper stabilization depends on compatibility with stabilizer types, ensuring a secure fit and smoother modding experience.
How Are PCB-Mount Stabilizers Installed and Stabilize Keys?
Are you wondering how PCB-mount stabilizers are installed and how they keep your keys steady? PCB mounted stabilizers fit into large holes in the PCB, with rear hooks slotting in securely. The front housing ends press into smaller holes, locking the stabilizer in place. There are two main types: screw-in stabilizers, which use screws and washers for added security, and clip-in stabilizers, which snap into place using retention tabs. Screw-in stabilizers offer the most stability, preventing wobble and rattle, but require more installation effort. Clip-in stabilizers are easier to install, simply snapping into place. Both types help reduce key wobble and guarantee your keys stay steady during typing, providing better overall stability and a more comfortable experience. For added stability, using lubricants such as synthetic greases can further reduce noise and wobble in stabilizers.
Installation Methods: Plug-and-Play or Soldering?

Have you ever wondered why some stabilizers are easier to install than others? It largely depends on whether they’re plate-mounted or PCB-mounted.
- Plate-mounted stabilizers are plug-and-play—you clip them into cutouts on the keyboard plate, no screws or soldering needed.
- PCB-mounted stabilizers, especially screw-in types, require fastening with screws through PCB holes and usually need soldering for secure attachment, making installation more complex.
- On hot-swappable keyboards, plate-mounted stabilizers can be easily swapped or serviced without desoldering.
- PCB-mounted stabilizers on soldered PCBs demand full desoldering for removal or replacement, increasing labor and time.
- When considering hot-swap socket compatibility for switch replacements, the installation process can vary significantly depending on whether the stabilizer setup is plate-mounted or PCB-mounted, influencing ease of maintenance.
Which Stabilizer Offers Better Wobble Resistance?
If wobble resistance is a priority for your build, you’ll notice that PCB-mounted stabilizers, especially screw-in types, stay more secure and reduce movement. In contrast, plate-mounted stabilizers tend to wobble and rattle more because they clip directly onto the plate, which isn’t as firm. For better structural stability, PCB-mounted options are generally the stronger choice. Additionally, the mounting style significantly impacts how stable the stabilizers feel during typing.
Secure Mounting Methods
When it comes to wobble resistance, PCB-mounted stabilizers generally outperform plate-mounted options because they attach more securely to the PCB itself. With screw mounts, PCB-mounted stabilizers lock firmly in place, reducing lateral movement.
In contrast, plate-mounted stabilizers rely solely on clips into the plate, which can loosen over time. Key points include:
- PCB-mounted stabilizers, especially screw-in types, attach directly to the PCB, offering superior stability.
- Plate-mounted stabilizers depend on clip-in mounts, which are prone to wobble and loosening.
- The screw mount guarantees the stabilizer housing and wire stay securely in place, minimizing keycap rattle.
- The stability of PCB-mounted stabilizers isn’t affected by plate material or quality, unlike plate-mounted options.
- Additionally, the material quality and construction of stabilizers play a crucial role in their overall wobble resistance and sound stability.
Structural Stability Integrity
The way stabilizers attach to a keyboard plays a significant role in their wobble resistance. PCB-mounted stabilizers, especially screw-in types, provide a firmer, more robust connection to the switch and PCB, greatly reducing wobble and side-to-side movement. In contrast, plate-mounted stabilizers press into the plate cutouts without screws, making them more prone to loosening over time and increasing wobble. This instability often results in rattling and pinging noises, which may require additional fixes. The material and precision of the plate influence wobble, but direct PCB attachment typically offers better alignment. For enthusiasts seeking superior stability, screw-in PCB-mounted stabilizers are the clear choice, providing increased wobble resistance and consistent typing feel compared to less secure plate-mounted options. Additionally, the material density of the stabilizer components can impact overall stability and sound, further affecting wobble resistance.
How Do Stabilizer Design and Materials Affect Noise and Rattling?

How do stabilizer design and materials influence noise and rattling? The mounting method and materials greatly impact sound and wobble.
- Plate-mounted stabilizers often rattle and ping due to their clip-only mounting and contact between the wire and metal plate during key presses.
- The split design of plate-mounted stabilizers, with parts above and below the plate, can cause wobbling unless the stabilizer stems are clipped flat for stability.
- Applying thin medical tape on the edges of plate-mounted stabilizers helps dampen wire-housing contact, reducing noise.
- PCB-mounted stabilizers, especially screw-in types, lessen noise and wobble with a more secure, screw-secured housing connection to the PCB. The choice of plate material also influences noise levels.
Maintaining and Customizing Stabilizers: Easy Tips
To keep your stabilizers in top shape, start by lubricating wires, stems, and housings with a light coating of Krytox 205g0 to cut down on noise.
If you notice wobbling or rattling, applying thin tape to the housing edges or adjusting the clip legs can make a big difference.
Regularly check and realign parts, especially after removing keycaps, to guarantee smooth, consistent performance.
Lubrication Techniques
Ever wondered how to keep your stabilizers performing smoothly and quietly? Proper lubrication of Cherry-style and plate-mounted stabilizers with Krytox 205g0 or similar lubricants can dramatically reduce friction, rattle, and ping sounds, making your custom mechanical keyboard feel and sound better.
To get the finest results:
- Apply lubricant sparingly on stabilizer wires, contact points, and stem legs.
- For plate-mounted stabilizers, place thin medical tape on housing edges before lubing to dampen noise.
- Carefully disassemble Cherry MX stabilizers, ensuring precise lube application on wire bends and inside housings.
- Regularly clean and relube stabilizers every few months to maintain peak stability, smooth travel, and consistent sound.
These techniques enhance the performance of your mechanical switches and keep your custom mechanical keyboard feeling and sounding its best.
Troubleshooting Common Issues
If your stabilizers are still frustrating you with rattling, wobbling, or noise after lubrication, there are straightforward fixes to improve their performance. For plate-mounted stabilizers, try applying thin strips of medical tape on housing edges to reduce wobbling. Confirm the stabilizer wire is clipped and aligned properly. To address pinging sounds, gently raise or file the plate around cutouts. Proper lubrication with Krytox 205g0 on stems and contact points minimizes noise and improves smoothness. If stabilizers feel loose or pop out, check and adjust plate cutout dimensions—filing edges or using shims can help. Regular maintenance, like repositioning wires and cleaning debris, guarantees better stability.
| Issue | Solution |
|---|---|
| Wobbling | Add medical tape and check alignment |
| Noise (pinging) | File around stabilizer cutouts |
| Loose stabilizers | Adjust cutout size or use shims |
| Popping out stabilizers | Verify clipping and fit |
| Debris buildup | Clean stabilizer housings regularly |
Are Stabilizer Choices Different for DIY or Hot-Swap Builds?
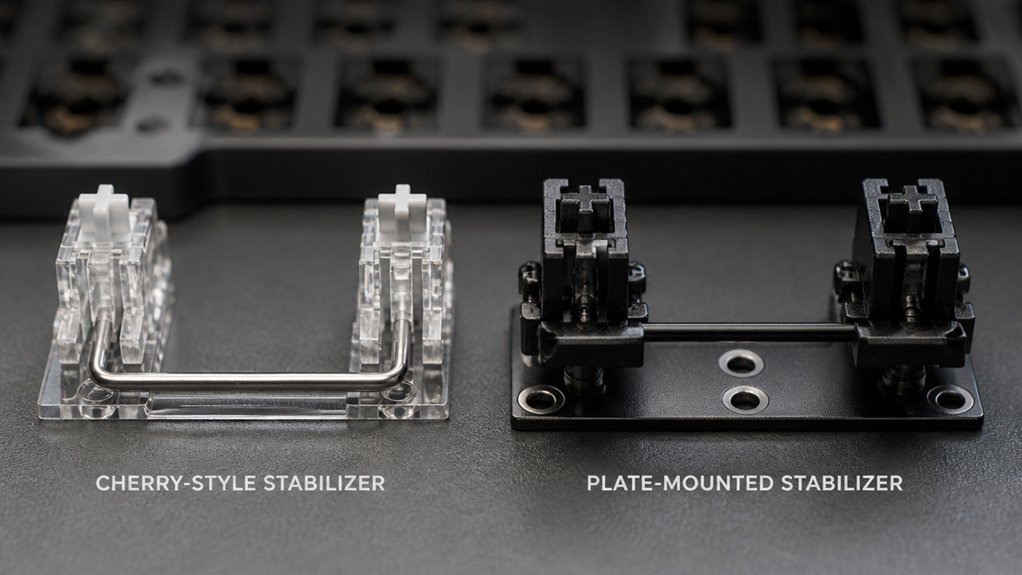
Could your choice of stabilizers differ depending on whether you’re building a DIY or hot-swap keyboard? Yes, your selection often hinges on build type.
For example:
- PCB-mount stabilizers are favored in DIY builds with soldered connections for their stability and reduced wobble.
- Plate-mount stabilizers are more common in prebuilt or simpler DIY setups with plate-mounted switches, allowing easier installation.
- Hot-swap PCBs make removing and tuning both stabilizer types easier, but PCB-mount stabilizers still demand precise alignment.
- Replacing or tuning PCB-mount stabilizers usually requires desoldering, whereas plate-mount stabilizers can be swapped more conveniently without desoldering switches.
Your choice depends on your preference for stability, ease of maintenance, and build complexity.
Tips to Align and Tune Plate-Mount Stabilizers for Best Performance
Proper alignment and tuning of plate-mount stabilizers are key to achieving ideal key feel and reducing rattling or wobbling. Guarantee the stabilizer housings fully snap into the plate cutouts and sit flush to prevent wobble. Clip the stabilizer stems’ bent bottom legs flat against the PCB to improve stability and lessen key wobble. Lubricate the wire and housing contact points evenly with Krytox 205g0 or similar to eliminate scratchy sounds and guarantee smooth keypresses. To further reduce noise, apply thin medical tape strips around the housing edges under the plate, stabilizing movement. Finally, straighten and properly align stabilizer wires before assembly. These simple steps help keyboard enthusiasts optimize stabilizer performance, minimize noise, and enhance overall typing experience.
| Step | Purpose |
|---|---|
| Fully snap stabilizers into plate | Prevent wobble and rattling |
| Clip stems’ bottom legs flat | Improve stability and reduce wobble |
| Lubricate contact points | Eliminate scratchy sounds |
| Add medical tape around housings | Reduce noise and stabilize housing movement |
How to Decide Between Cherry-Style and Plate-Mount Stabilizers

Choosing between Cherry-style and plate-mount stabilizers hinges on your priorities for stability, maintenance, and ease of installation.
If you want more stability and quieter operation, a screw-in PCB-mounted stabilizer might be best, offering a firmer mount and less wobble.
On the other hand, if you prioritize simple maintenance and quick keycap swaps, a plate-mounted stabilizer is easier to clip in and out.
Consider these factors:
- Mounting style: PCB-mounted stabilizers provide a more secure fit, whereas plate-mounted ones clip directly into the plate.
- Stability: PCB-mounted stabilizers offer fewer wobbles and rattles.
- Ease of installation: Plate-mounted stabilizers are simpler to install and remove without tools.
- Maintenance: Plate-mounted stabilizers facilitate faster keycap removal for updates or cleaning.
Your choice depends on whether stability or convenience matters most.
Pros and Cons of Stabilizer Types for Your Mechanical Keyboard Goals
When selecting stabilizers for your mechanical keyboard, understanding their pros and cons can help align your choice with your goals—whether that’s maximizing stability, simplifying maintenance, or balancing both.
Cherry-style stabilizers, typically PCB-mounted, offer superior stability and reduced wobble, making them ideal for high-end custom builds and improving your typing experience. They provide firm mounting but require more installation effort and proper PCB compatibility.
Plate-mounted stabilizers clip into the metal plate, allowing easier maintenance and quick swaps without desoldering, which suits casual users. However, they can produce more wobble and noise like rattling or pinging, though lubrication and clipping can help.
Your decision ultimately depends on whether you prioritize stability and customization or convenience and affordability for your typing goals.
Frequently Asked Questions
Are Screw-In Stabilizers Better Than Plate-Mounted?
Screw-in stabilizers are generally better if you want a more stable, quieter, and durable typing experience, especially for custom builds. However, if you prioritize quick installation and easy maintenance, plate-mounted stabilizers can still work well for you.
What Are the Different Types of Stabilizers Keyboard?
You can choose between plate-mounted stabilizers, which clip into the keyboard’s plate, and PCB-mounted stabilizers, including screw-in and clip-in types, that attach directly to the PCB for better stability and customization options.
What Is the Difference Between PCB Mount and Plate Mount Keyboard?
You’ll notice PCB mount keyboards have switches soldered directly onto the PCB, making modifications easier, whereas plate mount keyboards attach switches to a metal plate for added stability and durability, especially on larger keyboards.
What Are the Best Keyboard Stabilizers?
The best stabilizers depend on your needs, but screw-in PCB-mount stabilizers offer better stability and less wobble for high-end builds, while plate-mounted stabilizers are easier to install and maintain for casual use. Proper lubrication improves performance.



