

To effectively lubricate your keyboard stabilizers, start by carefully disassembling and cleaning all parts with appropriate solvents. Choose the right lubricants—thin oils for housings and thicker greases for wires—and apply thin, even layers with small brushes. Focus on areas like inside the housing, stem slots, and wire bends, wrapping tape around wire ends for noise reduction. Reassemble tightly but gently, then test stability and sound. For more tips to perfect your stabilizer mod, keep exploring these techniques.
Why Proper Lubrication Improves Stabilizer Sound and Feel
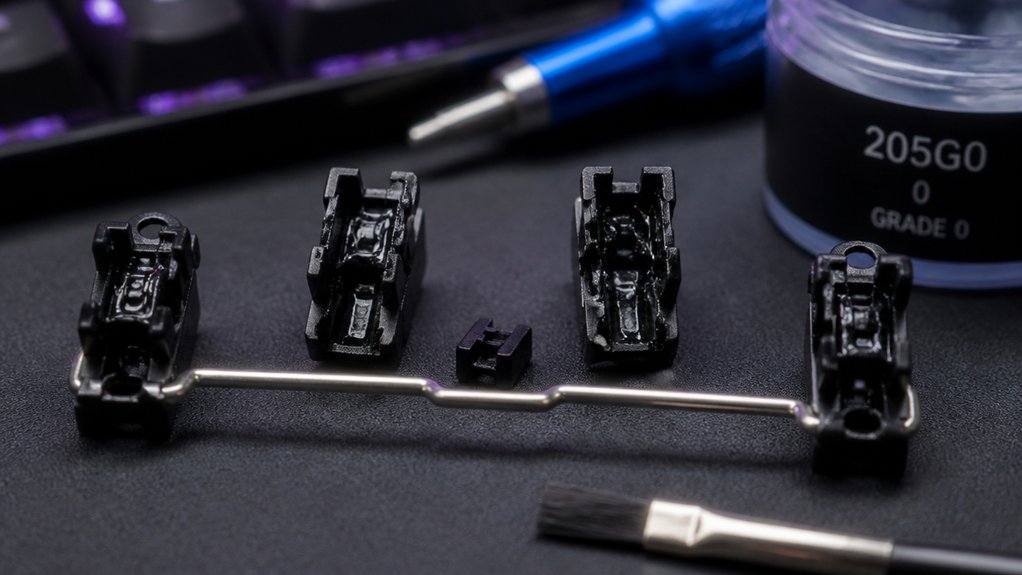
Proper lubrication of keyboard stabilizers is essential because it directly impacts both sound and feel. When you apply a suitable lubricant, like Krytox™ XHT-BDZ or 205g0, it reduces metal-on-plastic friction between the stabilizer wire and the housing. This smoothens key travel and minimizes rattle and ticking sounds.
Lubricating inside the stem where the wire rests guarantees a consistent and quieter typing experience. Well-lubricated stabilizers prevent uneven noise caused by dry contacts, giving you a more uniform sound profile. Additionally, using high-quality lubricants like Lucas Oil or SIL-Glyde ensures effective \surface protection\ and long-lasting performance.
However, over-lubing can make keystrokes feel mushy and sluggish. By finding the right amount of lubricant, you maximize tactile responsiveness and acoustic clarity, transforming harsh plastic-on-plastic impacts into softer, quieter keystrokes. Proper lubrication truly elevates your keyboard’s sound and feel.
How to Disassemble Your Stabilizers Correctly
Start by carefully removing your keycaps using the right tools to avoid damage.
Next, identify and separate the stabilizer components, keeping track of their orientation for reassembly.
Use gentle, appropriate tools like tweezers or screwdrivers to remove and handle the parts without bending or breaking anything.
Ensure you pay attention to mounting style compatibility to prevent improper reinstallation later.
Remove Keycaps Carefully
When removing keycaps from your keyboard, you’ll want to do so carefully to avoid damaging the stabilizers. Use a keycap puller to gently lift each keycap straight off, applying even pressure without twisting or bending.
If your mechanical keyboard has screw-in stabilizers, remove any mounting screws with a Phillips head screwdriver before attempting to lift the stabilizer components from the PCB.
For stabilizers with wires, carefully unclip and separate the housing and stems using tweezers or your fingers, ensuring you don’t bend or damage the wires. Keep all parts organized and note their orientation for reassembly.
Avoid forceful pulls at any stage, as these can stretch wires or break plastic clips, jeopardizing the stability and integrity of your stabilizers. Additionally, material quality plays a crucial role in ensuring your stabilizers remain durable and functional during disassembly and reinstallation.
Identify Stabilizer Parts
Have you ever wondered what’s inside a stabilizer before lubricating it? To disassemble correctly, you need to identify its parts. First, remove keycaps and switches using pullers.
Once exposed, carefully separate the stabilizer components, including housings, stems, wires, screws, and washers. Be gentle with the stabilizer wires—they bend easily, so handle them with tweezers or fingers to avoid kinks or damage. The stabilizer stem fits into the housing, guaranteeing smooth key operation.
For clip-in stabilizers, unlatch the legs carefully to avoid PCB damage, especially on thinner boards. Keep track of screw and washer placement during disassembly. Recognizing these parts, especially high-quality materials, assures thorough lubrication, prevents missed contact points, and facilitates easier reassembly.
Use Proper Tools
Using the right tools makes disassembling stabilizers safer and more efficient. Start by removing keycaps and switches with a keycap puller and switch puller to prevent damage.
To separate stabilizer components like housings, stems, wires, screws, and washers, handle them carefully with your fingers or tweezers for precision. Keep track of small parts by working over a clean surface to prevent loss.
If you’re dealing with screw-in stabilizers, use a Phillips head screwdriver or head screwdriver to remove the stabilizer screws—avoid stripping them by applying gentle pressure. Be cautious not to force stabilizer legs or wires, as this can cause bending or breakage.
Using proper tools guarantees safe disassembly, making your material durability process smoother and more effective.
Choosing the Best Lubricants for Stabilizer Parts
When selecting lubricants, you need to take into account their thickness and consistency to guarantee smooth operation without slowing down your keys.
It’s important to match the lubricant type to the specific stabilizer components, like using thin oils for housings and thicker greases for wires. Keeping compatibility in mind helps prevent damage and achieves ideal noise reduction and feel.
Additionally, considering the thermal stability of the lubricant ensures it maintains performance even at high operating temperatures.
Lubricant Consistency and Thickness
Choosing the right lubricant thickness is essential for achieving ideal stabilizer performance. A thin, even layer guarantees smooth key presses without making the stabilizers feel sluggish.
For plastic housings and stems, use Krytox™ 205g0, which offers a consistent, lightweight feel. On stabilizer wires and clips, thicker lubricants like dielectric grease or Krytox™ XHT-BDZ effectively reduce rattling and ticking sounds.
Be careful not to over-lubricate, as excess grease can cause mushiness, diminishing responsiveness and feel. To tailor the sound and smoothness, you can mix 205g0 with slightly thicker variants like 206 or Tribosys 3204.
Remember: the goal is a thin, uniform coating that balances sound dampening with fast, crisp key action. Proper application prevents residue buildup that could interfere with switch operation over time.
Compatibility With Stabilizer Components
Selecting the appropriate lubricant for your stabilizer components depends on understanding the material properties and how each lubricant interacts with different parts.
For tuned stabilizers, using Krytox™ 205g0 on plastic housing and stem walls guarantees a thin, even coating that reduces scratchiness without adding sluggishness. Apply Krytox™ XHT-BDZ or Loctite dielectric grease on stabilizer wires—especially on ends and clip-in areas—to cut down rattle and ticking noise. Avoid overapplying dielectric grease past wire bends, as excess buildup can hinder movement and alter sound consistency.
When working with PCB mount stabilizers, adding a light layer of 205g0 inside stem slots smooths contact points and refines the sound profile after assembly. Be cautious with thicker greases like Permatex, as they may cause mushy keyfeel on plastic components. Additionally, using high-quality materials such as premium polymer nylon housings and stainless steel wires with gold coating can enhance the durability and sound dampening qualities of your stabilizers, leading to a more rattle-free typing experience.
Applying Thin, Even Layers of Lube for Smooth Operation

To achieve smooth, consistent key presses, it’s essential to apply lubricant in thin, even layers. Use a small brush or a fine lube pen to carefully coat all sides of the stabilizer stems and inside housing walls, ensuring smooth contact surfaces.
Take your time and focus on applying a light coat to prevent mushy keys and uneven feel.
- Keep the layer minimal but thorough to avoid over-lubrication.
- Concentrate on the inside walls of the stem where the stabilizer wire contacts.
- Use a gentle, steady hand to distribute the lube evenly.
- For wires, apply Krytox™ XHT-BDZ in an “L” shape to reduce rattle without bulk.
- Proper lubrication also involves considering the material quality, which influences how the lube interacts with the stabilizers, ensuring long-lasting smoothness.
Following these steps will help you achieve the best results and a balanced, smooth stabilizer performance.
How to Lubricate Stabilizer Wires at Bends and Clips
To get the best results, focus on applying lubricant carefully at the wire bends and clips, using a precise amount to prevent buildup.
Proper tape application helps keep the lubricant exactly where you want it while avoiding excess.
Be sure to use thin, even coats to maintain smooth movement without compromising the tactile feel of your stabilizers.
Proper Tape Application Techniques
Wondering how to effectively apply tape to stabilizer wires at bends and clips? Proper tape application is make or break for a tuned stabilizer, reducing tick noise and unwanted play.
First, wrap PTFE tape around the wire ends and clip-in areas, forming a clean “L” shape. This prevents metal-on-plastic contact and minimizes friction.
Use these techniques:
- Keep tape thickness minimal to avoid resistance at bends.
- Cover only necessary areas, guaranteeing full contact without excess.
- Maintain even tape application for consistent silent operation.
- Always tape first, then lubricate, maintaining proper order.
Applying tape carefully at bends and clips guarantees smooth motion. It sets the foundation for an ideal, noise-free stabilizer, enhancing overall keyboard feel. Proper material selection and wire design, as recommended in stabilizer material quality, are crucial for durability and effectiveness.
Mastering this step guarantees your stabilizers stay well-tuned and silent.
Applying Lubricant Precisely
Applying lubricant precisely guarantees your stabilizers operate smoothly and quietly, especially at bends and clips where friction is most likely to cause noise or unwanted play.
Make sure to generously apply Krytox™ XHT-BDZ or Loctite dielectric grease in an “L” shape on the wire ends and where the wire clips into the stem. Focus on the bends, but avoid extending dielectric grease past the first bend, as excess can lead to a mushy feel.
Use a fine brush or lube pen to apply a thin, even coat of Krytox™ 205g0 inside the wire slot after assembly if you want extra smoothness or tick reduction.
Be sure the wire is fully seated and clipped into place before applying final lubrication for consistent and stable stabilizer operation.
Avoiding Excess Lube Buildup
Proper lubrication involves applying just enough to reduce friction without creating excess that can hinder key travel. To avoid excess lube buildup, focus on small amounts at critical contact points, since a little goes a long way.
Carefully lubricate the stabilizer wire ends and clip-in areas in an “L” shape, avoiding over-application that causes sluggishness. Use a fine brush or lube pen to precisely coat the wire bends and clips; this guarantees minimal but consistent coverage without pooling. Refrain from lubing the entire wire length, as excess can cause rattle or mushy feeling.
After assembly, test the keys and add a small amount of Krytox™ 205g0 inside the wire slot only if ticking persists, preventing over-saturation. This targeted approach maintains smooth key travel and reduces excess buildup.
Techniques for Lubricating Stems and Housing Inside and Out
To effectively lubricate your stabilizer stems and housings, start by applying a thin, even layer of Krytox™ 205g0 to all contact points. Focus on the inside walls of the housings and the stems, especially where the wire contacts, to reduce friction and ticking. Use a small brush or lube pen for precise application. For screw-in stabilizers, make sure you lubricate the threads and the mating surfaces for smoother assembly.
| Area to Lubricate | Method |
|---|---|
| Inside walls of housings | Light coating with Krytox™ 205g0 |
| Stabilizer stems | Cover all sides evenly |
| Wire contact points | Focus on reducing friction |
| Screw-in stabilizers | Lubricate threads during assembly |
Proper application results in quieter, smoother stabilizers with consistent movement.
Using Tape to Minimize Ticking Noise in Stabilizers

Have you noticed the ticking noise when you type? Using tape, like PTFE or Teflon, can help reduce this in Mode Stabilizers and Cherry clip-ins.
Wrap a thin layer of tape around the wire ends before lubricating to create a buffer that minimizes metal-plastic contact. Always apply tape prior to lubrication, ensuring it adheres well and enhances sound dampening. Be cautious not to over-tape; too thick can cause sluggish keypresses.
For best results, combine tape application with a light coat of Krytox 205g0 or dielectric grease on the stems and wire channel.
Consider these tips:
- Keep tape layers thin and even
- Use high-quality tape for durability
- Check for smooth key travel after taping
- Reapply if ticking persists
Reassembling Stabilizers for a Secure, Flush Fit
Ensuring your stabilizers sit securely and flush against the PCB or plate is essential for consistent key performance and reduced noise. For a sturdy, plate-mounted keyboard build, check that stabilizer wires are fully clipped into the housing slots to prevent movement or rattling. Gently press down on the stabilizers to confirm they sit flush, and adjust the screws accordingly. Tighten the screws firmly but avoid overtightening, which could damage the PCB or warp the stabilizer housing. During reassembly, verify all components—housing, stems, wires—are properly aligned for smooth key travel and consistent sound. After installation, test the keys for any play. If looseness persists, re-seat or adjust the stabilizers for a secure, quiet fit.
| Step | Action |
|---|---|
| 1 | Clip stabilizer wires securely |
| 2 | Press down to check flush |
| 3 | Adjust and tighten screws |
| 4 | Confirm component alignment |
| 5 | Test keys for stability |
Testing and Troubleshooting Stabilizer Performance
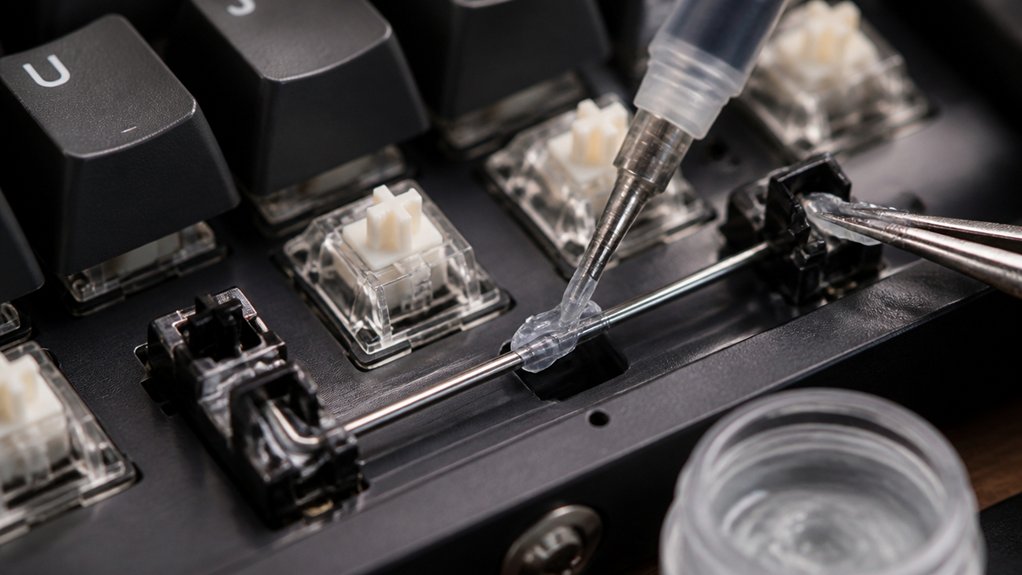
Ever wonder if your stabilizers are functioning smoothly? You need to know how to test and troubleshoot to guarantee they perform much better. Start by installing switches and keycaps, then press stabilized keys side to side—listen for rattle, ticking, or scratchiness.
Check the spacebar on a flat surface; warping causes wobble and instability. If ticking persists, confirm the stabilizer wire is fully clipped into the housing and add a small amount of lubricant inside the stem hole. Additionally, inspect stabilizer wires for bends and gently straighten them for smoother performance and less noise.
Finally, verify stabilizers sit flush on the PCB and screws are tight. Proper testing and troubleshooting can greatly improve stabilizer function and extend your keyboard’s lifespan.
Long-Term Tips for Maintaining and Fine-Tuning Stabilizers
To keep your stabilizers performing smoothly over time, regular inspections and maintenance are essential. Check for dust buildup or hardened lubricant, and gently clean with an appropriate solvent to prevent scratchiness.
Reapply a thin, even layer of Krytox 205g0 on stems and housings, and Loctite dielectric grease or Krytox XHT-BDZ on wires every 6–12 months, depending on usage. After installation, allow a break-in period of several days to a week, then evaluate performance before adding more lube, as over-lubing can cause sluggish keys.
Periodically check wire alignment and gently straighten bends to reduce ticking and maintain smooth travel. Keep a maintenance kit handy for quick touch-ups. This will make future modding easier, depending on the PCB, and prolong stabilizer life.
Frequently Asked Questions
What to Lube Keyboard Stabilizers With?
You should lube keyboard stabilizers with Krytox™ 205g0 for the housing and stems, and apply Krytox™ XHT-BDZ or Loctite dielectric grease on the wires’ ends and clip-in areas to reduce noise and improve smoothness effectively.
Can I Use Vaseline to Lube My Keyboard Stabilizers?
You shouldn’t use Vaseline to lubricate your keyboard stabilizers because it’s too thick, sticky, and attracts dust, which can cause sluggish keys, buildup, and make future lubrications less effective. Use specialized lubricants for best results.
How to Make Keyboard Stabilizers Better?
To make your keyboard stabilizers better, apply a thin layer of Krytox™ 205g0, use Krytox™ XHT-BDZ or Loctite grease on wires and clips, and clip stabilizer legs for improved stability, reducing rattle, noise, and wobble for smoother, quieter typing.
Should You Lube Stabilizer Stems?
Yes, you should lube stabilizer stems. It reduces scratchiness and noise, guarantees smoother key travel, and improves overall feel. Just apply a thin, even layer without overdoing it to avoid sluggishness or mushiness.



