
To sound damp your mechanical keyboard properly, start by installing o-rings on your keycaps to reduce bottom-out noise, and lubricate switches and stabilizers to minimize rattles and friction. Add foam inside the case to absorb internal echoes and vibrations, and use thick, high-quality keycaps like PBT for softer sounds. External dampening, like desk mats and covers, can also help. Combining these steps will create a quieter typing experience—keep exploring for more detailed techniques.
Why Is My Mechanical Keyboard So Loud?
Ever wonder why your mechanical keyboard sounds so loud? The main reason is that mechanical switches produce louder noise because of the switch housing, where key stems and springs create plastic-on-plastic impact and friction noises.
When you bottom out the keys, the keycaps hitting the switch housing cause a sharp, thudding sound, especially with thin ABS keycaps—they transmit higher-frequency noise. Clicky switches like Cherry MX Blue add even more noise with built-in click jackets that generate the sharp click sounds.
The keyboard case design, including hollow chambers and thin plastic plates, amplifies these sounds internally through vibration. Additionally, a hard desk surface can reflect the noise, making your typing even louder. Understanding these factors helps identify why your keyboard is louder and what can be adjusted for noise reduction.
One effective approach is to incorporate foam switch dampeners, which can significantly absorb vibrations and modify the sound profile to achieve a deeper and softer sound.
Start Here: Basic Tips to Quieter Your Keyboard
To immediately cut down on the noise your mechanical keyboard produces, start with some simple, effective modifications. Installing o-rings on keycap stems can cushion bottom-out impacts, making your keyboard noticeably quieter—up to 50%.
Installing o-rings on keycaps can cut keyboard noise by up to 50%.
Choosing quieter switches like Cherry MX Silent Red or Brown naturally reduces sound compared to clicky options. Adding foam inside your keyboard case absorbs vibrations and dampens noise reflection from the desk surface.
Lubricating stabilizers and switch sliders with a lightweight lubricant like Krytox 205g0 eliminates rattling and high-frequency sounds. Upgrading to PBT keycaps instead of standard ABS ones also reduces the harsh “clack” sounds typical of cheaper keycaps.
Additionally, selecting the right O-ring dampeners can further fine-tune noise reduction and improve the overall typing experience.
These basic steps can greatly improve your typing environment without extensive modification.
Install O-Rings to Reduce Bottom-Out Noise
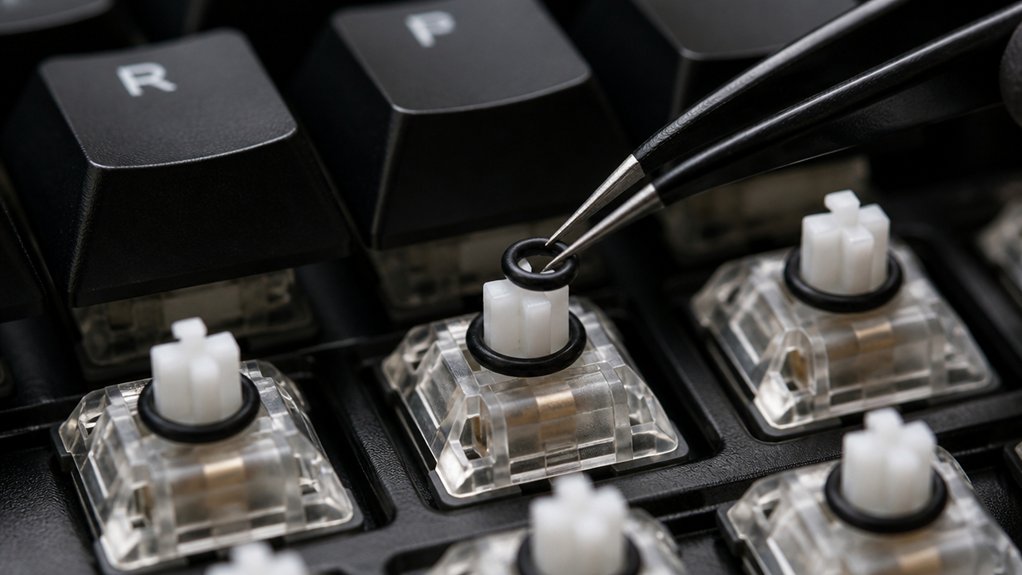
Installing O-rings is one of the simplest and most effective ways to cut down on bottom-out noise from your mechanical keyboard. These small rubber rings cushion the keycaps when they bottom out, markedly reducing impact noise.
To install, remove each keycap with a puller, slide an O-ring onto the stem of the mechanical switch, then carefully reattach the keycap. Using foam dampers designed for keyboards can further enhance sound absorption by reducing vibrations and echo within the keyboard case.
Thicker and softer O-rings provide more noise dampening but might slightly alter how your typing feels. A full set can outfit a standard keyboard, with larger keys needing multiple O-rings for proper sound reduction.
Using O-rings can lower keystroke noise by around 6 decibels, making your keyboard much quieter without affecting switch performance or requiring major modifications.
Lubricate Switches and Stabilizers for a Smoother, Quieter Feel
To achieve a smoother, quieter typing experience, you need to apply lubricants carefully to switches and stabilizers. Using the right lubricants and proper techniques prevents damage and over-application, which can affect feel. Always follow model-specific tutorials and safety precautions to guarantee effective and safe lubrication. Additionally, selecting lubricants with optimal material compatibility ensures they won’t cause damage over time.
Proper Lubricant Application Techniques
Applying lubricant correctly is essential for achieving a quieter, smoother typing experience. Start by applying a medium-thick lubricant like Krytox 205g0 to the switch sliders to reduce friction and the sound produced by plastic-on-plastic contact, without affecting keypress feel.
Use thicker grease on stabilizer contact points and metal bars to minimize rattle and stabilize large keys like the spacebar. Lightly oil the springs inside switches to prevent scratchy sounds while preserving tactile feedback and switch return speed.
Carefully disassemble switches and stabilizers, following model-specific tutorials for precise lubricant placement and to avoid damage. Avoid over-lubrication, which can make keypresses mushy; instead, focus on thin, even layers on sliding surfaces and pivot areas for ideal sound dampening and smoothness. Proper thermal stability of the lubricant ensures consistent performance and long-lasting quietness.
Stabilizer Lubrication Methods
Lubricating stabilizers properly makes a noticeable difference in reducing noise and improving key feel, especially on larger keys like the spacebar and shift. Use a thick grease like Krytox 205g0 on stabilizer metal bars and plastic housings to dampen rattling and chatter.
Applying medium-thick lubricant to switch sliders, along with thicker grease at contact points, minimizes plastic-on-plastic friction and metal-on-plastic rattle, leading to smoother, quieter keystrokes.
Clipping excess plastic feet from the stabilizer stems prevents excessive movement, enhancing noise reduction.
For the best results, disassemble carefully, avoid over-lubing, and refer to model-specific tutorials to preserve switch performance. Proper stabilizer lubrication effectively dampens sound and creates a more refined typing experience within your keyboard case.
Considering the material quality of stabilizers can also contribute to quieter operation and long-term durability.
Lubrication Safety Precautions
Because improper handling can damage your switches and stabilizers, it’s essential to follow safety precautions during lubrication. Always disassemble the switch carefully to prevent component damage, and test the switch before full reassembly to guarantee smooth, quiet operation. Using compatible tools like tweezers and pullers from well-designed lubing stations can help avoid accidental damage during disassembly. Use appropriate lubricants like Krytox 205g0 or Tribosys for switch sliders, applying sparingly with a fine brush to avoid over-lubrication. For stabilizer contact points, use a thicker grease for effective noise reduction. Avoid excessive lubrication on springs or electronic components, as this can interfere with switch actuation or cause unwanted noise. Follow model-specific tutorials, since switch housing designs vary and influence lubrication needs and risks. Proper safety and care guarantee your lubrication enhances performance without damaging the components.
Add Foam Inside Your Keyboard Case to Absorb Echoes
Selecting the right foam material is key—look for dense options like polyurethane, silicone, or neoprene that effectively absorb vibrations.
Proper placement involves fitting the foam between the PCB and case or beneath the switch plate, guaranteeing it doesn’t obstruct switches or stabilizers.
When installing, take your time to handle disassembly carefully and confirm the foam lies flat to prevent any damage or rattling.
Additionally, choosing foam with the appropriate material and thickness ensures optimal sound dampening without compromising key travel or compatibility.
Foam Material Selection
Choosing the right foam material is essential for effectively dampening keyboard noise. When selecting foam, look for acoustic foam or dense rubber that can absorb vibrations and reduce echo chambers inside the keyboard case.
Foam thickness, typically between 1.5 to 3mm, impacts sound output, with thicker foam offering better noise reduction. Materials like silicone or specialized damping foam are ideal because of their density and rebound properties. Proper foam placement between the PCB and keyboard base helps minimize reverberation without obstructing switches or components.
Using the correct foam can reduce typing noise by up to 50% and create softer, deeper keystroke sounds. Guarantee the foam is cut precisely to fit cavity shapes, maximizing sound absorption inside the keyboard case. Additionally, selecting heat-resistant and durable materials ensures long-term performance without degradation from heat or constant vibrations.
Placement and Installation
To effectively add foam inside your keyboard case, start by carefully removing the keycaps and unscrewing the case to access the interior components. This allows you to place sound-dampening foam where it’s most effective. Using foam with the appropriate density and thickness ensures optimal vibration absorption and sound deadening. Here are the key steps:
- Position 1.5-3mm thick foam flat inside the keyboard case, placing it between the PCB and the case base to absorb vibrations and echo.
- Use high-quality sound-dampening foam like acoustic foam, silicone pads, or rubber padding designed for keyboards to guarantee proper sound absorption without electrical interference.
- Cut the foam precisely to fit the inside of your keyboard case, avoiding interference with switches or stabilizers. Reassemble securely to minimize reverberation.
Upgrade Keycaps to Lower Noise: PBT vs. ABS
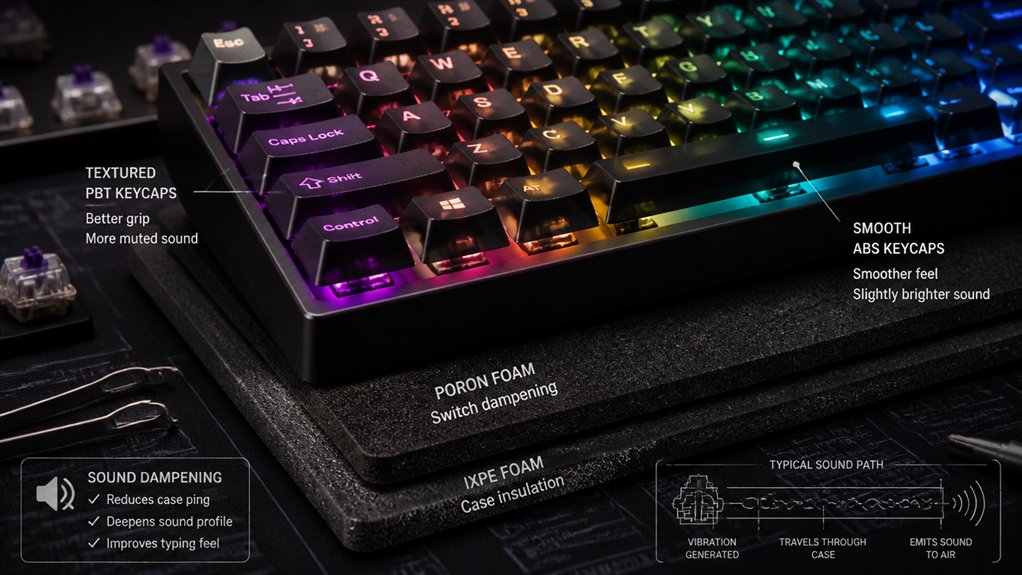
Upgrading your keycaps can considerably lower the noise generated by your mechanical keyboard, and understanding the difference between PBT and ABS is key.
PBT keycaps are thicker and denser, usually around 1.3–1.5mm, which helps produce softer, lower-frequency “clack” sounds that dampen typing noise. ABS keycaps tend to be thinner and less dense, often under 1mm, resulting in higher-pitched “click” sounds that amplify noise during use.
Double-shot PBT caps provide extra durability and sound absorption compared to single-shot ABS caps, which wear faster and can increase noise over time.
Switching from ABS to PBT keycaps is an effective way to reduce harsh plastic-on-plastic vibrations, making your mechanical keyboard quieter during everyday typing.
Soundproof Your Keyboard Case With Dampening Materials
Installing sound-dampening foam inside your keyboard case is one of the most effective ways to reduce unwanted noise. By placing foam between the PCB and the case bottom, you can dampen sound and minimize reverb caused by hollow cavities.
Use dense, non-conductive materials like acoustic foam, bitumen sheets, or silicone pads, ideally 1.5–3mm thick, to effectively absorb sound without interfering with PCB components, stabilizers, or switch movement. Proper foam placement is essential: avoid blocking screw mounts or stabilizers to maintain functionality.
Filling voids beneath the PCB transforms harsh, plastic-on-plastic sounds into softer, deeper tones. To maximize damping:
- Carefully position foam for full coverage.
- Make certain no obstruction of switch or stabilizer movement occurs.
- Remove or loosen screws for vibrations reduction.
Modify Stabilizers With Clips and Band-Aid Mods for Less Rattle
Modifying stabilizers by clipping extra plastic feet on the stems helps reduce excessive movement and rattling noise.
Applying Band-Aid material under the stabilizers cushions impacts and minimizes metal-on-metal sounds.
Combining these mods with lubrication can greatly improve your keyboard’s stability and quietness.
Stabilizer Clipping Techniques
Clipping stabilizer stems is a simple yet effective way to reduce rattling and improve keyboard soundproofing. By carefully removing excess plastic legs, you minimize stabilizer movement, directly reducing keyboard noise.
Here are three key steps to achieve the best results:
- Clip carefully and evenly—eliminate unnecessary plastic to prevent rattling without damaging the stabilizer.
- Apply lubricant—use Krytox or similar grease on contact points to smooth out movement and reduce noise.
- Combine with a band-aid mod—placing small pieces beneath the stabilizer housings cushions impact noise during key presses.
Together, these stabilizer clipping techniques greatly decrease rattling and loud vibrations, turning a noisy keyboard into a smoother, quieter typing experience.
Band-Aid Dampening Method
The Band-Aid dampening method provides an easy and effective way to quiet stabilizer-related noise by adding a soft cushion beneath the stabilizer housing. This band-aid dampening mod involves placing a small piece of soft material under the stabilizer housing on the PCB, which absorbs impact and reduces rattle.
The cushion minimizes metal-to-metal contact, leading to less noise and smoother keypresses. Combining this with clipping the stabilizer stems decreases excess movement, especially on larger keys like spacebar or enter.
Don’t forget to lubricate the stabilizer metal bars and contact points; a bit of lubricant or grease smooths the action and further minimizes rattling. The result is a quieter, more stabilized typing experience with less noise distortion.
Impact on Key Rattle
Combining stabilizer clipping with band-aid damping greatly reduces key rattle by addressing both structural looseness and impact noise. Clipping stabilizer stems limits excess movement, halting mechanical key rattle on larger keys like the spacebar.
Applying band-aid material under stabilizers cushions impacts, preventing bottoming out and dampening noise. Lubricating stabilizer metal bars and contact points with thick grease, such as Krytox 205g0, further minimizes metal rattle and guarantees smoother operation.
You’ll notice a dramatic difference when stabilizers are properly modified and lubricated, making typing quieter and more solid.
- Feel the satisfaction of a stable, rattle-free keystroke.
- Experience the confidence that comes from reducing disruptive noise.
- Enjoy a more refined, satisfying mechanical typing experience.
Control Desk Vibration With Mats and Sound Absorbers
Vibrations from your mechanical keyboard can easily transfer to your desk surface, amplifying noise and disrupting your quiet workspace. To control this, use a desk mat made of soft, dense foam or other cushioning materials.
A large desk mat helps reduce sound by absorbing vibrations transmitted from the keyboard, preventing them from bouncing off hard surfaces like glass or hollow wood. Thick, cushioned mats are especially effective at dampening vibrations caused by rigid desk constructions, boosting overall noise reduction.
While DIY options like folded towels can lessen desk vibrations, they lack the aesthetic appeal and consistency of specialized mats. For maximum effect, combine a desk mat with keyboard case foam or O-rings to target both keyboard and desk vibrations, creating a quieter, more comfortable environment.
External Covers and Desk Pads to Cut Noise Reflections
Using external covers and desk pads can greatly reduce noise reflections from your workspace. A soft, dense desk mat made of rubber or fabric absorbs vibrations and dampens the sound, preventing sharp echoes.
Silicone keyboard covers fit snugly over your keycaps, muffling keystroke sounds by softening impacts and blocking upward noise escape. Positioning a desk mat beneath your keyboard minimizes reverberation and dampens contact with hard surfaces.
Consider these options:
- Thick desk mats—absorb vibrations and reduce reflection.
- Silicone keyboard covers—soften keystrokes and dampen sound.
- Textured or fabric-covered desk pads—break up sound waves and prevent echoes.
These accessories are easy to remove, clean, and highly effective at controlling noise reflections.
Advanced Mods: Gasket Mounts and Filming Switches
To achieve a quieter, more refined typing experience, advanced modifications like gasket mounts and filming switches are highly effective.
Gasket mounts use soft Poron or silicone gaskets between the keyboard plate and case to isolate vibrations, sound dampening keystroke impact and case resonance. Poron gaskets, typically 0.5 to 1.5 mm thick, balance sound dampening with tactile feedback.
Filming switches involve inserting thin plastic films between the switch’s top and bottom housings to eliminate wobble and internal rattling. Disassembling switches is necessary for proper installation, making this mod ideal for hot-swappable or custom keyboards.
Combining gasket mounts with filming switches addresses both structural and mechanical noise sources, delivering a smoother, quieter typing experience essential for sound dampening enthusiasts.
Troubleshooting Common Noise Issues and Tips
Are you struggling with persistent noise issues on your mechanical keyboard? Here are key tips to create a quieter typing experience:
- Install O-rings on keycap stems to cushion impact — this reduces bottom-out noise by about 6 dB and helps prevent harsh sounds during key presses.
- Lubricate stabilizers and apply the band-aid clipping mod to reduce stabilizer rattle on larger keys, smoothing out vibrations for a more stable, noise-free keypress.
- Add foam make or silicone padding inside your hollow keyboard case to absorb reverberations, diminishing high-pitched clicks and amplifications caused by case resonance.
Addressing these common noise issues can dramatically improve your keyboard’s sound profile without sacrificing performance.
Consistent troubleshooting leads to a more enjoyable, quieter typing experience.
Next Steps: Achieve the Quietest Mechanical Keyboard Possible
Taking further steps to silence your mechanical keyboard involves combining multiple sound-dampening techniques for maximum effect. To make your mechanical keyboard as quiet as possible, start by installing medium-hard rubber rings (~1.5mm thick) on all key stems, which dampen key noise during presses.
Lubricate your stabilizers, sliders, and springs with Krytox or Tribosys to reduce rattling and smooth out keystrokes. Add multi-layer sound-dampening foam inside the case—plate foam and PCB bottom foam absorb vibrations and minimize hollow reverberation.
Consider switch options like silent or linear switches, paired with thick PBT or double-shot keycaps, to lower clicking sounds. Finally, use a gasket-mounted case or Poron gasket foam to isolate vibrations and prevent sound from traveling through the chassis for the ultimate quiet typing experience.
Frequently Asked Questions
How to Sound Dampen a Keyboard?
To sound dampen your keyboard, install O-rings on keycap stems, add foam inside the case, lubricate switches with Krytox, choose thicker PBT or silicone keycaps, and combine mods like stabilizer clips and gasket mounts for maximum noise reduction.
What Is a 96% Keyboard Missing?
A 96% keyboard is missing a dedicated navigation cluster and separate arrow keys, making navigation less intuitive. It combines functions into a smaller layout, which means less key spacing and fewer extra function or macro keys than full-sized models.
What to Do if a Mechanical Keyboard Gets Wet?
If your mechanical keyboard gets wet, immediately disconnect it from power, remove keycaps, blot excess liquid, turn it upside down to drain, and let it dry for at least 24-48 hours in a warm, ventilated area.
How to Make a Mechanical Keyboard Sound More Creamy?
To make your mechanical keyboard sound more creamy, use thicker PBT or double-shot silicone keycaps, lubricate switches with Krytox, add sound-dampening foam, and install soft O-rings or gasket mounts, all of which soften and warm the keystroke sound.
In Summary
By applying these tips, you can considerably reduce your mechanical keyboard’s noise. Start with simple methods like O-rings and lubrication, then move on to adding foam and using external covers for even better silence. If you’re willing to go further, explore gasket mounts and filming switches. With patience and the right mods, you’ll enjoy a quieter keyboard that’s perfect for shared spaces or late-night gaming. Keep experimenting, and you’ll find the perfect sound level for your setup.



