
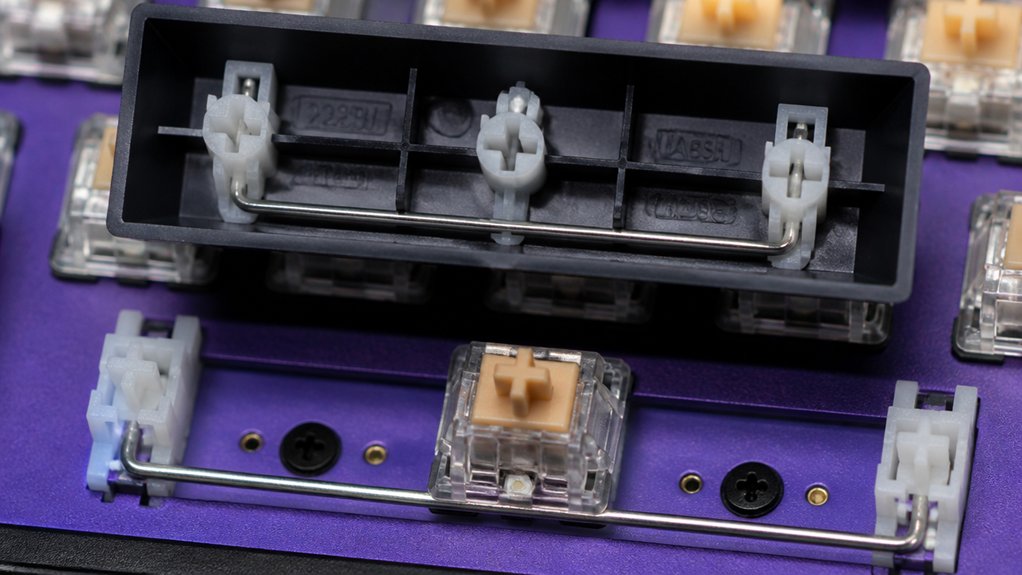
Start by listening closely for rattling or clicking sounds when pressing keys, especially larger ones like the spacebar. Inspect stabilizer components for loose parts, misalignment, dirt, or debris, and check that everything is properly lubricated. Confirm the stabilizer bar is fully seated, and verify the housings are secure and correctly oriented. If you find issues, try cleaning, applying lubricant, or adding wedges to improve stability. Keep these tips in mind to troubleshoot effectively; more details will guide you through advanced fixes.
Listen for Rattling or Unusual Sounds During Keypresses
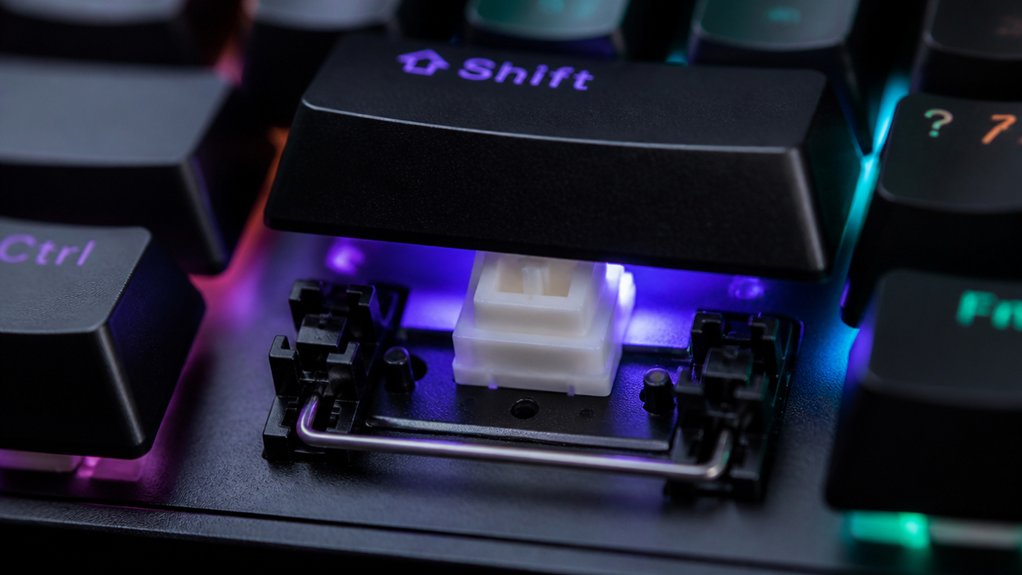
When you press a key, listen carefully for any rattling or unusual sounds, as these can signal stabilizer issues. Rattling sounds often result from loose tolerances causing the stabilizer wire to strike the stabilizer housings or plastic sliders. Pay close attention to distinct ticking or clicking noises that happen during key presses—these usually indicate contact between the wire and the housing. Larger keys, like spacebars, are especially prone to rattling due to greater wire movement and leverage. Improper lubrication can also cause or worsen these sounds, making the stabilizer components less smooth and more prone to hitting each other. Checking if stabilizer wires are straight and not touching the housing edges during movement can help identify internal issues, especially when combined with proper lubrication for quieter operation.
Inspect Stabilizer Components for Loose or Misaligned Parts
Start by checking if the stabilizer wire is straight and moves smoothly without rubbing against the plate edges.
Make sure the stabilizer housings are securely seated, aligned properly, and not loose or tilted.
Finally, inspect for any loose or broken components, like screws or clips, that could affect stability or performance. Additionally, verifying the presence of pre-lubrication on the stabilizers can help ensure smooth keystrokes and reduce noise.
Check Stabilizer Wire Alignment
To guarantee your stabilizer functions smoothly, you need to verify that the wire is properly aligned and free of bends or warps. Start by removing the keycap using a keycap puller for easy access. Check that the stabilizer wire is straight, without any bends, which can cause binding or slow keypress response. Make certain the wire doesn’t contact the keyboard plate edges during key movement to prevent friction. Confirm both ends are securely seated in the stabilizer housing’s slots, avoiding wobble or rattling. If the wire shows warping or deformation, replace it, especially since injection molding can sometimes cause slight misalignments. After inserting, clip the wire’s 90-degree bends firmly into place to keep it aligned during regular use. Additionally, inspecting the wire housing design ensures that the stabilizer wire remains stable and prevents unwanted movement.
Confirm Housing Mounting Stability
Guaranteeing your stabilizer housings are properly mounted is essential for smooth and consistent key operation. First, verify that the stabilizer housings sit firmly and evenly in the PCB or plate, avoiding tilt or wobble that can cause uneven keypress resistance. Check that they’re mounted parallel and perpendicular to the surface to prevent mechanical binding or friction during key press. Gently wiggle the stabilizer housings to detect any looseness; excessive wobble often indicates loose mounting screws or clips needing tightening. Also, inspect inside the housing for plastic flashing, molding leftovers, or displaced washers, which can hinder stability and cause sticky keys. Adjust mounting screws or clips to guarantee they’re neither overtightened nor too loose, maintaining stability without risking damage. Ensuring the stabilizers are free from molding leftovers and properly assembled helps improve overall typing feel and reduces rattling.
Inspect for Loose Components
Inspecting for loose components is essential because even small misalignments or dislodged parts can greatly impact stabilizer performance. If the stabilizer housings aren’t firmly seated or aligned correctly, you may experience slow, sticky keypresses.
Check that the stabilizer wire isn’t bent or touching the plate edges, which causes resistance. Make sure the sliders and inserts aren’t loose or rattling inside the housing, as this creates noise and poor sound quality. Look for displaced cloth washers or misaligned mounting screws that could cause movement or binding.
Sometimes, a simple Band-Aid mod—adding a small piece of tape—can help improve stabilizer stability and reduce noise, enhancing your typing experience. Remember, stabilizer components are an important part of smooth, consistent key action.
Check for Dirt, Debris, or Lack of Lubrication Causing Noise
Dirt, debris, and lack of lubrication are common culprits behind noisy stabilizers. When dust or hair gets trapped inside the stabilizer housings or around the wire, it causes grinding or rattling noises during keypresses.
To really good results, remove the key caps to inspect for buildup and clean thoroughly with compressed air or a soft brush. Ensuring the stabilizer components are free of dust and debris is essential before applying lubricant.
Without proper lubrication, the stabilizer wire, sliders, or housing contact points can produce scratchy or loud noises. Applying a thin, even coat of Krytox 205g0 on these parts reduces friction and stabilizes the sound during use.
Visual inspection before lubrication guarantees you address initial contaminants, leading to the best results in quiet, smooth stabilizer performance. Regularly using high-quality lubricants like stabilizer lubricants such as GPL 205 Grade 0 or Glorious G-Lube can also help maintain smooth operation and prevent future noise issues.
Test Key Stability and Smoothness Before and After Adjustments
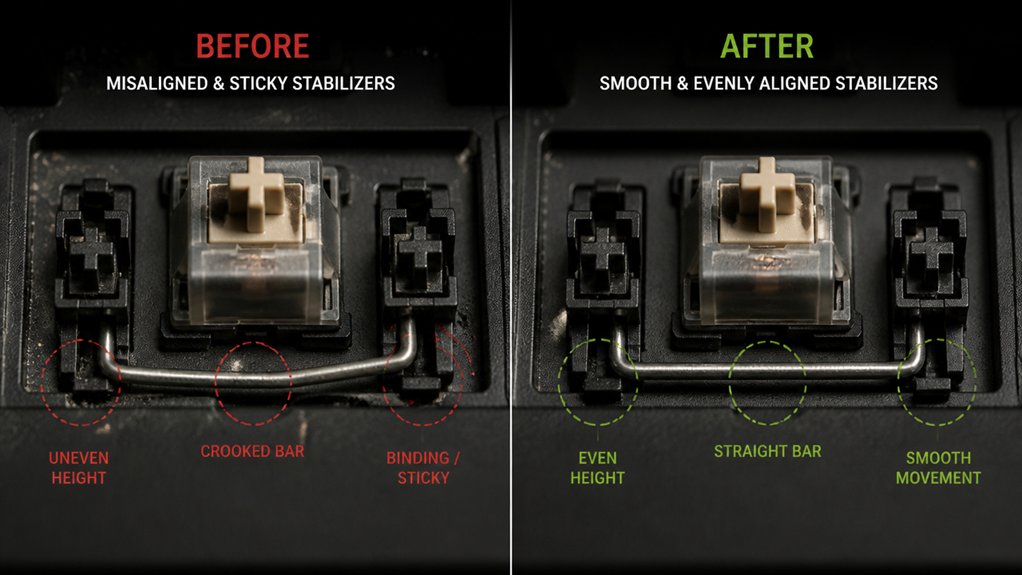
Start by pressing and releasing each stabilized key several times to feel for binding or uneven return.
Then, compare how smooth and far each key travels before and after lubrication or housing tweaks.
Finally, listen for any changes in noise, and check key movement and alignment to guarantee consistent stability across all keys. A thorough inspection will also help identify if the stabilizers are wire wobble or if additional tuning is necessary to improve performance.
Check Key Movement Smoothness
Before making any adjustments, it’s essential to evaluate the key’s movement to identify issues like sticking or unevenness. Test longer keys like spacebar or shift to check for smoothness, and watch if every time, one side feels different. Confirm the keycap is properly seated—improper seating can be the thing that really causes friction. Observe if the stabilizer wire moves freely, avoiding contact with the plate or housing edges; obstruction makes every movement sluggish. Gently rock the keycap to spot wobbling or looseness, which hints at misalignment or loose mounting. Compare key movement before and after lubricating stabilizer parts—improvements tell you it’s working, while residual issues may need further attention. Additionally, inspecting the compatibility of stabilizer types with your specific keyboard layout can prevent potential fitment issues during troubleshooting.
Observe Key Stability Changes
To effectively observe key stability changes, focus on pressing the stabilizer-supported key repeatedly and noting how smoothly and evenly it travels without wobbling or sticking. Pay attention to any wobbling or inconsistent motion, which indicates instability.
Before and after making adjustments, compare how easily the key responds to your presses. If reseating the keycap improves stability, warped or improperly seated caps could be the cause.
Loosening stabilizer screws might enhance responsiveness, suggesting overtightening caused binding. Bashing the key gently can help free sticky stabilizer components; observe if the key now moves more freely.
Also, observe how inserting small wedges or realigning stabilizer housings affects key travel—realignment can reduce resistance and improve key stability. Additionally, applying lubrication to stabilizer components can further decrease noise and improve motion smoothness.
Test Before and After
Testing key stability and smoothness after making adjustments is essential to guarantee your stabilizers are functioning properly.
Begin by pressing each stabilized key slowly, checking for smooth, even travel without sticking or delayed return. Gently rock the keycap sideways to detect any wobbling or looseness, which indicates loose or misaligned stabilizer components.
After lubricating or clipping, repeatedly press the keys—bashing them—to feel for improved responsiveness and the removal of sluggishness. Listen closely to the sound profile before and after adjustments; a reduction in rattling or ticking signals successful tuning.
You can also swap keycaps side-by-side on stabilizer keys pre- and post-mod to observe if there’s a noticeable difference in smoothness, helping you pinpoint the effectiveness of your stabilizer modifications. Ensuring your stabilizer components are firmly secured with sturdy mounting methods guarantees consistent performance and prevents unnecessary wobbling.
Make Sure Stabilizer Bar and Housing Are Properly Seated and Tightened
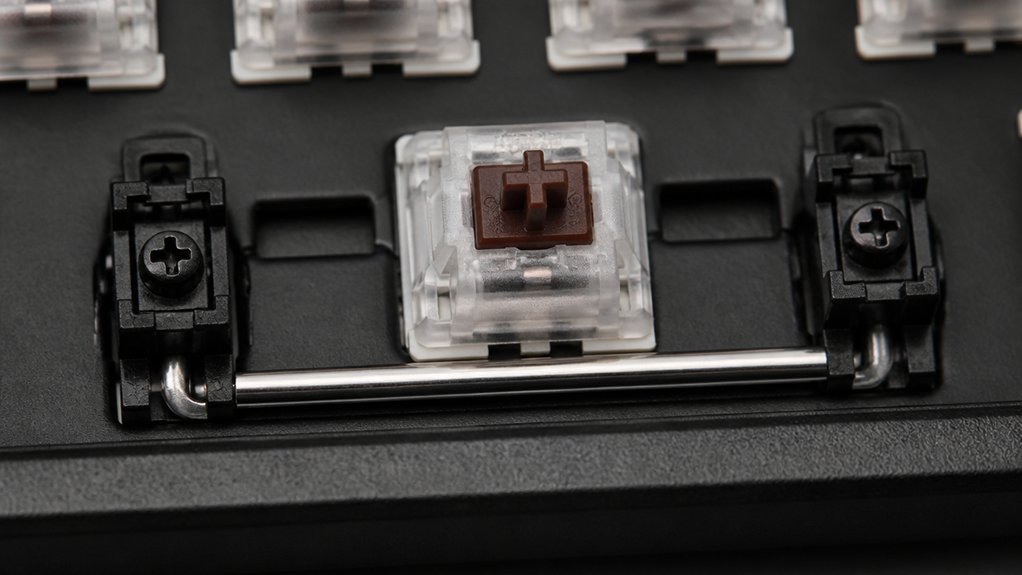
Guaranteeing the stabilizer bar and housing are properly seated and tightened is essential for smooth keyboard performance. Make sure the stabilizer wire is fully inserted and seated within the housing to prevent binding or loose movement.
Check that the stabilizer housing is firmly mounted to the PCB or plate, with screws or clips tightened enough to hold it steady without applying excessive pressure. Confirm the housing is parallel and perpendicular to the mounting surface to avoid uneven pressure that hampers movement.
Be cautious not to over-tighten, as too much torque can warp the PCB or housing. Finally, verify the stabilizer bar doesn’t contact the plate or housing edges during key press travel, maintaining clearance to reduce friction and noise. Proper seating and tightening guarantee reliable stabilizer operation.
Additionally, ensure that any magnetic features are correctly aligned to facilitate quick and secure adjustments during modding.
Confirm Stabilizer Wire Is Straight and Not Contacting the Plate or Housing
A crooked or bent stabilizer wire can cause key sluggishness or uneven movement, so it’s essential to verify that the wire is perfectly straight. Carefully inspect the wire for bends, kinks, or warping that could hinder smooth motion.
If you notice any imperfections, gently use pliers to straighten the wire, ensuring it moves freely within the stabilizer housing. Check that the wire’s length and shape match the manufacturer’s specifications to prevent improper contact.
Also, verify the wire’s position so it doesn’t scrape or rub against the plastic surfaces of the keyboard plate or housing. Any contact or friction can lead to resistance during keypresses.
Ensuring the stabilizer wire is straight and properly positioned helps maintain smooth, consistent key movement and prevents sluggish or sticky keys.
Check for Manufacturing Residues or Physical Damage in Stabilizer Parts
Start by inspecting the stabilizer housings and stems for any plastic flashing or leftover molding residues that could cause friction.
Examine the parts closely for surface cracks or chips that might interfere with proper movement.
Also, clear dust, debris, or manufacturing grease to guarantee smooth operation.
Inspect for Mold Flash
When diagnosing stabilizer issues, inspecting for mold flash is a crucial step because excess plastic residues can cause friction and hinder smooth movement. Mold flash appears as thin plastic burrs or raised edges along seams and contact surfaces, which can interfere with slider action.
To detect subtle flash, use a bright light and magnification, especially inside the small slots and holes where the stabilizer wire and slider move. Carefully remove any mold flash with a precision cutter or fine sandpaper to reduce binding and improve response.
Pay extra attention to older or budget stabilizers, as manufacturing quality may be lower, increasing the chances of mold flash issues.
- Look along seams and contact surfaces for burrs or raised edges
- Use magnification to spot flash inside small slots and holes
- Remove flash carefully to prevent damage and improve movement
Look for Surface Cracks
Inspecting stabilizer parts for surface cracks and damage is essential because even small splits can compromise their function.
Carefully examine the stabilizer housing and stems for tiny cracks or splits that may indicate material fatigue or impact damage, which can hinder smooth movement. Look for leftover plastic flashing or molding residues inside the parts, as these can cause binding or dragging during keypresses.
Trace the stabilizer wire for bends or surface damage that might catch inside the housing or on the plate, leading to slow or sticky keys. Also, check the keycap stem and seating area for stress marks or fractures that could prevent proper fit and operation.
Inside surfaces of housings and sliders should be scrutinized for rough spots or cracks that might increase friction or noise during use.
Check for Dust Debris
After examining the stabilizer parts for surface cracks, it’s important to check for any dust, debris, or manufacturing residues that may cause friction or sticking during use. These residues, like plastic flashing or molding leftovers, can snag or bind the stabilizer components.
Use compressed air or a soft brush to clear dust, lint, and small debris from housing and stems, maintaining smooth motion. Also, inspect the stabilizer wire for dirt buildup where it contacts the housing or plate, as this increases resistance. Look for scratches, nicks, or chips on parts, which can trap debris and impair performance.
Finally, wipe all surfaces with isopropyl alcohol on a microfiber cloth to remove oils and fine dust, ensuring peak stabilizer function.
- Remove plastic flashing or molding residues
- Clear dust and lint with compressed air or brush
- Wipe surfaces with isopropyl alcohol
Ensure Stabilizer Fits and Compatibility With Your Keyboard and Keycaps
Guaranteeing your stabilizer fits properly and is compatible with your keyboard and keycaps is essential for peak performance. Verify that the stabilizer type (such as Cherry-style screw-in or plate-mounted) matches your keyboard’s PCB and plate specs. Confirm keycap stem spacing aligns with the stabilizer housing to prevent binding or loose movement. Inspect the stabilizer housing for secure mounting and correct orientation—north/south facing matters. Tighten screw-in stabilizers just enough; over-tightening can distort the PCB and impair function. Also, test keycap seating; warping or improper placement increases friction and sluggish response.
| Compatibility Aspect | Impact |
|---|---|
| Stabilizer Type | Guarantees proper fit and secure mounting |
| Keycap Stem Spacing | Prevents binding and loose stabilization |
| Housing Orientation | Maintains correct alignment |
Try Common Fixes: Lubrication, Wedges, and Clip Modifications
To improve stabilizer performance, try simple fixes like lubrication, wedges, and clip modifications. Applying Krytox 205g0 lubricant sparingly to housings, wires, and sliders reduces friction and rattling without causing sluggish keystrokes.
Insert small fabric wedges, like Band-Aid pieces, beneath stabilizer housings to adjust spacing and prevent wire contact with the plate, which enhances smoothness and responsiveness. Clipping the two opposite rectangular “feet” of stabilizer inserts with flush cutters minimizes wobble and binding by reducing excess plastic interference.
Additionally, repeating gentle bashing presses on stabilized keys helps settle the components into ideal alignment for smoother action. For better acoustic stability and noise reduction, combine dielectric grease on PCB contact points with medical tape under stabilizer mounts.
Maintain Your Stabilizers Regularly to Prevent Future Problems
Regularly maintaining your stabilizers is key to keeping them functioning smoothly and preventing issues before they worsen. Monthly, remove keycaps and blow compressed air into stabilizer housings to clear dust buildup. Check alignment and seating to catch misalignments early, preventing binding or uneven key travel. Annually, disassemble the stabilizers for deep cleaning and re-lubricate with Krytox 205g0 for peak sound and feel. Use proper keycap pullers and pull evenly to avoid damaging stems and housings. Consistent maintenance reduces noise, rattling, and sluggish responses, extending the lifespan of your stabilizers. Visualize this process with the following table:
| Step | Action | Purpose |
|---|---|---|
| 1 | Remove keycaps | Access stabilizer housings |
| 2 | Blow compressed air | Clear dust and debris |
| 3 | Inspect alignment | Prevent misalignment issues |
| 4 | Full disassembly & cleaning | Deep clean and re-lube |
| 5 | Reassemble & test | confirm smooth, quiet operation |
Frequently Asked Questions
How to Fix Stabilizer in Keyboard?
To fix your keyboard stabilizer, reseat or swap keycaps, inspect and straighten the wire, tighten screws carefully, clean and lubricate parts with Krytox, and add tape or grease to reduce noise and improve response.
How to Improve Keyboard Stabilizer?
You can improve your keyboard stabilizer by reseating keycaps, cleaning and lubing stabilizers with Krytox and dielectric grease, adjusting mounting screws, clipping feet, applying tape mods, and ensuring case pressure and damping are properly set for smooth, rattling-free keystrokes.
How to Diagnose Keyboard Issues?
To diagnose keyboard issues, check for unresponsive or sticky keys, listen for abnormal sounds, and observe key movement. Remove keycaps and stabilizers to examine contact points, wires, and housing alignment; test each key’s response manually.
How to Balance Keyboard Stabilizers?
To balance your keyboard stabilizers, confirm the wires are straight and free of contact, align housings properly, apply lubrication like Krytox, loosen screws slightly, and use tape wedges to fine-tune spacing for smooth, rattle-free key presses.
In Summary
Keeping an eye on your stabilizers and performing regular checks can save you time and frustration. By listening for sounds, inspecting components, and trying simple fixes, you can address most issues early. Proper maintenance guarantees your keyboard stays smooth and quiet, enhancing your typing experience. Don’t forget to reassemble carefully and double-check all parts. With these tips, you’ll keep your stabilizers in top shape, delivering reliable performance every time you type.



