

To master stabilizer tuning, start by carefully disassembling your stabilizers, cleaning all parts thoroughly, and clipping any protruding legs for smoother action. Balance and bend the stabilizer wires on a flat surface to reduce rattling and ticking noises. Apply lightweight Krytox 205g0 lubricant inside the housing, stems, and wires for whisper-quiet, smooth key presses. Consider mods like the Holee or adding foam dampening if needed. Keep experimenting and adjusting to achieve ideal silence and feel as you discover the finer details of stabilizer tuning.
What Are Stabilizers and Why Do They Matter?
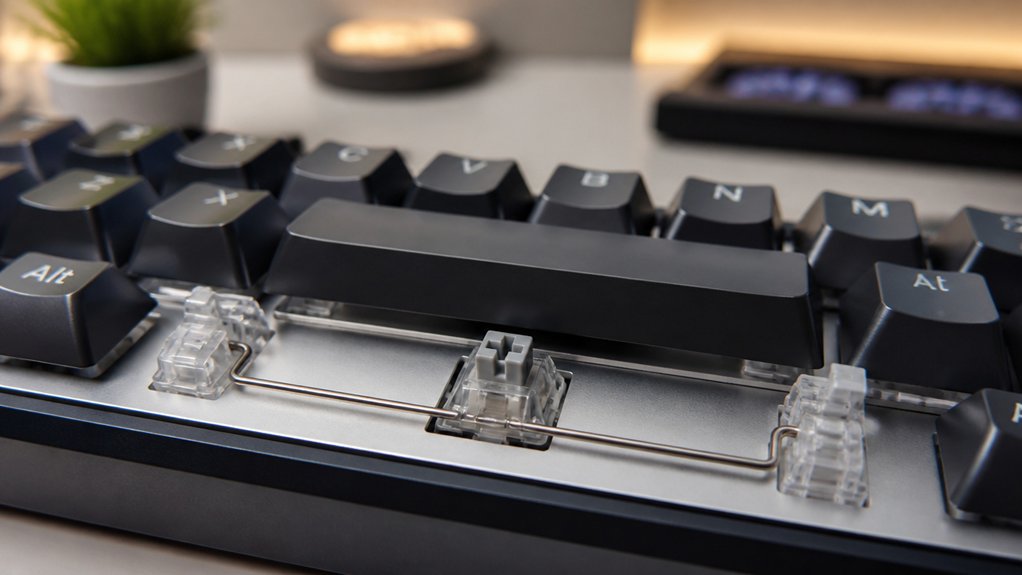
Have you ever wondered why some keyboards feel smoother and quieter than others? That’s where stabilizers come in. These components support larger keys like the Spacebar, Enter, and Shift, preventing wobbling and ensuring balanced support.
The stabilizer wire runs through these parts, helping keys press down evenly and smoothly. Without proper stabilizers, your keyboard’s sound profile can turn harsh or scratchy, causing rattling, ticking, or noise.
Proper stabilizers ensure smooth, even key presses and reduce harsh, rattling noises in your keyboard.
Poorly tuned stabilizers make typing less pleasant and can distract you with unwanted sounds. But when you tune them correctly—clipping, lubricating, or adding mods—they transform the sound profile into a smooth, thocky experience.
Stabilizers are vital for achieving a consistent, quiet, and satisfying typing feel in your custom keyboard build.
How to Choose the Best Stabilizer for Your Keyboard
Choosing the right stabilizer for your keyboard depends on several factors, including your build’s mounting style, PCB thickness, and desired sound profile.
If you want an affordable option, consider Cherry clip-in stabilizers—they’re easy to install but often need clipping and lubrication with Krytox 205g0 to reduce scratchiness. For quieter, smoother performance, Knight stabilizers (especially v4) use silicone double injection molding and are screw-in compatible, making them easy to mod with Krytox 205g0.
TypePlus x YIKB stabilizers feature high-quality adhesive shims, ideal for 1.2mm PCBs, and require minimal lubrication. Meanwhile, Mode and Durock stabilizers offer balanced modding potential through lubrication and shimming, suitable for most custom mechanical builds.
Always factor in mounting style and PCB thickness for the best sound and feel.
How to Disassemble and Maintain Stabilizers
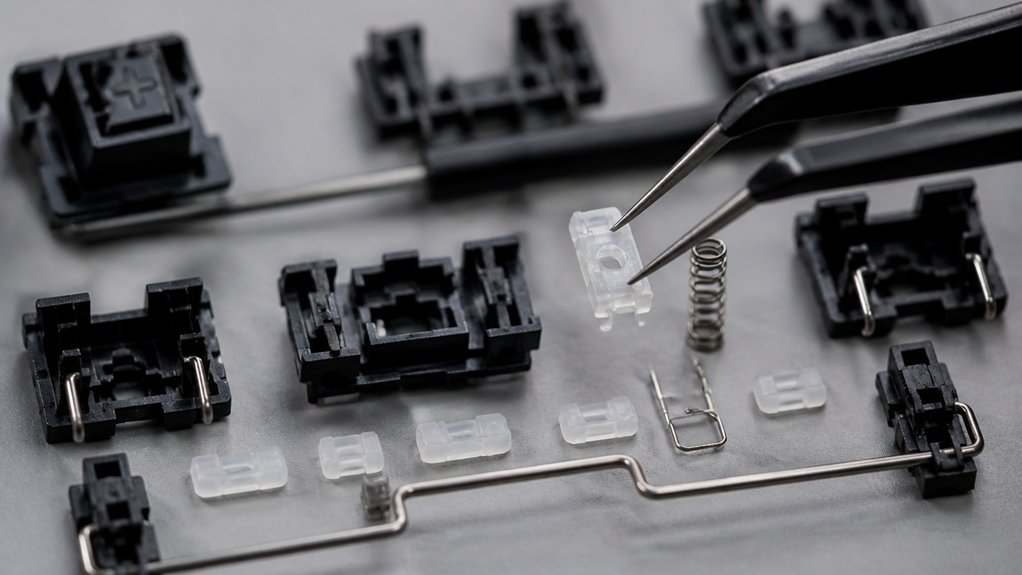
Disassembling and maintaining stabilizers is essential for guaranteeing smooth, quiet operation and ideal sound. Start by removing the keycaps and switches if needed. Then, release the stabilizer wire by turning the housing 90° and sliding it out. Push out the stabilizer stem, which you can clip with flush cutters for better sound and less plasticky bottom-out noise. To maintain, thoroughly clean all parts—housing, stems, and wire—to remove old lubricant and debris. Use a fine brush to lubricate inside contact points with Krytox 205g0 and apply dielectric grease or Krytox XHT-BDZ on the wire, avoiding excessive bends. When reassembling, guarantee the stems face the wire clip, snap the wire securely into place, and confirm all parts sit flush on the PCB or plate.
| Step | Tool/Material | Key Point |
|---|---|---|
| Remove housing and stems | Keycap puller, cutters | Clean before lubricating |
| Lubricate contact points | Krytox 205g0, grease | Guarantee no excess, focus on contact areas |
| Reassemble stabilizer | Hands, clips | Confirm parts sit flush, secure wire |
Clipping and Balancing Stabilizer Wires for Quieter Typing
To reduce noise, start by carefully clipping only the excess protruding legs of the stabilizer stems with flush cutters, ensuring you don’t compromise stability.
Next, balance the stabilizer wires on a flat surface by gently tapping them to eliminate uneven tension that causes ticking sounds.
Finally, make small, controlled bends to the wire legs, testing each adjustment to achieve key stability without wobble.
For optimal performance, consider applying a lubrication to the stabilizer components to further minimize noise and friction.
Proper Clipping Techniques
Proper clipping of stabilizer wires is essential for achieving quieter, smoother keystrokes. To do this effectively, follow these steps:
- Use flush cutters to carefully clip only the two protruding legs of the stabilizer stems at the bottom, avoiding the flat legs to reduce plasticky bottom-out noise.
- After clipping, balance the stabilizer wires by placing them flat on a stable surface. Hold one side steady and gently tap the other against a non-glass surface to eliminate wire rattle and ticking.
- Always test the stabilizers by pressing keys to guarantee increased smoothness and quietness, and make small adjustments with gentle wire bends if needed.
- For optimal performance, consider lubricating the stabilizers after clipping to further reduce noise and improve stability.
This method guarantees a cleaner, quieter typing experience.
Adjusting Wire Tension
Have you noticed rattling or ticking sounds when you press certain keys? Adjusting wire tension can help eliminate these noises.
Start by carefully clipping only the two forked legs of the stabilizer stem with flush cutters, avoiding the flat legs to reduce plasticky noise and improve smoothness.
Next, balance the stabilizer wires on a flat surface—preferably a non-glass one—by holding one end steady and gently tapping the other side downward. This helps remove rattle and ticking without over-bending the wire, which can cause instability. If a flat surface isn’t available, tools like syringes or stabilizer twister tools work well.
After making adjustments, test the keys side to side to verify rattling or ticking has been minimized before moving on. Always check for proper wire wobble and ensure the stabilizer functions smoothly after tuning.
How to Lubricate Stabilizers for Smooth, Silent Performance
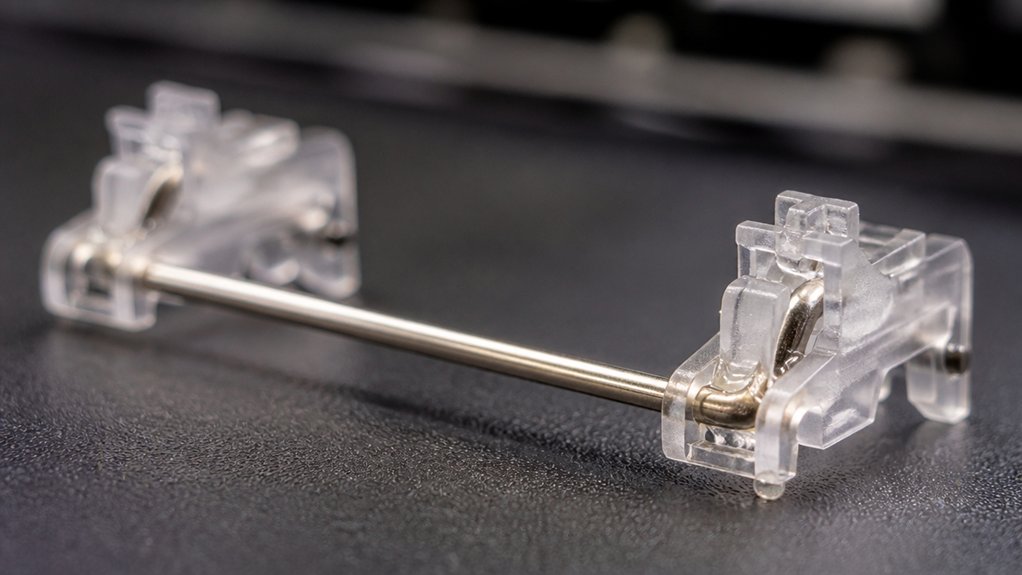
Wondering how to achieve smooth, silent stabilizers? Follow these steps for peak lubrication:
Achieve quiet, smooth stabilizers with proper disassembly, targeted lubrication, and cushioning for noise reduction.
- Disassemble the stabilizer completely, separating stems, housings, and wires. This guarantees lubricant reaches all plastic-on-plastic contact points, especially inside the stabilizer housing and stem holes.
- Apply Krytox 205g0 or similar lubricant inside the stabilizer housing and along the stem walls, creating a thin, even layer for smoother movement.
- Use a band-aid inside the stem holes before lubing to cushion the wire contact, reducing rattling and noise. Avoid over-lubing—light coatings are enough.
- Consider using a multi-purpose silicone lubricant like SIL-Glyde to protect surfaces from wear and withstand varying temperatures, ensuring longer-lasting silent stabilization.
Reapply as needed after testing for a silent, smooth keystroke.
How the Holee Mod Helps Reduce Stabilizer Noise and Rattling
The Holee Mod is a simple way to cut down on rattling and hollow sounds in your stabilizers. By adding adhesive strips inside the stems, you prevent the wire from knocking against the plastic, which keeps things quiet. Using stabilizer tuning kits can further enhance the modulation and overall sound profile of your keyboard. This tweak makes your typing feel smoother and more solid, reducing distracting noises.
Reduces Hollow Sound
Applying the Holee Mod helps eliminate the hollow, scratchy sounds often heard in unmodified stabilizers by dampening resonance inside the stem chamber. This mod reduces the hollow noise by cushioning the wire and preventing metal-on-plastic contact. Using materials like stainless steel wires with protective coatings can further improve durability and sound consistency. When you insert a band-aid snugly inside the stabilizer stem’s holes, it absorbs vibrations that cause hollow sounds. To maximize effectiveness:
- Use a thin fabric band-aid and press it firmly inside the angled and small stem holes.
- Guarantee the band-aid fits tightly to prevent excess movement.
- Carry out the Holee Mod before lubricating for a secure fit and peak sound dampening.
This simple modification greatly softens the hollow tone, making your stabilizers sound cleaner and more refined during typing.
Prevents Rattling Noise
By cushioning the contact points inside the stabilizer stem, the Holee mod greatly reduces rattling noises during typing. You insert thin band-aid strips into the stabilizer stem holes, smoothing wire contact and minimizing plastic-on-metal contact. Properly cutting the bandage guarantees it covers both the angled and smaller holes, creating reliable noise dampening. Applying Krytox 205g0 before inserting the band-aid enhances lubrication, preventing rattle and reducing scratchiness. When you combine the Holee mod with Krytox, it limits the rattling caused by loose contact points. The slight initial tightness eases with use, resulting in quieter, smoother keystrokes over time. The process effectively silences stabilizer rattle, providing a cleaner, more stable typing experience. Incorporating stabilizer materials such as high-quality plastics and metal components further enhances durability and sound dampening.
Properly Installing Stabilizers to Prevent Wobble and Loose Fit
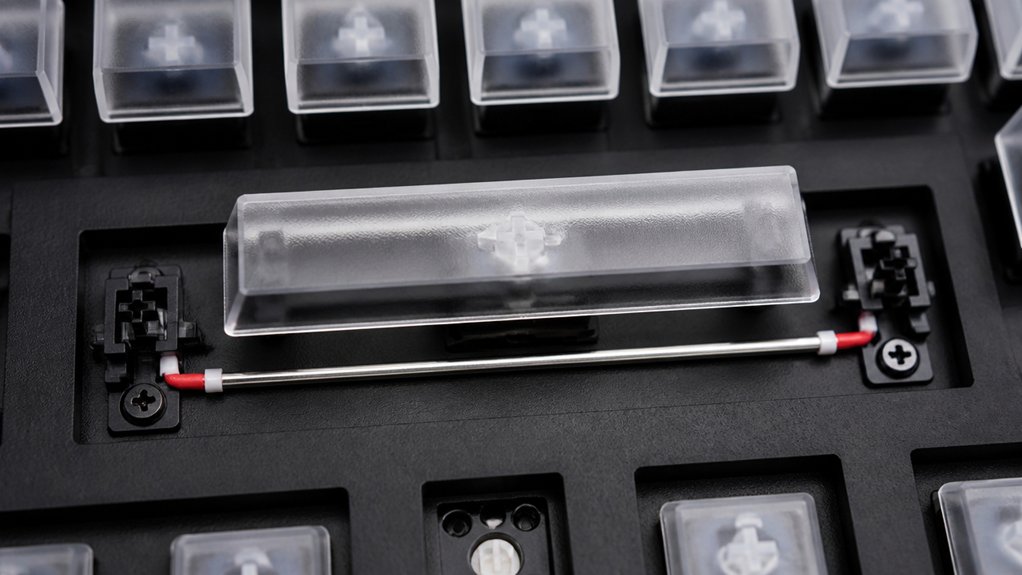
Proper stabilizer installation is essential for a stable and quiet typing experience. To prevent wobble and loose fit, follow these steps:
- For screw-in stabilizers, make certain they’re fully tightened to the PCB. Use included shims with thin PCBs (1.0–1.2mm) to avoid loose fits and wobble.
- When installing clip-in stabilizers, press them carefully into the PCB slots until fully seated. Be cautious of popping out, especially with tight PBT keycaps or thinner PCBs without shimming.
- To secure plate-mounted stabilizers, apply adhesive bandage strips or foam stickers on the plate clips. This reduces rattling and stabilizes the housing.
Verify stabilizer wires are balanced and clipped properly to prevent side-to-side wobble and ticking noises.
Troubleshooting Common Stabilizer Problems Before and After Mods
When stabilizers still rattle or produce unwanted noise after installation or mods, it’s usually due to wire misalignment or insufficient lubrication.
Ticking or sticky sounds often stem from poorly clipped stems or inadequate lubrication inside the housing, so reclip and reapply Krytox 205g0 thoroughly.
To isolate persistent issues, try swapping keycaps or switches to determine if the stabilizer or switch is causing the noise. Using high-quality materials and proper assembly methods can significantly improve stabilizer sound and feel, as highlighted in material quality and durability considerations.
Identifying Persistent Rattle Sounds
Have you ever experienced a persistent stabilizer rattle that just won’t go away? To identify it, focus on common causes.
- Check the wire clip areas — loose or misaligned wires often cause ticking, but poor lubrication can lead to a persistent stabilizer rattle. Applying Krytox 205g0 inside the housing and on the wire (without extending past the bend) can usually fix it.
- Inspect the stabilizer stems — plasticky bottom-out noises often result from uncut stabilizer legs or insufficient lubrication.
- Verify overall assembly — confirm stabilizers are fully seated and wires are balanced on a flat surface. Rattles from components beyond stabilizers may require testing different switches to isolate the true source, preventing misdiagnosis.
- Consider lubricant quality — using a premium synthetic grease like Krytox 205g0 can significantly reduce noise and friction, contributing to a quieter, smoother typing experience.
Addressing Ticking and Stiction
Addressing ticking and stiction is a key step in refining stabilizer performance, both before and after applying mods. Ticking often occurs from insufficient wire lubrication or improper bends, which can be minimized by applying a light coat of Krytox 205g0 on wire bends and gently balancing the wire on a flat surface. Proper foam damping using closed-cell foams can also help reduce vibrations that contribute to noise. Stiction, causing scratchy key feels, results from dry contact points between the stem and housing; lubricating these contact areas with Krytox 205g0 resolves this issue. Be cautious not to over-lube, as too much Krytox can cause sluggishness. The Band-Aid mod, which involves placing fabric strips inside stem holes, can reduce ticking and rattling, but might initially increase stiffness—this eases with time. Proper break-in and minor tweaks, like clipping stabilizer legs or adding foam, can further diminish residual issues.
Comparing Budget and Premium Stabilizers: Which Is Right for You?
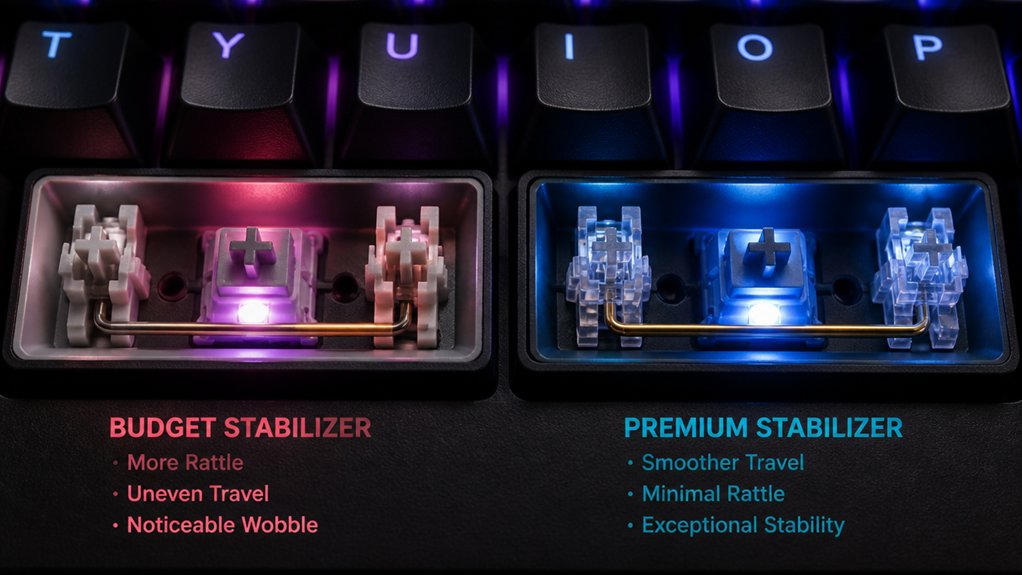
Choosing between budget and premium stabilizers depends largely on your priorities and setup.
Selecting budget or premium stabilizers hinges on your priorities and DIY comfort level.
If you’re working with a budget mechanical keyboard or just starting out, Cherry Clip-Ins are affordable at around $10 USD, easy to install, but tend to sound scratchy and may need clipping and lubrication.
Premium stabilizers like Durock or C³ Equalz, priced between $12-$20 USD, offer quieter, smoother typing with screw-in mounts, but require more effort to install.
Consider this:
- Budget options (Cherry Clip-Ins, TypePlus, Stupid stabilizers) prioritize cost and easy modding but might need extra tuning.
- Premium stabilizers (Durock, Mode) deliver refined feel and sound but need more installation effort.
- Your choice depends on your DIY skill and desired typing experience for your custom keyboard.
Fine-Tuning Stabilizers for Consistent, Quiet Keypresses
To achieve consistent and quiet keypresses, fine-tuning your stabilizers through proper lubrication and minor modifications makes a significant difference.
Start by applying Krytox 205g0 thoroughly inside the stabilizer housing and on all stem walls to reduce friction and noise.
Use a small amount of Loctite dielectric grease on the wire, but avoid extending past the bends to prevent plastic-on-plastic rattling.
Clipping the two plastic legs on Cherry-style stabilizer stems results in smoother, less scratchy keypresses.
Before assembly, balance and gently bend the stabilizer wires on a flat surface to eliminate uneven tension and ticking sounds.
Finally, allow a break-in period for the grease to settle, which will naturally improve stabilizer performance over time.
Maintaining Your Stabilizers for Long-Lasting Performance
Maintaining your stabilizers regularly is essential to guarantee they continue performing smoothly and quietly over time. Consistent care prevents dirt buildup and guarantees peak sound and feel.
To maintain long-lasting performance, consider these steps:
- Reapply Krytox 205g0 on housing and stems, and use dielectric grease on wires every few months to keep everything lubricated and quiet.
- Monitor for signs of lube degradation, like increased scratchiness or rattling, and perform thorough cleaning and relubrication as needed.
- Avoid overtightening stabilizer screws, guarantee wires are properly clipped, and re-assess or perform modifications like Holee mods if noise or scratchiness return.
Proper storage of spare parts and lubricants will also streamline routine re-maintenance.
Final Tips for Achieving the Smoothest, Quietest Stabilizer Setup
Achieving the smoothest and quietest stabilizer setup requires attention to detail and proper technique. First, carefully clip only the two protruding legs of stabilizer stems with flush cutters before lubricating to reduce scratchy bottom-out noise.
When applying lubricant, use a small amount of Krytox 205g0 inside the housing and on both sides of the stem walls. Lightly place the band-aid inside the stem holes, known as the Holee mod, to cushion wire contact and reduce rattle.
Be sure to gently balance and bend the stabilizer wires on a flat surface to eliminate ticking sounds without creating mushy key feel. After modding and lubing, give your stabilizers several days to settle, ensuring the smoothest, quietest performance over time.
Frequently Asked Questions
How to Make Keyboard Stabilizers Better?
You make keyboard stabilizers better by clipping protruding legs, lubricating with Krytox, performing the Holee mod, adding foam or shims, and breaking in the stabilizers. Test for rattles or noise, then fine-tune as needed.
How to Balance Keyboard Stabilizers?
You balance keyboard stabilizers by placing the wire on a flat surface, gently tapping the opposite end, and making small adjustments. Avoid sharp bends, use smooth tools, and recheck noise levels to guarantee even tension and quiet keypresses.
Can Ozone 11 Help With Mastering?
Yes, Ozone 11 helps with mastering by providing precise audio analysis, EQ, and spectral shaping tools, allowing you to enhance and balance stabilizer sounds, reduce unwanted noise, and compare before-and-after results for a professional, polished finish.
What Are the Best Keyboard Stabilizers?
You should consider Knight stabilizers for quiet, smooth performance, or Durock for excellent sound and feel after modding. For budget-friendly options, Cherry clips or TypePlus stabilizers work well, but essential to match your PCB and keycap needs.



